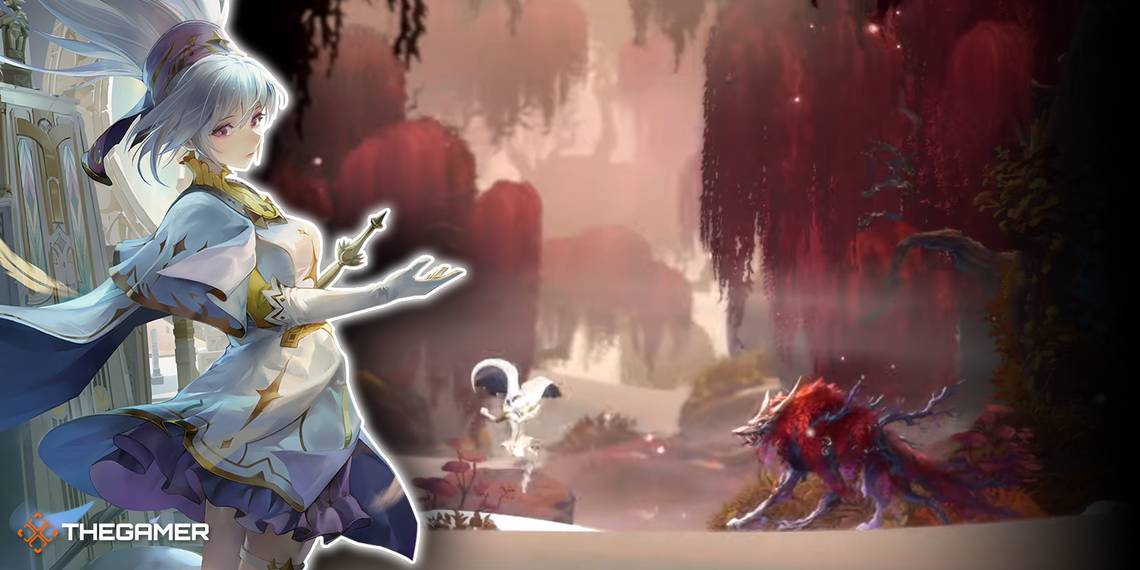
Afterimage has many formidable foes spread throughout its many zones, most of which will grant you new Afterimages, allowing you to reach new areas and explore even more of Engardin. Lush Wolf is the first boss you will encounter, setting your expectations high for the later boss fights in the game.
Despite being the game's first boss encounter, Lush Wolf still has some tricks up its sleeve and can prove troublesome if you aren't anticipating them, especially since you don't have access to many weapons or healing items. The good news is this encounter is more than manageable once you get the hang of things.
Lush Wolf Overview

As touched on in the opening section, the Lush Wolf is the first boss encounter in Afterimage, serving as the "Tutorial Boss," so to speak.
This encounter will teach you the basic strategies and general gameplay to expect going forward. You will have to learn its attack patterns, find a way around them, and land attacks to emerge victorious, which will be how all other boss fights are handled.
The difference between the Lush Wolf fight compared to all the others is your lack of Afterimages and Weapon variety. However, this means that its moveset is limited, easily telegraphed, and not all that demanding.
Lush Wolf Information
|
HP |
130 |
|---|---|
|
Level |
5 |
|
Attack Power |
11.5 |
|
Optional? |
No |
|
Zone |
Rubiwood Desert |
|
Drops |
x1Talent Point +2 EXP |
Lush Wolf Boss Fight Guide

Being the game's first boss fight, the Lush Wolf's moveset is very limited, offering only four moves to look out for in total. However, while the Lush Wolf is relatively weak, so are you in this state of the game.
For the most part, this encounter can largely be handled by evading its attacks, attacking it during its recovery, and repeating that pattern until you have it defeated. For a more detailed look at its attacks and how to handle them, the sections below will have you covered!
Preemptive Jump

While seemingly harmless at a glance, the Preemtive Jump action from the Lush Wolf enables it to immediately follow it up with a more powerful attack, catching you off-guard and placing you in a rough situation.
Preemptive Jump has the Lush Wolf jump forward toward you with a short hop, dealing no AoE damage of any kind when it lands, allowing you to quickly run away from it, positioning yourself to go on the offensive immediately after.
However, as soon as the Lush Wolf lands, it will almost always immediately perform Fierce Bite or Strong Slash, so avoid moving toward it whenever it lands, or you could receive immense damage as a result.
They can also perform its Piercing Dash move after Jumping, but it is infrequent and will almost always be the other ones previously mentioned.
Fierce Bite

Fierce Bite is an attack of the Lush Wolf's that has it quickly lunge forward with its mouth wide open before swiftly snapping it shut, delivering large amounts of damage to anything caught between its sharp teeth.
This move is telegraphed with a bright yellow light that appears over the Lush Wolf's mouth, giving you ample time to run away from the attack. Let the animation play out, run back toward the Lush Wolf to land an attack or two, and run in the opposite direction again.
Lush Wolf will almost exclusively use this move after its Preemptive Jump, but it can also use it freely, so don't rule it out of its arsenal if it is standing idle after another attack. This attack also has a very tiny hitbox, so you don't have to create that much distance to avoid it.
Keep an eye out for the flash of light, create distance, then close the gap and land a few attacks of your own before retreating to prepare for its other attacks. This will be the best way to handle its Fierce Bite attack!
Strong Slash

Strong Slash is very similar to Fierce Bite in that it is well-telegraphed and handled similarly on your end. This attack has Lush Wolf swing its front left claw downward in an arc-like motion, covering the space in front of itself.
You can telegraph this move by looking for the red trail that starts following its claw as it raises its paw before striking. The attack is quick and devastating, so avoid getting caught by it at all costs, or you could be in grave danger.
To evade this attack, run in the opposite direction of the Lush Wolf when you see the red glow appear. Unlike the Fierce Bite, however, the Strong Slash covers a much broader and further distance, so you will need to create much more space than before.
After the attack animation plays out, you can run toward the Lush Wolf and land an attack or two before returning to the defensive and preparing for its other attacks. This and its Piercing Dash are its most common attacks, so be ready to deal with this one often!
Piercing Dash

Lastly, we have its Piercing Dash attack, which sees the Lush Wolf hunker down before swiftly propelling itself forward with tremendous speed and velocity, dealing excessive damage on contact.
Piercing Dash is well-telegraphed, as you will see the Lush Wolf get down in a prone-like position before it bolts forward. There will also be a red trail behind it, so you will have lots of time to avoid it.
To counter this attack, simply time your Jump just before it makes contact with you to have it zoom by beneath you, allowing you to land, run toward it, and land several attacks of your own.
This attack can be tricky to evade at first, but once you get the timing down, you will dodge it every time from that point onward. We suggest Jumping right before the Lush Wolf reaches you, then stalling your descent to the ground with aerial attacks.
Doing this will keep you in the air a bit longer, allowing you to completely evade the Piercing Dash attack from the Lush Wolf. After you land, you can land a decent amount of attacks on the Lush Wolf, so go all out before returning to a more defensive approach!
Rinse and repeat these strategies until the Lush Wolf's HP is depleted!
Lush Wolf Second Phase

After you deplete the Lush Wolf's HP, it will transform into an otherwordly creature of deep purples and bright pinks with three heads. While we would love to show you how to defeat this cool and colorful beast, this is a scripted encounter, and you will have to die here to progress the story.
You cannot deal damage to the Lush Wolf during this phase of the fight, so save your resources and time and just succumb to its wrath. However, after your death, you will learn of the Confluences (Checkpoints) and be told to head to the nearby village.
Lush Wolf Second Encounter
Once you make it to the village, you will encounter another Lush Wolf, except this time, it has roughly half of its HP left. This Lush Wolf has the same moveset as the previous one, so you will handle it the exact same way as last time.
This Lush Wolf also doesn't transform, so after its HP is depleted, it's dead, and you will receive a Talent Point and... Two EXP... for your efforts. From here, you can continue your journey and run into even more formidable bosses!