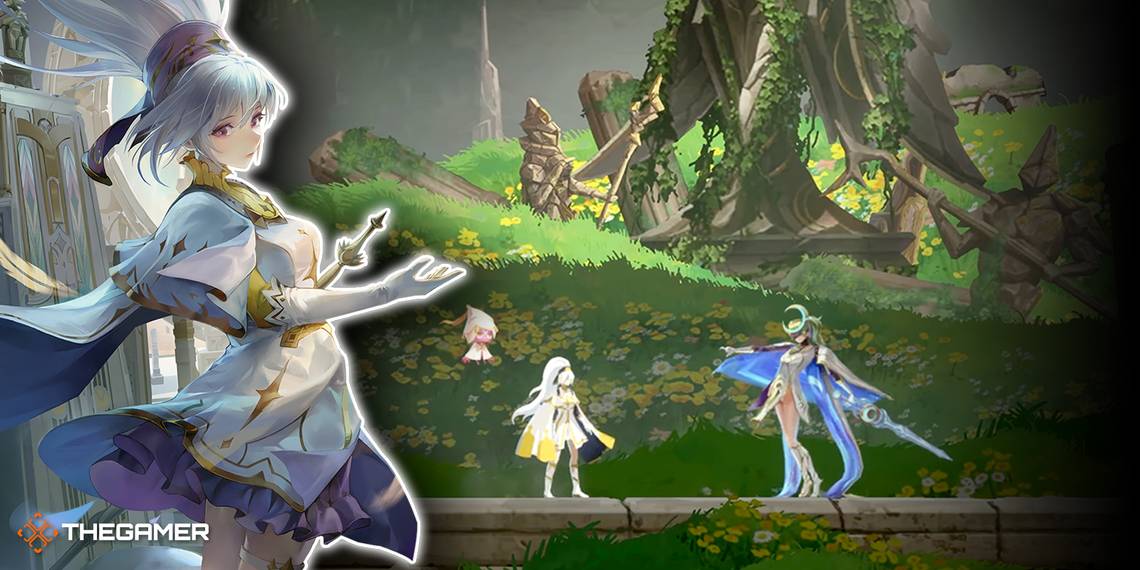
Afterimage has many bosses for you to encounter in its expansive, hand-drawn world of Engardin, some being pushovers, with others being quite challenging and formidable to go up against. The mysterious Three Question Mark Boss (???) you encounter early in your journey is the latter and will give you a run for your money.
Up to this point of your adventure, the bosses have been interesting but not all that involved or demanding. Hence, the sudden spike in difficulty and power is a sight to behold and one that will force you to focus or die swiftly at the hands of this mysterious foe.
Three Question Mark Boss Overview

With the Lamellar Warrior down and the ability to Dash while airborne or grounded acquired, you can now pass over the raised drawbridge and access more of the Rainbow Plains area.
Once on the other side of the drawbridge, continue heading east until you reach a Confluence and rest at it to update your Map and replenish your Healing Relics. From here, you can keep east until you come to an open area, where you will run into the Three Question Mark Boss (???).
Despite only being Level 11, like the Lamellar Warrior, she is much more formidable in comparison and will require significantly more focus and strategy to beat. You can find more about her in the table below, hopefully giving you an idea of her strength.
Three Question Mark Boss Information
|
HP |
819.8 |
|---|---|
|
Level |
11 |
|
Attack Power |
20.7 |
|
Optional? |
No |
|
Zone |
Rainbow Plains |
|
Drops |
Secret Art: Full Moon +114 EXP |
Secret Art: Full Moon is a scroll that unlocks unique Talents in the Talent Tree upon reading it. These Talents can then be purchased with Talent Points from the Talent Tree!
Three Question Mark Boss Fight Guide

As touched on above, the Three Question Mark Boss is a force to be reckoned with and should not be taken lightly. She has access to eight moves, which is the most a boss has had so far by a wide margin, and all of them are devastating in their own right, making her all the scarier.
There will rarely be a moment where you aren't moving during this encounter, and your new Dash ability will prove helpful right from the jump of this battle, enabling you to get out of dodge and right back into action at a moment's notice.
This encounter will have you constantly dodging incoming attacks while looking for a window to get in and land a few hits of your own, all while moving quickly and decisively. One wrong move can spell your death, so use the guides below to learn more about her moveset and how to counter them.
Teleport

One of the more simplistic tools at her disposal is her ability to Teleport freely around the arena, which she does often and strategically, making her exceptionally hard to pin down.
She will create a portal above herself and one on the other end of the arena before swiftly warping away from you, creating distance between you and herself that enables her to cast her more range-focused abilities.
You can land several hits on her before she Teleports, as the animation is quite long, giving you ample time to see where she will be Teleporting to. We recommend stopping your attack just before she Teleports to adequately react to what she does next, as it can be a wide range of things.
Ring Of Light

After she Teleports away from you, she will almost always capitalize on the distance she created by firing off a Ring of Light that travels the entire screen length and deals considerable damage if it hits you.
This move is easy enough to dodge, as all you have to do is jump through the center of it, but there are a few catches you should be aware of.
First, the Ring will constantly expand and contract, so your timing is crucial here. As soon as you see the Ring close, jump toward it, and you will pass through it the moment it expands, allowing you to evade all damage.
The other caveat is this is merely a setup action for her, meaning she will follow this up with another attack, trying to catch you off-guard when you land back on your feet. She will almost always follow this attack up with Crescent Waves, which you can learn more about below.
Crescent Waves

Crescent Waves has the Three Question Mark Boss launch Crescent-shaped Waves of Light at you from her sword, traveling across the entire stage and dealing significant damage when they hit their opponent.
You can easily jump over these projectiles, but the catch is that she will almost always perform this action as you descend from a previous jump, so you will have to react quickly and decisively to avoid it.
To avoid taking damage here, you can either stall by attacking in the air, then quickly Dash toward her as you're still airborne. Or you can land and instantly jump again if the projectile is far enough away.
For this, we prefer the former method, as you are already airborne when she likely casts this attack, so stalling, then Dashing will be your best option not only to avoid taking damage but to get close to her and land a few hits of your own.
Blinking Crescent Slash

During the battle, she will periodically create a portal behind herself and dash backward into it, suddenly appearing through another portal that spawns behind you, finishing the attack off with a devastating Crescent Slash from her sword.
This attack is brutal to evade due to the portal suddenly appearing behind you and the wide range and area her Crescent Slash covers. It also deals severe damage, so you can't just take the hit, either, especially since she frequently spams this one on top of that.
However, as soon as you see her create a portal behind herself, wait for her to dash backward into it, then immediately start Dashing toward her previous position. You will see the new portal appear and can then position yourself far away from it to avoid getting caught by the attack.
When she whiffs the Crescent Slash, you can move in and land a few hits before going on the defensive again. You can also time a jump plus a Dash to avoid the damage, but that's much more complex and harder to pull off, so we suggest doing the other method.
Full Moon Blade Rotation

Another devastating attack in her arsenal is her Full Moon Blade Rotation attack, telegraphed by her pointing her blade straight ahead briefly before swinging it clockwise around herself, creating a perfect circle.
After she completes the rotation around herself, a Full Moon will briefly appear around her, severely damaging anything caught within or around it.
This action comes out extremely fast, so your only hope of evading it is to get far away from her the moment you see her thrust her sword forward. Any sort of hesitation here will likely get you caught up in the Full Moon, leading you to take mass amounts of damage.
When you see her stick her sword out in front of herself, Dash away immediately, and don't look back. Don't worry about getting in hits here. It's not worth the risk.
Piercing Moon Beams

If watching out for her devastatingly swift teleportation attacks wasn't enough, she will occasionally create a portal above herself before thrusting her sword into it, allowing her rain Piercing Moon Beams down from the heavens, causing mass damage.
Before the Piercing Moon Beams are summoned, you can see where they will land, allowing you to position yourself to avoid them entirely. Focus your eyes on the blue-ish colored rays of light shining down from the heavens, and go anywhere in the arena where they aren't present.
After a short period, the blue-ish colored rays of light will turn into devastating Piercing Moon Beams, so you want to avoid being under them at all costs. This is relatively easy to avoid, especially since the move is well-telegraphed.
Charging Teleport

To no one's surprise, she has yet another incredibly powerful and annoying move you have to deal with: her Charging Teleport.
This move has her create a portal on both ends of the arena before Dashing full speed into the one closest to her and appearing through the other one like a speeding bullet, using her momentum to deliver a crushing strike with her sword for immense damage.
You can jump her over when she exits the other portal, but she moves incredibly fast, so be prepared to jump as soon as you see her go through the first portal. You can stall while airborne by attacking and can then Dash backward to get behind her.
Depending on your positioning after you Dash, you can get a hit or two in, but we recommend not getting too overzealous here, as this attack is very hard to evade, let alone capitalize on.
Instant Overhead Crescent Strike

Lastly, we have an attack that is, fortunately, rare for her to use, as it is likely the most irritating one to deal with and seems unfair compared to the others.
This attack is her Instant Overhead Crescent Strike, which has her create a portal above you before creating another one beneath herself, having her Teleport above you before she delivers a devastating plunging attack.
The thing about this attack is it happens extremely fast. Like, FAST-FAST. While you can see her begin to do it, reacting to it is an entirely different ballgame, especially since she will weave it into her other attacks, giving you almost no time to register what she's doing.
Dashing in any direction is the only way to evade this move, and you will also need excellent reflexes. If you see a portal suddenly appear above you, Dash immediately. That's all we have for this one. So, umm, good luck?
Rinse and repeat these strategies until the Lamellar Warrior's HP is depleted!