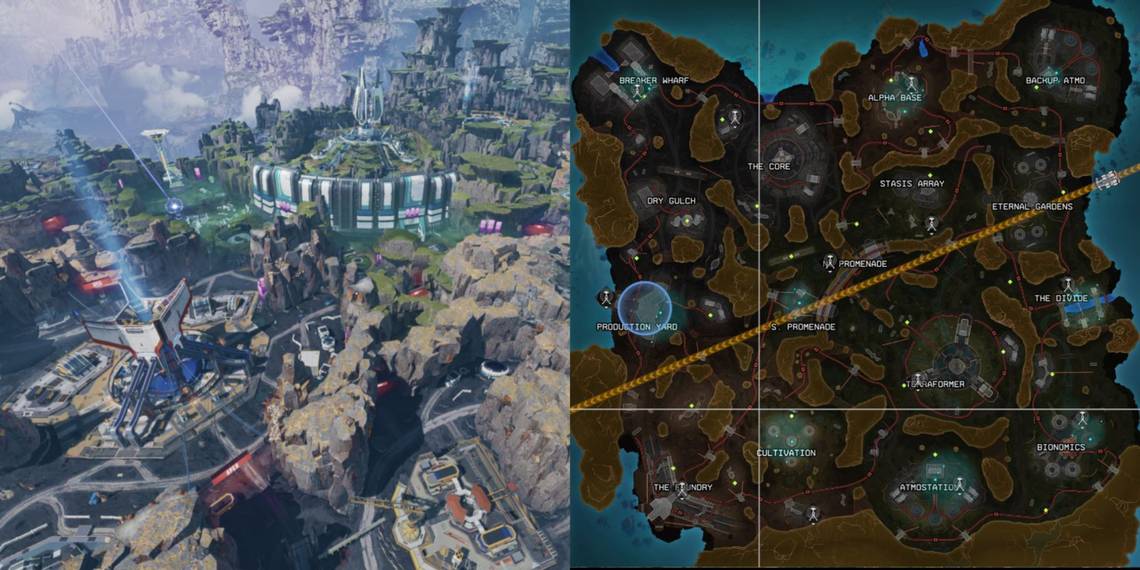
Apex Legends introduced the Broken Moon map when Season 15, otherwise known as Eclipse, launched. Broken Moon is smaller than the previous map Storm Point, but it is a little bit bigger than World's Edge, making it the second-largest map in Apex thus far.
With a new map comes fresh POIs and fun locations to land at and get killed immediately. Broken Moon has a total of 17 POIs, which gives you plenty of options when choosing your 'prime spot for mayhem', as Fuse would say. The locations on the map are nearly all connected by Zip Rails, which are hyper-fast ziplines capable of taking you in to or out of any fighting in a flash.
10 The Divide - Middle-East Edge Of The Map

If you want to find a relatively quiet place to land, you can't go wrong with The Divide. Typically, this place doesn't see much action, making it a reliable place to get a slow and steady start. Even if another squad lands with you, there's more than enough loot to go around, and you can use the buildings and the sizeable chasm to keep your distance.
Not to mention Zip Rails will take you between the buildings, letting you reposition. The Divide is easily accessible from Bionomics to the south, which can be a popular place. All the different paths near The Divide make it a nice place to set up camp to get the drop on another squad, too.
9 Atmostation - South East Of The Map's Centre

Atmostation is located at the south of the map. It's usually one of the first places you'll fly over, depending on the dropship's trajectory. It can be popular since it has multiple buildings to loot and an inner area, and it's no stranger to visitors.
Taking control of the centre will help your squad considerably, but ensure you keep an ever-watchful eye out for pesky third parties. As you might imagine, the central part of this place gets busy in a hurry. There are so many line-of-sight angles here, so pay attention if you're sticking around.
8 Breaker Wharf - North West Corner

Breaker Wharf is a massive area that sadly doesn't get much screentime since it's far out of the way. Situated at the top left of the map, you'll find this is an incredibly fun hot-drop location due to the multiple elevations, corridors, and rotation spots available, but you will have a long way to go for the next Ring if it's anywhere in the south.
For the most part, Breaker Wharf is a location you can land in that will be another slow and steady start to a game. You'll be able to pick it clean of loot without much hassle since it won't be a priority for many people simply because it's so far from the action.
7 Eternal Gardens - North East

While it might be difficult, try not to get distracted by the wonderful garden hedge sculptures dotted around this place. Eternal Gardens is one of Broken Moon's prettier areas. It's almost a shame people have to get taken out over here. Again, this POI is essentially a circle, with buildings on the outside, pathways further in, and the large tower as its epicentre.
Landing directly at the tower will put you in a tactical position if you can survive the onslaught of other squads. There's a lower level to the centre that you can move to and from with zip lines while also letting you run out around the outside to get back up top for a sneaky flank.
6 North Promenade - Centre Of The Map

The North Promenade is as central as you can get for a POI in Broken Moon. It puts you right in the middle of the map. Despite being a big area, it's a long tunnel that gives you plenty of exit and ambush points, not to mention a ton of ground loot.
Landing at the entrance, you'll want to head left or right along the tunnel to grab everything you can get your hands on. There will be supply bins to open on the way on either side, giving you a winding, concentrated loot area and crafting materials to boot.
5 Alpha Base - Top Centre Of The Map

Alpha Base's design is similar to areas such as The Docks on Olympus and The Tree on World's Edge. This is much smaller than either of those areas, so the buildings and loot are more concentrated and easy to navigate.
The buildings can be full of good loot, while the outside has a landing pad and pathways linking the buildings together, all of which can be collected quickly. Landing here with enemies is a bit frantic, so be careful when picking your building and spot.
4 The Core - North From The Map's Centre

More often than not, this is where the action happens. The Core is another gigantic POI, but instead of having the fights localised in the middle, you'll find more squads taking the buildings outside, aiming to flush anyone in the centre out of hiding.
From here, depending on the Ring's movement, the path into the North Promenade is always a good time. A lot of squads naturally end up there. If you drop here and survive, you have your pick of all the loot and a superb position to barricade yourself in or move on to the next Ring.
3 Bionomics - South Eastern Corner

If you're looking for a frantic start, Bionomics can be a strong contender. Situated in the bottom right corner of the map, Bionomics is a prime hot-drop location when it wants to be. There's not much to do there, and taking fights can be difficult due to the spread-out nature of this POI.
Heading for the large tree in the middle of this POI or one of the ring buildings on the edges will be your best bet when landing here. Loot in the buildings can be scarce, so be prepared to button mash to be the first one to grab a weapon. Winning here will set you up nicely with direct pathways to the rest of Broken Moon.
2 Terraformer - South East Of The Map's Centre

One of the larger POIs on the map, this place is always a fun drop if you can get ahead. There are so many chokepoints, elevations, and layers to this part of the map that can give you a great view of the surrounding area or a nice place to hunker down in.
Try to steer clear of going into the middle immediately, simply because there are multiple angles people can get and hit you from the back or higher up. Your best bet would be to land lower down and make your way up, or land in the middle and loot around the centre in
1 Production Yard - Western Edge Of The Map

Another massive landing spot in Broken Moon, Production Yard is always a solid choice. Not only are there tons of loot on the ground, supply bins, an upper level, and a lower level of the main factory, but you'll also have so many choices for rotations to try and outplay any enemy squads you run into.
If you land here and there's no one around, you get the entire place to yourself to loot, which will be a significant amount unless you have fallen out of favour with the RNG Gods. Apex is, after all, a Battle Royale. From this landing spot, you access the Promenades to the east, Dry Gulch and Breaker Wharf to the north, and Cultivation to the south.