Quick Links
Battlefield 2042 is split into four modes: All-Out Warfare, Breakthrough, Hazard Zone, and Portal. Arguably the most interesting mode of the bunch is Portal, acting as a custom games editor that comes with its own scripting language. Portal also features remastered maps and weapons from previous Battlefield titles, allowing players to reimagine some of Battlefield's most iconic maps and modes.
More importantly, Portal gives players the tools to create their own experiences to share with their friends or the community. We'll be going over how to use Portal, its basic features, and give a rundown of how the logic editor works. If you've never used Portal before and need the essentials, you've come to the right place.
|
Note: This guide focuses on the fundamentals of Portal and gives an overview of the logic editor. More advanced logic editor guides will be added in the future. |
Using Portal

Creating a Portal server will require two things:
- A game type
- A copy of Battlefield 2042
The latter seems obvious, but it's possible to create 2042 Portal game types without owning Battlefield 2042. Creating custom game types is free for everyone.
The act of creating a custom game type is done through portal.battlefield.com. You'll be creating your custom experience in a web browser. In this browser, you'll be able to alter just about everything tied to your game type. Player counts, which items are restricted, maps, and even custom logic are all done from this website. We'll cover specific options and the logic editor later in the guide. For now, just keep this in mind.
Once you've created a game type you're happy with, you can save it by clicking the folder icon at the right-hand part of your screen. Give the mode a name and description, then click "Save." You'll now be able to host a server in-game or share a custom code for other players to try out your game mode. You can access this code by clicking on that same folder icon and selecting the "Share Code" button at the bottom of your screen. Share this code with friends or in your server description so others can host your game mode.
Playing On Portal Servers

|
Note: If you're only interested in making content with Portal, skip to the next section. |
Even if you have no desire of creating a custom experience yourself, you can experience hundreds of player-made game types through Portal's in-game server browser. While you're in the Portal menu in 2042, you can search for servers that others have made. In this server browser, you can filter your search results based on
- Server name
- Player count
- Ping
-
Tags
- Asymmetrical balance, TDM, Conquest, etc.
These filters don't appear to save as of writing, so you'll need to reapply these filters each time you look for a server. You can also host a server with someone else's game type if you have their experience code. Once you find or create a server, hop in and play.
|
Note: Most servers will start a new match after the post-game screen. Don't leave the server; wait for the next game to start. |
Portal Options
The amount of options you can tweak in Portal is truly staggering, not accounting for the platform's logic editor. Virtually everything can be tweaked here, ranging from maps to AI stats. Let's go over each option.
Game Mode

Arguably the most important choice you'll make, the game mode you select will dictate the core behavior of your Portal server. You have five options:
- Rush
- Conquest
- Conquest Large
- Team Deathmatch
- Free-for-All
Rush is a 32v32 mode that pits attackers versus defenders. The attackers must arm explosives at certain checkpoints and prevent the defending team from disarming them. Blowing up both objectives opens up more of the map, similar to Breakthrough. Attackers win if all stations are destroyed. Defenders win by draining the attacker's tickets to zero.
Conquest is 32v32 and takes place over medium-sized variants of 2042's maps. By tweaking further options, you can alter the weapons, vehicles, and even characters your players can use.
Conquest Large is just like Conquest but 64v64. This supports the largest maps in 2042 but is only available for current-gen consoles and PC.
Team Deathmatch is a race to achieve as many kills as possible. Most TDM lobbies are infantry-focused, although there's a way to force spawn vehicles through vehicle Portal settings. TDM has logic editor support.
Free-for-All is just like Team Deathmatch with the exclusion of teams. It's every soldier for themselves. FFA has logic editor support.
Map Rotation And Game Mode Details

The next two settings are all you'll need to create a server. Map Rotation dictates which maps will use your game type. Select whichever maps suit your needs. Game Mode Details lets you alter some basic functionality with your server, dictating how many players the mode supports, squad settings, and the duration of each match. You can also make some basic scoring tweaks here.
Modifiers

This is the bread and butter of Portal for most users. The Modifiers tab is divided into the following categories:
- Gameplay
- Soldier
- Vehicle
- Player UI
- AI
Gameplay is where you can tweak general weapon behavior and damage output. You can allow friendly fire, change what enemies drop on death, how fast projectiles move, how much damage your weapons deal, and whether guns have aim assist.
Soldier contains settings for player movement, how death is handled, and other infantry capabilities. This section allows you to alter the Man-Down state, health, the ability to slide and sprint, and how long it takes to redeploy.
The Vehicle tab contains every vehicle-related modifier you can think of. You can alter vehicle spawn rates, max HP, and if players are able to exit vehicles.
Player UI, short for User Interface, allows you to enable or disable certain HUD elements. You can change the compass, mini-map, your character's HUD in general, how pinging works, and if the Plus System can be accessed.
Finally, AI allows you to tweak the number, difficulty, and stats of any bots in your server. You can't tweak specific AI behavior in this menu, although you can choose their difficulty (Beginner, Intermediate, or Advanced). The PvE AI cap is 30 per team. The PvP AI cap is equal to your server capacity. AI stat-altering settings are the same as the Soldier settings.
Restrictions

This menu lets you restrict the types of equipment, weapons, vehicles, and characters that players can use on your server. You can tweak weapon, vehicle, attachment, and Specialist restrictions. This is also the section where you can select between different Battlefield eras for your server. You can select the following eras:
- BF2042
- BF1942
- Bad Company 2
- Battlefield 3
Logic Editor

Only available for TDM and FFA modes, the logic editor allows advanced users to create custom events and modifiers for their server that the default Portal settings don't cover. The logic editor uses a visual programming language that will be familiar to Unreal Engine 4 or Blender users. Game logic is entered into Rules blocks that fire off under certain predefined conditions. Users can also create Subroutines to more easily break up your game type into blocks of code.
Logic Editor Basics

|
IMPORTANT: The logic editor only works with Team Deathmatch and Free-for-All currently. |
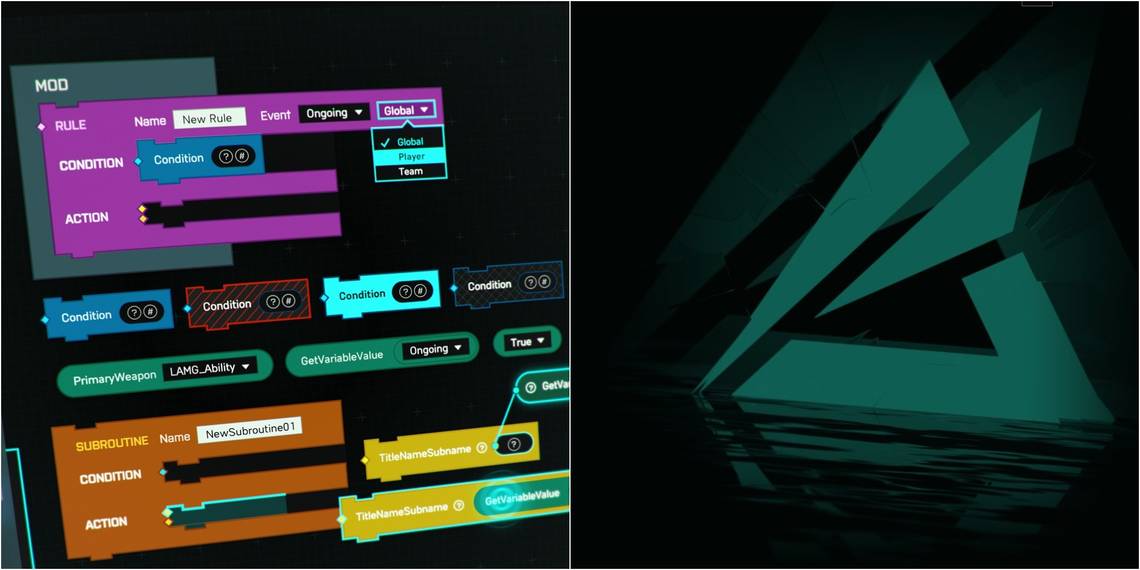
If you've never tinkered with a visual programming language before, the logic editor might come off as overwhelming. Don't worry; it's fairly simple. When you first boot up the logic editor, you'll see two things: a Mod block and a Rule block.
- Mod: This grey box will execute any functions inside it. If you have Rule blocks outside this Mod box, it won't take effect on your server.
- Rule: This purple block is where the magic happens. Slot in actions (yellow blocks) to execute a command. These actions are activated under certain conditions called Events located at that the top-right of the Rule cube that sometimes includes a scope—who the condition impacts (Global, Player, or Team). You can add optional conditions (blue blocks) into the "Conditions" section to further restrict when these Rules are activated.
All you're doing in the editor is adding and expanding Rule blocks by plugging various nodes into them. The nodes you add will determine what that block does. For example, let's say we wanted the game to display "Hello, World!" onto the screen when you spawn. We can do that by altering two things:
- The Rule block's "Event" trigger.
- Adding a "DisplayCustomMessage" node to the Rule block's "Action" section.

When you click on the "Ongoing" dropdown menu at the top-right of the Event block, you'll see a wide range of options. We want "OnPlayerDeployed," referencing when the player character spawns into the map. Now, head to the left-hand part of your screen to find a long list of categories. Click on the search bar, type "DisplayCustomMessage" to find a yellow node (it's also found under the yellow "User Interface" section). Drag it into the "Action" part of the Rule block.

If you have a keen eye, you'll notice that this yellow block has some blank spots with symbols on them. These are parameters that are needed for the action to work. If you right-click on the node and select the "Help" option, you'll see a short documentation snippet that'll tell you which parameters the node accepts. In this case, we need a:
- Message
- CustomMessageSlotItem
- Number node that determines the message's duration, and a
- Player/TeamID node to display the message to a certain group of people.
If you look up each request in that search bar we used earlier—except "Number" which is in the "Literal" category—you'll find everything you need. Drag and drop the parameters into their respective slots. For the "CustomMessageSlotItem" node, the slot you use doesn't matter.
|
Note: If you want a message to persist indefinitely on your server, set your "Number" node to a negative number. |

You'll notice that the "Message" node also has some empty spaces. Once again, we can view the "Help" tab to see that this parameter needs a string of text. Head to the "Literal" category and grab the "Text" node. Drag it into the Message node, then type whatever you want to appear (Hello, World!). We're done. Click the folder icon at the top-right of your screen to name and save your mode. Boot up 2042's Portal mode to check out your new message.
Logic Editor Message Slots

If you want to keep experimenting with messages, the image above showcases where each message is displayed on the player's HUD.
Logic Editor Icons
The various commands you can use in the logic editor will have empty spaces with symbols inside of them, denoting what parameter types they require or support. Here's what each icon represents:
|
|
|
|
|
|
|
|
|
|
|
|
|
|
|
|
|
|
|
|
|
|
|
|
|
|
|
|
|
|
Don't worry about memorizing these icons. At any time while using the logic editor, you can right-click on any node and click "Help" from the list of options. This will give an overview of what the node does and which types of parameters it needs to function. If you leave these icons blank, most nodes won't function.
Portal Node Types

On the left-hand part of the logic editor is a list of categories that each contain various nodes or parameters you can use. The color of the node denotes its use:
- Yellow: These are parameters or actions that go into the "Action" part of a Rule block.
- Green: These are storage/reference nodes that typically slot into other node types.
- Blue: Only one block exists: "Condition," adding additional requirements to activate a Rule block it's slotted into.
-
Purple: Categorized under "Control Actions," these blocks control the flow of your code.
- If Else: When the condition is met, the request is executed. If an "Else" statement is present and the "If" statement isn't met, "Else" fires instead.
-
While: So long as the parameter prerequisite(s) are met, this code will repeatedly trigger.
- BE CAREFUL: While loops can crash your server if no "Break" can be activated.
- LoopVariable: A while loop that iterates on the control variable parameter each time it's triggered.
- Break: Stop the loop this node is nested into.
- Orange: This refers to a Subroutine, a chunk of code that executes when referenced.
Logic Editor Tips & Tricks
.jpg?q=50&fit=crop&w=740&dpr=1.5)
Portal's logic editor is extremely powerful and allows for near-limitless possibilities. Below is a list of tips and tricks that will make your time with the editor far smoother:
- Whenever you get stuck, right-click on a node and select "Help" to view documentation.
- Use the search bar at the top-left of the screen to find certain nodes more quickly.
- Split up your problems into chunks. If your gamemode needs UI elements and custom AI traits, split those up into different Rule blocks.
-
If a Rule block is getting rather large, split it up into multiple Rule blocks or use a Subroutine—a chunk of code that executes when it's referenced.
- Subroutines are especially useful for reusing code.
-
You can name Rule blocks. Do this frequently to make your code easier to follow.
- If that isn't enough, create a Literal "Text" node and write a comment. Place it next to the code it's referencing to help yourself and others understand how your code works.
-
If you want to enable vehicles in TDM or FFA, head to the "Modifiers" tab in your game mode (not in the logic editor). Under "Vehicles," look for "Combat Vehicle Spawn Type." Select "Spawn on Map."
- More vehicles spawn in larger maps.
-
To create custom spawn locations or objectives, use vectors. You can record points of interest by utilizing a vector recording script.
- The code for one can be found in a Reddit thread by u/MrPenitent