When I opened up my Warhammer 40k: Kill Team box for review, I was so naive about Warhammer that I didn't even realize the models needed to be assembled. I've learned so much about the hobby since then, and for others who might be interested in getting into Warhammer (hopefully through the exceptional Kill Team Starter Set) this guide is designed to help you get what you need, put them together, and avoid some of the beginner mistakes I made while building my Kill Team models for the very first time.
Getting The Right Tools
At an absolute minimum, you'll need to get the following tools: plastic cutters, a penknife, plastic glue, tweezers, and a file/polishing bar. This hobby kit on Amazon is the one I first purchased, it has just about everything you need other than the plastic glue. Alternatively, if you buy one of the Warhammer 40,000 paint sets, they usually come with plastic cutters, glue, and sometimes even a mold line remover.

Take note: plastic glue is different than regular super glue. Plastic glue actually melts the glue together, creating a better fit and stronger bond. I have used three different kinds of glue while learning: the plastic glue that comes with the citadel essentials paint kit, this micro-precision Gorilla glue, and this gel Loctite super glue. The plastic glue works the best by far, the Gorilla glue works too and dries super fast, but it often leaves a white chalky residue on the model even where I didn't apply it. The gel stuff takes to long to dry and is just no good. Stick with plastic glue from a hobby shop if you can get it, but the Gorilla glue works ok.
Much Assembly Required
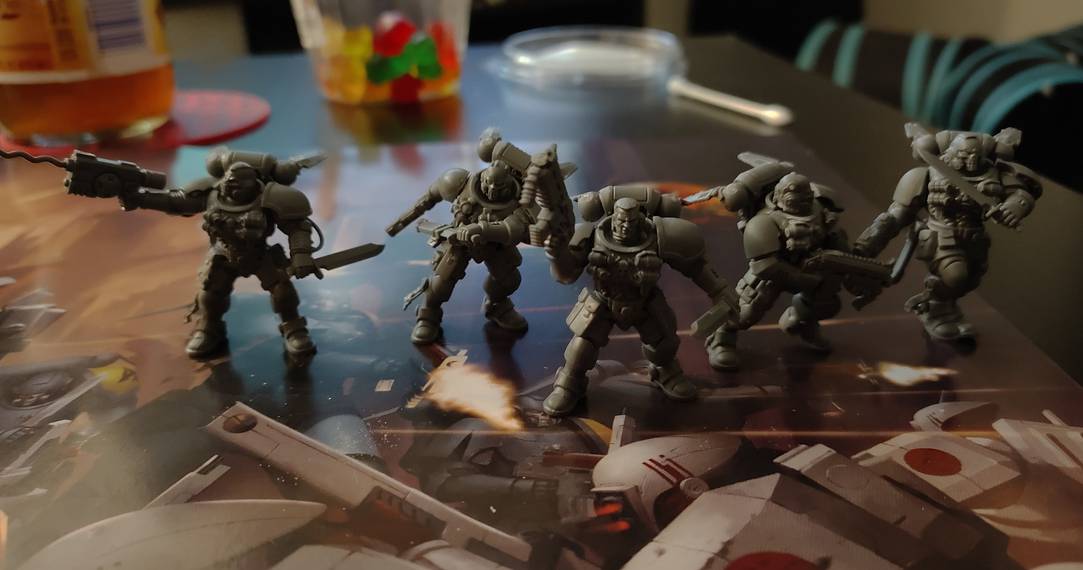
When you open up Kill Team, you're going to see an overwhelming number of body parts, weapons, and terrain attached to these rectangular sheets. DO NOT start removing them. All of the parts are labeled on the sprues and you'll want to cut them out one by one while you assemble your models.

For Kill Team, in particular, I highly recommend you sort through the character cards that come with the game and find the prebuilt units they provide. This will be your guide to how to build your first models. There is a staggering number of choices you make when you build your models, from facial expressions, arm position, grenade types, and gear. Warhammer isn't like Lego: the instructions will show you all the different options you have for building your models. Until you're more familiar with how the game works, I recommend you stick with the character cards included in the Kill Team box.
Remove, Smooth, Dryfit, Glue
The guide included with the models does an excellent job of walking you through the steps to assembly. It usually will have you build one unit from beginning to end so you understand how it goes, then lead you through an assembly line-style build strategy: build all the legs, then add torsos, then arms, etc. Here are the things the instructions don't tell you:
As you remove each piece of the model from the sprues, it's in your best interest to do some clean up on that piece. Use the curved side of your plastic cutters to cut as close to the piece as possible, then use either your penknife or file to smooth down the spot where the sprue was connected. Often times, that connection point is actually the joint where the piece will connect with the rest of the model. This is done to hide the imperfection in the model, so smoothing over that sprue mark will make it easier to connect it to the rest of your model in your desired angle/pose. If the sprue mark isn't on a joint, smoothing it down will make it easier to hide with paint.

You also want to clean up any mold lines you see. These are the hard edges left behind from the molds that are used to form the individual pieces of the model. They're easiest to spot on rounded pieces like legs, so if you see what looks like a seam, you should lightly file them down until smooth.
Next, you want to do a dry fit of the piece. This just means you're fitting them together before adding any glue. Warhammer models are not like Lego, they don't fit perfectly together with a snap. Rather, limbs and heads are designed such that you can put them in almost any position and they will still fit. Mess around with the angle and pose of the part while you dry-fit to find the position you like the most.
Finally, add glue to both pieces you are connecting. Remember that the plastic glue melts the plastic together, so you want to get a dot of glue on both sides to make a strong bond. hold them together for a good 20-30 seconds to ensure they bind.

Sometimes you need to connect pieces that are especially tiny, and in those situations, I like to used curved tweezers to hold the pieces in place while gluing. Remember that it's about holding it steady, so don't worry about how much pressure you're applying.
The Finishing Touches
There's a lot of little features you can add to your models to give them personality and help differentiate them from your other units. For the space marines that come in the Kill Team Starter Set, you can add different combinations of grenades to their chests and different medals once you've decided on the weapons they should have. These tiny features are easy to overlook, but they make can make your team individualized and unique, especially once they're painted.

The Kill Team Starter Set comes with a Space Marine team, a Fire Warrior Team, and a ton of environmental obstacles to use in your skirmishes. It may seem daunting, but if you throw on one of your favorite movies (something long like Avengers: Endgame) the time will absolutely fly by while you put together your very first Warhammer army.