It’s not unusual for a Souls game to be packed with secrets, in particular areas hidden off the beaten path that players will only find if they commit themselves to the art of exploration. Demon’s Souls is no different in this regard, the original PS3 release having been wonderfully remade by BluePoint Games for the PS5.
Although Demon’s Souls’ art direction has changed, the level design has been left untouched, allowing players to discover all of Boletaria’s secrets. At the same time, BluePoint Games have added in their own bonuses to help round out FromSoftware’s cult classic RPG. Demon’s Souls may not share the same scale of secrecy as Dark Souls or Bloodborne, but it’s a game that knows how to reward a diligent & savvy audience.
10 Boletarian Gates (1-1)

Players will likely notice a gated off area at the start of 1-1 when first playing through a game. Although treasure lurks beyond, the gate remains completely unlocked unless Boletaria is pushed to either Pure White or Pure Black World Tendency. Not only can players find a Colorless Demon’s Souls among a host of useful items, Executioner Miralda can be found & fought. When killed, Miralda drops one the best sets of armor for Body Type A – comparable to the Ancient King set for Body Type B.
9 The Mausoleum (1-1)

Demon’s Souls doesn’t have as many secret bosses as Dark Souls or Bloodborne, but it does have an extremely notable one in the form of Old King Doran – one of the hardest boss fights in the game. Guarded by a lone Red Eye Knight in 1-1, most players won’t even see the Mausoleum on a first playthrough.
Actually entering the ancient structure requires either completing Ostrava’s quest line – saving him in 1-1, 1-2, 1-3, actively speaking with him in the Nexus, and then again in 1-4 – or killing him on the spot. Ostrava will drop the Mausoleum Key which can then be used to challenge Doran for his sword & armor set.
8 Yuria’s Cell (1-2)

Prior to the events of the game, both Biorr of the Twin Fangs and Yuria, the Witch were imprisoned by Executioner Miralda in 1-2. Both NPCs are stationed in the stage’s final watchtower, with Biorr down below and Yuria up above. While rescuing Biorr simply requires a key from 1-3, saving Yuria is a bit more complicated.
Players must find the full Fat Official set by killing said enemies across the Boletarian Palace and Stonefang Tunnel. Once all four pieces of armor have been found and equipped, players can access a hidden staircase inside of 1-2’s watchtower to bring Yuria back to the Nexus.
7 Inside The Mysterious Door (1-3)

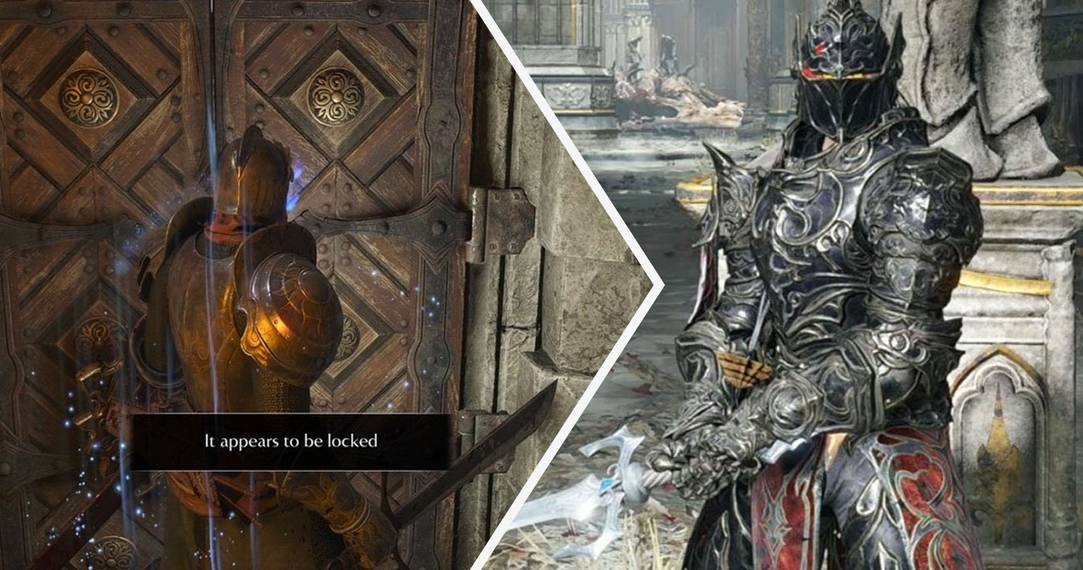
BluePoint Games’ remake of Demon’s Souls is incredibly faithful to the original release in regards to enemy and level design, but there was one notable addition which quickly caught the attention of longtime fans: a mysterious new door in 1-3. Recently unlocked by the fanbase, opening said door requires playing through Fractured Mode and finding 26 Ceramic Coins to trade into Sparkly. Once they’ve all been traded in, Sparkly will reward players with a Rusty Key which can unlock 1-3’s brand new door: revealing the Penetrator’s armor lying in wait.
6 Mineshaft Of Death (2-1)

The Archstone of the Burrow King is arguably the easiest overall area in the game, all three major stages easily traversable so long as players are patient. Enemies here are also complete pushovers for anyone playing a magic build. That said, the way to Flamelurker can be exhausting, especially when coupled with how demanding the boss is.
Thankfully, there’s a secret shortcut right at the start of 2-2 that players can easily abuse. Past the Scale Miners is a mineshaft. What looks to be a bottomless pit at first glance actually has several platforms that can be used to carefully maneuver all the way to the bottom. This will require trial & error along with a good eye and understanding of the game’s physics, but getting to Flamelurker in a minute is too good to pass up.
5 The Venerable Sage’s Cell (3-1)

The Prison of Hope is an extremely treacherous area, filled with disorienting passageways, terrifying enemies, and lighting that can obscure the many bottomless pits littering the top floors. 2F in particular has a pile of rubble blocking roughly half the floor, which only clears away once Latria has been pushed to Pure White World Tendency. The rubble will remain cleared even if players shift Tendencies, the pathway leading to a cell with a Three-Cornered Hat and the Venerable Mage’s set – the same armor worn by Sage Freke.
4 Latria’s Peak (3-2)

3-2 is even more dangerous than 3-1, trading away cramped hallways and bottomless pits for narrow walkways above a massive swamp, one wrong move plummeting players to their death. As players make their way through the stage, they’ll eventually start scaling large towers to cut down chains stringing together the massive heart in the center of 3-2.
If players push Latria to Pure White World Tendency, a makeshift bridge will appear atop the very first tower. At the very top is the 2F W Key Cell for the Prison of Hope, used to free Rydell in 3-1.
3 Sparkly The Crow’s Nest (4-1)

Sparkly the Crow plays a vital role in unlocking the mysterious door, so knowing how to get to her in the first place is important. Sparkly is stationed at the highest point of 4-1 in an easily identifiable tree. Inside the first watchtower past the fog gate is a pathway that will lead players directly towards Sparkly’s tree. Although Sparkly’s trades aren’t as varied as Snuggly’s in Dark Souls, she still gives away solid treasure overall.
2 Adjudicator Shortcut (4-1)

While 4-1 isn’t a particularly challenging stage to begin with, it’s actually possible to skip most of the level through a level design oversight – one that BluePoint Games have included in their remake. On top of the very first watchtower in the stage is a broken piece of wall players can roll onto from off the staircase. Successfully fast rolling over the wall lands players on top of the Ring of Regenerator and right around the corner from 4-1’s boss, the Adjudicator.
1 Selen’s Island (5-2)

The Valley of Defilement is a vile area most players tend to blitz through as quickly as possible. While nowhere near as bad as Blighttown was, the poisonous swamp is an overwhelming area that’s only offset by its comparatively easy boss fights. What few NPCs there are don’t offer much in the way of information, leaving most of the area’s lore up to subtext and item descriptions.
By pushing the Valley of Defilement’s World Tendency to Pure White, however, Selen Vinland will appear on a small island in 5-2. There, she’ll offer players more information on Garl Vinland – her brother and Maiden Astraea’s sworn knight – while also triggering the start of a side quest that pits players against Garl’s Black Phantom after Astraea has been defeated.