This tomb is full of trap chests that are meant to teleport you to different locations in the dungeon. Many illusionary catacombs within Elden Ring require you to remember paths and play a game of finding the difference. Luckily we have guides to explain exactly where to go in these dungeons and what's going on. Auriza Side Tomb is located in a small corner of Atlus Plateau.
From the Outer Wall Battlegrounds Site of Grace, head up the side path to the North-East. Following this dirt road leads you to the Draconic Tree Sentinel and the entrance to Leyndell, Royal Capital. There is another side path on this dirt road that goes under the entrance bridge, though. This leads to a smaller bear in the middle of a field. Beyond the bear is Auriza Hero's Grave. Head North, almost off the edge of the map to find doors inside the cliffside leading to Auriza's Side Tomb dungeon. Be wary of a gigantic bear hiding in the bushes near the edge here.
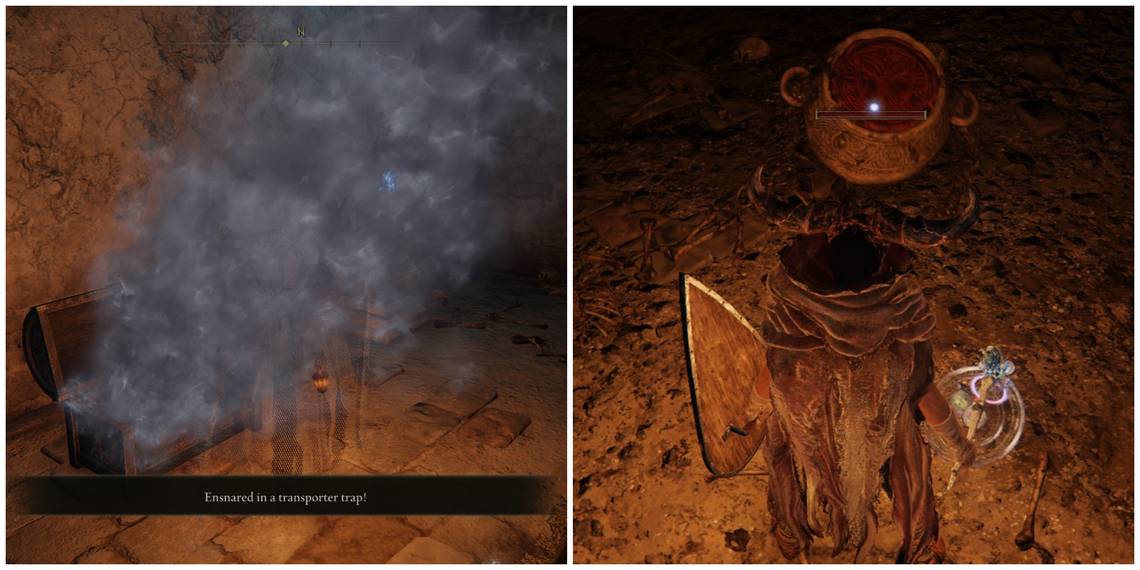
Let the chests in this dungeon trap you, it is how you're supposed to get around.
Auriza Side Tomb Overview

|
Auriza Side Tomb Overview |
|
|---|---|
|
Bosses |
Grave Warden Duelist |
|
Enemies |
Living Jars, Imps |
|
Notable Loot |
Cracked Pot, Grave Glovewort (6), Ghost Glovewort (6), Ritual Pot, Perfumer's Cookbook (3) |
Dungeon Walkthrough

Past the dungeon's Site of Grace, you'll bump into small Living Jar enemies. Some of them will explode, so upon death blow make sure to dodge backward. There are two ways you can go here. Around and forward leads to a trap chest.

Instead, we are going to jump out the window that's to the left. Make sure to collect the Grave Glovewort (6) here before jumping out.

You'll notice the lever for the boss door ahead. You can't reach it just yet. Behind you will be a chest that teleports you back to the beginning, where you just were. Instead, walk down the steps. Two imps will jump down. Behind the stairs is another Grave Glovewort (6) and an imp. Continue to the right of the stairs and through the next doorway, where a Grave Glovewort (5) will be.

Just above you will be an imp with a ranged lightning attack. If you can do ranged damage, take him out here, otherwise, you can ignore him for now.
To your left, or ahead of you, is a blocked-off area with a bunch of items behind it. You'll be able to get those soon. Continue North-West, through the dungeon.

You'll now come across another chest after bumping into a few imps. To the left of the chest is a hiding imp. Just before the chest, to your left, is a dip in the wall. This is a fake wall, hit it.

Down the steps is another chest and two exploding Living Jars. For now, turn back and use the first chest you saw to teleport to the previously inaccessible area.

There will be two gigantic Living Jar enemies, so be prepared for a fight. In this den will be the items Cracked Pot and Perfumer's Cookbook (3). Turn around and use the chest in this room. It will bring you back.
Now, use the chest that was in the hidden room. There's a Grave Glovewort (5) there.

This chest teleports you to the top side ledge of the cathedral room. This is actually a different, yet identical room to the one you were just in. There will be two imps ahead of you. Past them and to your left will be stairs going up onto the ledge of the previous imp room.
If you remember from dropping out of the window, there should be a lever here. There isn't because this is another identical room.

Instead, drop down and go up the stairs and through the doorway up. There will be a large Living Jar here with a Ritual Pot item in front of him. A smaller Living Jar is hiding to the right. After dealing with them, go back down the stairs. There will be another Grave Glovewort (6) under these stairs. Continue through the dungeon the same way as before and reach the cathedral again.

This time, go into chest number two which was behind an illusionary wall to collect more loot. The first chest will bring you to the boss room lever.

Through the second chest, continue down the side ledge again.
This time, to your left, will be a ladder leading to a dead end with a chest. Use this teleporting chest to seemingly return to the beginning area. You haven't. Go around, like you were to return to the Site of Grace. Instead, there will be a Ritual Pot item, a large Living Jar in the corner, and a Smithing Stone (5) in the other.
With these collected, jump out that side window again.

Continue through the dungeon as normal. This time, use chest number one. This leads you to another sewer den, different from before. There will be around three smaller Living Jar enemies here with some items to collect.
- Cracked Pot x2
- Ghost Glovewort (6)
There's a ladder to the right. It will lead you to the lever and a Grave Glovewort (6).

You are now back in the original dungeon. Drop down and go up the stairs. Use the chest to teleport back to the beginning. Reset at the Grace and continue through the now open boss door, opposite of the Grace.
Grave Warden Duelist Boss Fight

This is a tanky boss you probably haven't seen before unless you've been to Murkwater Catacombs. The Grave Warden Duelist will have a couple of little Living Jar allies behind him. They are slow and not as quick and aggressive as him, so you don't have to worry about them unless you roll into them. Instead, you can stay away from the center of the room or quickly take care of them.
If you're a mage, you'll have plenty of time to cast spells once you make some distance between yourself and the boss. When you make the distance, he tries to catch up to you at a relatively normal to slow speed. Bosses that have range or lunge toward you instead make it harder for mages to make space and cast. Here, you'll be able to accomplish that.
As a melee build, you'll have to do a lot of dodging and weeving from his consistent hammer swinging. Once he starts, it's hard for him to stop. Inflicting status effects like Rot or Bleed will help, as well as trying to stagger him. He can easily be backstabbed because you can roll into his attacks and end up behind him. He does not turn and change position quickly, making consistent backstabs effective.
When you see the Grave Warden Duelist put both hammers in one hand, make distance and play it safe. This means he is charging up his grab attack. No matter what enemy it is, a grab attack is usually instant death unless you have over 30 Vigor.
Upon defeat, the Grave Warden Duelist drops Soldjars of Fortune Ashes.