Elden Ring features a wide range of optional dungeons for players to find and loot. A small handful can be found in Limgrave, the game's starting area. One of the longest dungeons you'll find is Highroad Cave, a dungeon separated into two parts.
Fending off wolves, bats, and a giant might be intimidating to newer players, but the rewards are certainly worth it. A powerful curved sword, talisman, and upgrade materials can all be found here. Let's go over where to find the Highroad Cave, how to clear it, and the best way to take down the Guardian Golem boss.
Highroad Cave Overview

|
Highroad Cave Overview |
|
|---|---|
|
Boss |
Guardian Golem |
|
Enemies |
Wolves, Bats |
|
Notable Loot |
Smithing Stones |
|
Shamshir |
|
|
Blue Dancer Charm |
|
A torch, lantern, or Starlight sorcery is highly recommended for this dungeon.
Highroad Cave is the largest dungeon you'll find in Limgrave, excluding Stormveil Castle. This dungeon has two parts: a wolf den and a spacious cavern. Both sections feature dim lighting, so a torch or other lighting source is highly recommended. Prepare to get swarmed by tons of fodder enemies. Should you beat this dungeon, you'll get some Smithing Stones, the Shamshir curved sword, and the Blue Dancer Charm that enhances your attack power as you decrease your current equip load.
Dungeon Walkthrough

Before you walk past the Shrine of Grace into the dungeon proper, be sure that you have a torch or some source of light handy. Without one, you're going to have a hard time in the next few rooms.
The first room will have a few wolves patrolling a rather large pit. Strike down the lone wolf, then turn around to fight the two wolves attempting to ambush you. When they're slain, you can either explore the side tunnels for some cave moss or proceed downward. For those attempting the latter, equip your torch to see which platforms you can land on. Dropping straight down will get you killed.
On the lower floor, you'll want to head right to find another room of wolves. You can use the elevation difference to land a jump attack or deal some damage from range, eliminating one of the wolves. Look to your left once you've cleared these wolves. They'll be a narrow passage that will lead to an overlook of the next room. Ranged builds can kill the wolves from here, while melee builds can kill one of the tougher white wolves with a heavy plunge attack. Be wary of the bushes in here, as most of them are hiding a sleeping wolf. Take on the wolves one at a time, manage your distance, and you should be fine. Continue through the tunnels to find the next part of the dungeon.
Sunken Cavern

A Shrine of Marika is present here, acting as a sort of checkpoint should you die. You won't have to repeat the previous section whenever you respawn.
This section is incredibly dangerous for melee builds and trivial for most ranged characters. Make your way along the narrow path to find a bat overlooking the area. If you put away your light source, you can score an easy hit or two on it. With the bat dead, drop down to the top of the waterfall. Three bats will ambush you at this point. Run into the cave before fighting them. If you don't you could accidentally fall off the waterfall and die. Chip away at the bats, then loot the small cave to find some Smithing Stones and Golden Runes.


Continuing onward, fall straight down the waterfall. You won't take any damage and land on a narrow platform submerged by water. You'll want to sprint and jump across to the destroyed pillar, then run along the diagonal pillar to reach the central platform. Jump attack one of the bats, then kill the rest that approach. The corpse on the platform has a curved sword called the Shamshir you can take. Jump atop the destroyed pillar base to reach a nearby cave, progressing through the area.

A submerged pillar can be reached from the central platform, denoted by a second waterfall. This will lead you straight to the boss. We recommend using this shortcut if you don't care about the rewards on the main path (they're quite lackluster and not worth grabbing).

Up ahead will be a massive land octopus. This enemy is incredibly weak to fire damage, so consider using Flame Grease or pyromancies to kill this thing; torches won't do much. For everyone else, pelt away at the octopus from either its side or from a distance, damaging it until its front beak is open for a critical hit. One critical strike should kill the enemy for most, but if not, repeat the process. Push past the octopus, drop down to the nearby waterfall, then run through it to reach the boss fog gate.
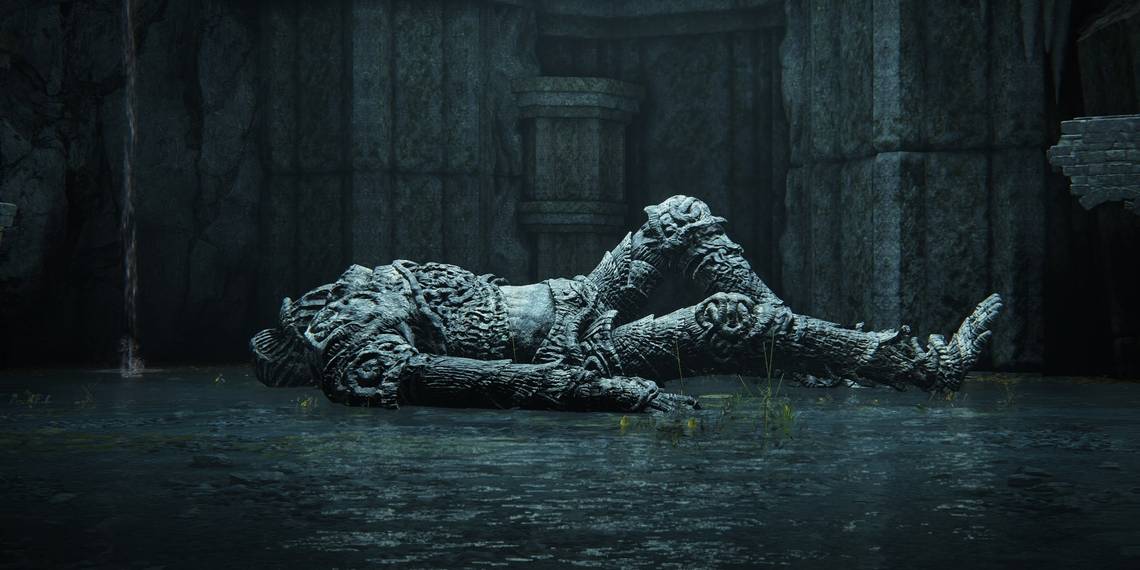
Boss Guide

A Guardian Golem will be resting when you cross through the fog. When ready, charge the boss and attack its ankles. So long as you stay behind the boss' ankles, it can't do much to hurt you. Dodge whenever it attempts to stomp you, and run towards the boss whenever it charges into a wall. It might occasionally use a fire breath attack, but you can avoid this by walking alongside its ankles during the attack; don't get greedy with attacks during this.
While it looks like you aren't doing much damage, damaging the Guardian Golem's ankles deals immense posture damage. Hitting its ankles enough will cause the golem to fall, allowing you to land a critical hit on its chest. This ends the fight for most melee builds, but spellcasters and rangers can use this opportunity to land a flurry of hits and heal. Repeat this process until the boss is dead. Defeating the Guardian Golem will grant the Blue Dancer Charm, a talisman that increases your damage based on how low your equip load is.
Boss Tips
- Do not summon spirits for this fight. Spirits can cause the boss to use more AoE attacks that could hurt you. Only use spirits if you're seriously struggling to damage the boss.
- Stay as close to the boss as possible. Despite its size, it can't do much to hurt you if you stand under it.
- Focus on attacking its ankles whenever possible, even if you're a ranged build. This is your main way of opening the boss to a critical hit.
- Heavy attacks and jump attacks deal more posture damage to the boss, opening it up for a critical hit sooner.