Elden Ring is known for its ‘build-a-sentence’ style message system. The format has been host to confusion and memes alike. But it isn’t the only way to communicate. There remains another option: the Prattling Pate.
These bizarre, pareidolia-inflicted stones present a more vocal approach to communication in the popular open-world RPG. When used, your character emits an audible ‘voice clip’ that other players in your world can hear. But you won’t start the game out with these items. That’d be far too easy for a FromSoftware title. Instead, you’re going to need to hunt them down one by one. Here is every Prattling Pate, organized by how quickly and easily they can be acquired.
It is pronounced ‘pay-t’ and not ‘pah-tay.’ A pate is an old word for the head, while Pâté refers to a way to prepare meats.
8 Hello Prattling Pate

This is the only pate that can be acquired almost immediately after leaving the tutorial zone and entering Limgrave proper. North of the Church of Elleh, where Merchant Kalé resides, is the Stormfoot Catacombs. Progress through there until you reach the fiery hallway. Deftly make your way down the hall and behind the fire pillar itself. That is where the ‘Hello’ pate resides.
You can disable the fire pillar by striking it with just about any weapon, allowing for an easy escape after grabbing the pate. It also means that a carefully aimed arrow or throwing knife can disable it from the beginning of the hallway.
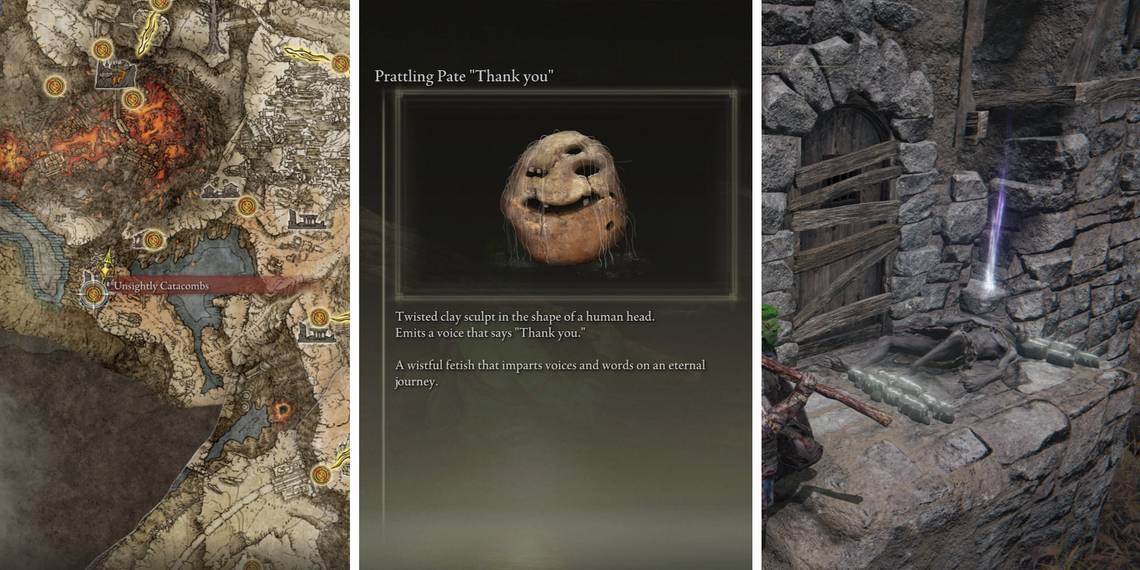
7 Thank You Prattling Pate

Moving on to the Weeping Peninsula, the next pate can be found inside the Tombsward Catacombs. If you’re having a hard time finding it, head directly south from the Church of Pilgrimage until you see a grouping of large stone pillars. The entrance is hiding among them against the cliff face.
Once inside, proceed through the catacombs as usual. When you reach the trick dead end after the fire pillar, the ‘Thank You’ pate will be resting on a corpse up against the right side wall.
6 Please Help Prattling Pate

The saddest looking pate of the bunch, this one is located inside of the Impaler’s Catacombs on the northeastern side of the Weeping Peninsula. If not yet discovered, the location can be found by starting at the Crater-Pocked Glade Site of Grace and following the eastern cliff edge north. It will eventually lead to the catacombs’ entrance.
Get to the room that crushes you against spikes in the ceiling. Trigger the trap and backpedal into the hall so that it rises without you, then drop down into the area under the rising platform. The next room will be a flooded chamber where zombies spawn out of the floor repeatedly. The ‘Please Help’ pate will be on a small patch of land against a nearby pillar.
5 Wonderful Prattling Pate

Moving on to the wet and wild lands known as Liurnia of the Lakes, start at the Liurnia Highway North Site of Grace and head east. Once you’re at the cliff edge, follow it south. When that dead-ends, wrap around and start following the western cliff wall north. It will lead you to the Cliffbottom Catacombs entrance.
Not far into the catacombs will be a multi-leveled room with a stairway bridge crossing over a gap. Fall into the gap and dispatch the Omen that resides there. This room has two outlining hallways on each side. One of these sides will be where the ‘Please Help’ pate is. Be careful, though, another omen is hiding in the darkness of these side hallways.
4 Apologies Prattling Pate

It’s around this point that each pate starts becoming harder or more dangerous to reach. Head to the Altus Plateau and go as far west as you can, to the point where you’re essentially under Mt. Gelmir. You’ll find a place called the Perfumer’s Ruins not far after passing the small lake section. A bit south from there is a lower level of land and the entrance to the Unsightly Catacombs.
This particular location is locked behind a Stonesword Key Gargoyle. Be sure to have at least two Stonesword Keys beforehand.
Fortunately, locating the pate itself is fairly easy once inside. Progress through the catacombs as normal. Once you reach the lever that opens the door, you can see the ‘Apologies’ pate in a hallway across the gap in front of you. On each end of this room are hallways leading to the opposite side.
3 Let’s Get To It Prattling Pate

An absolute hassle and a half, this might be the most frustrating pate to actually get to. It’s located deep within the Sainted Hero’s Grave in the middle of the Altus Plateau. The entrance to the grave itself is guarded by a Black Knife Assassin, whom you will need to bypass one way or another to continue.
Summoning a spirit summons with a large group can work as an effective distraction for the assassin, allowing you to run past, open the door, and book it inside before they can attack you.
One of the more complicated dungeons in Elden Ring, it’s full of secret pathways and light-based combat puzzles. Unfortunately, the ‘Let’s Get To It’ pate is waiting in the final room of the area. On the opposite end of the room, an invulnerable shadow warrior can be found waiting for you.
2 You’re Beautiful Prattling Pate

This pate is located in the Hermit Village of Mt Gelmir. Thanks to the confusing topography of the region, the only actual way to reach the village is to start in the ravines on the east side of the mountain. Start there and make what is essentially a full circle around the volcanic landscape until you find the village.
The dangers here are with the many demi-humans scattered throughout the area. Go too far in, and you’ll draw the attention of Demi-Human Queen Maggie, a powerful area boss. The ‘You’re Beautiful’ pate itself is out in the open, on top of a small set of stairs on the side of a building.
This is the only pate that plays a role in an NPC’s quest line. It is necessary to fully complete Boc the Seamster’s story. Found in a demi-human village, it’s also the only pate that describes itself as a demi-human head instead of a human one.
1 My Beloved Prattling Pate

Nothing says ‘convenient’ like trying to navigate awkwardly shaped pathways high in the sky, while an army of Pillsbury trumpet players fires magic bubbles at you. That’s the beauty of the Haligtree Canopy. That’s also exactly where the final Prattling Pate is hiding.
Not far from the Haligtree Canopy Site of Grace, progress down the branch you’re on and look below you on the Eastern side. You should see a collection of scarlet rot mushroom coral with a corpse and an item. That’s the ‘My Beloved’ pate. Don’t try to jump, you won’t survive. Instead, make your way down the tree’s branches and then back up the one that the pate is on.