Quick Links
Sellia Crystal Tunnel in Elden Ring is a challenging underground area with more than just your average digger waiting inside. While it may seem like an unnecessary challenge, completing the tunnel gives you access to rare and valuable weapon upgrade materials. This is one of the more dangerous side dungeons in the early and mid-game, one that’s best handled once you have good equipment and higher stats.
Sellia Crystal Tunnel also has an item of value for Incantation users: a Talisman that raises the potency of every faith spell you use. Completing Sellia Crystal Tunnel isn’t required for any ending, but it will make your journey through the latter part of the game just a bit easier.
Sellia Crystal Tunnel Overview

|
Boss |
Fallingstar Beast |
|---|---|
|
Enemies |
Digger, Prawn Miner |
|
Loot |
Smithing Stones, Somber Smithing Stones, Crystal Scrap, Rock Blaster Spell, Faithful Canvas Talisman |
There's quite a bit of loot to be found in Sellia Crystal Tunnel, though unlike the other tunnels you may have encountered so far, you'll have to fight for it. The Fallingstar Beast in particular is one of the most challenging tunnel bosses outside Altus Plateau.
The prawn miners are the most difficult enemies to deal with thanks to their ranged attacks, though they are vulnerable to magic. The diggers, like other crystallian-type enemies, are mostly immune to physical damage from your average sword. Heavy weapons and magic are the way to go for them.
Sellia Crystal Tunnel Location

The tunnels are in central Caelid, north of Aeonia Swamp and northwest of Sellia, Town of Sorcery. You can get there by venturing north through the swamp if you don’t feel like dealing with the Town of Sorcery.
Alternatively, the trap chest in Limgrave’s Dragon-Burnt Ruins warps you there instantly, and while you can reach the tunnel almost as soon as the game starts, waiting is better. This is a high-level area with difficult enemies, and you’ll need better equipment to handle it.
How To Get Out Of Sellia Crystal Tunnel

If the Dragon-Burnt Ruins trap sent you here, you’re in a bit of a bind. The only way out is resting at a Site of Grace, and the closest one is at the tunnel entrance. Getting there involves a frantic dash to the entrance past diggers and prawn miners.
The diggers are slow enough to pose no threat, but the prawn miners can send out a shower of spikes that track your movement. You can either dodge them or, if your endurance is high enough and you have a good shield, you can block them and continue running.
You can’t fast travel out, and dying sends you back to the treasure chest in the hut – not to a Site of Grace.
From the hut you spawn in, face the exit, and wait for the enemy to pass. If you have the Assassin’s Approach Incantation, use that to make your retreat a bit easier. Otherwise, run out, turn right, and drop down the rocky ledges.
Your exit is on the left, though by now, you’ll likely have a prawn miner firing projectiles at you. If the volume is on, you can hear when they launch. Try timing your dodges to avoid damage, and otherwise, just keep running. Take the right fork, drop down, and rest at the SIte of Grace.
You must rest at the Site of Grace to break the trap. Just activating it won't work.
Exit the tunnel, and you can fast travel back to where you want to be.
Sellia Crystal Tunnel Guide

Once you’re ready to tackle the tunnels of your own volition, mix a Flask of Wondrous Physik with damage and defense-boosting tears, and head inside. Melee characters should use heavier weapons, such as Bloodhound’s Fang, to break through the diggers’ defenses, while magic classes should prioritize low-cost spells such as Flame Sling, Catch Flame, or Glintstone Pebble.
A shield with 100 percent damage block can withstand the full blast of the prawn miner's projectiles
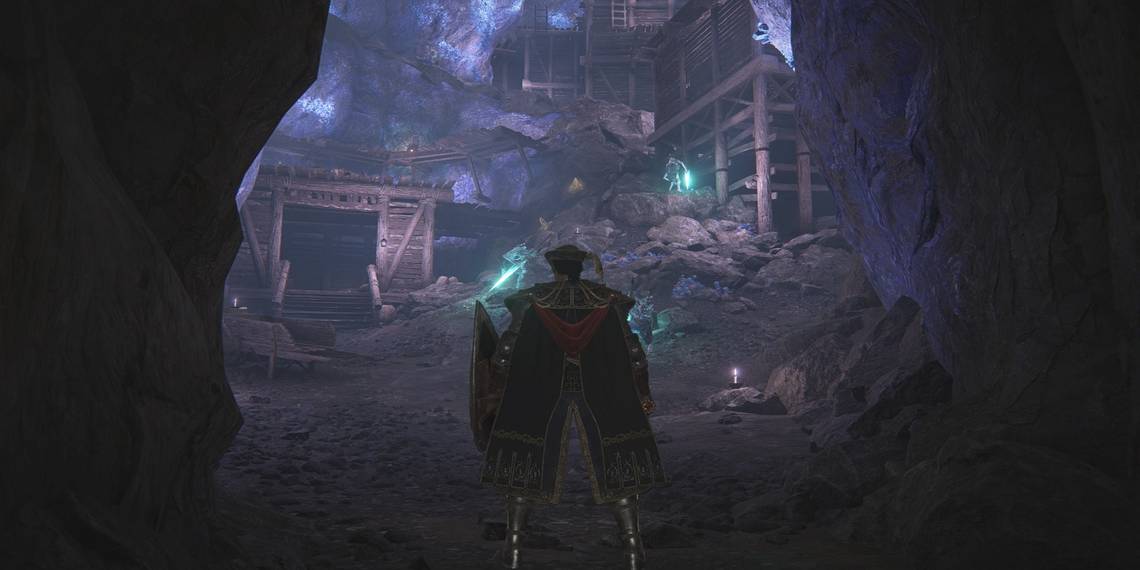
You’ll see three diggers, which you can take out with a weak spell or jump attacks. A prawn miner will stand on top of the closest hut and fire projectiles at you. Use magic to take it out, or dash up the rocky ledges and use a jump attack to briefly stun it.
There’s another prawn miner on the hut above you, so deal with it the same way. The third prawn miner in this area is on the upper walkway, past two diggers. At the end of the walkway is a corpse with a Rune Arc, so make sure to grab that.

Interact with any areas that have a yellow glow like the ones in the image above. These are smithing stones, often at intermediate levels, and are invaluable for enhancing your weapons. The ground level where the first three diggers were also has several crystal deposits, which you can use for making crystal darts and other magic items.
Once you’ve defeated the enemies and grabbed your items, hop onto the roof where the second prawn miner was, and leap over the debris to reach the path on the other side.

This area only has one enemy, a digger, and then opens out into a wider area with no enemies. Climb the ladder, turn around, and grab the Somber Smithing Stone [4] from the corpse on the platform. Ahead are a few more diggers and another prawn miner on the hut roof. This miner drops down to engage in combat, so you won’t be able to hide in the hut for long.
Once the enemies are defeated, get the Rock Blaster spell from the chest, climb the ladder, and head into the next tunnel. This one is devoid of enemies and opens onto another broad area. The corpse there has a grease item on it, but mind how you go. A prawn miner is lurking in the area to your left and will ambush you.

To the right, you’ll see two prawn miners worshiping on a platform. They don’t notice you until you’re right near them, which gives you time to prepare a strong attack or spell.
Fire works well, or Hoarfrost Stomp if you have the Icerind Hatchet. Even in its nerfed state, it deals high damage and stops enemies from acting momentarily.
If you’re a faith class, it’s absolutely worth defeating these two. The item in front of them is the Faithful Canvas Talisman, which raises the power of all Incantations.
From here, it’s a straight shot to the boss room.
Sellia Crystal Tunnel Boss: Fallingstar Beast

The Fallingstar Beast is a massive, cow-like creature that relies on heavy bash attacks and a gravity spell. The most common attacks are:
|
Attack |
Description |
|---|---|
|
Head Bash |
The Beast swings its head from side to side and can chain this attack several times. |
|
Leaping Bash |
The Beast leaps into the air, lingers for a moment, and crashes down towards you. The move’s hit box lingers after the Beast lands, so the best way to dodge is forward instead of backward or to the side. |
The Fallingstar Beast can also charge you and use its tail in a swipe that affects a broad area. Finally, it sometimes creates a small gravity well around it, pulling in allies and damaging them.
Unless you have a legendary Spirit summon, your best bet for assistance here is a tanky summon such as the Jellyfish. This method gives you more of an opening to attack the beast or cast spells. Melee classes should try focusing on the middle and back portions, partially because these seem to be more vulnerable and also because it keeps you out of range of the Beast’s attacks, albeit briefly.
Victory earns you the Somberstone Miner’s Bell Bearing. Give this to the Twin Maiden Husks in the Roundtable Hold to add Somber Smithing Stone [1] and Somber Smithing Stone [2] to their wares.