Quick Links
At this point in Escape Academy, you'll be approaching the halfway point. With access to three levels once you rescue Eel from the prison ship, Trial by Taste seems like a nice, calming break from the high-octane puzzley stunts you've been pulling.
Little do you know, however, that this level has something more in store for you. What starts out as a simple task with a delicious reward at the end turns into yet another panic-filled exercise in escape room logic. Let us guide you through the trials and pitfalls that this culinary-themed escapade provides.

How To Get The Milkshake

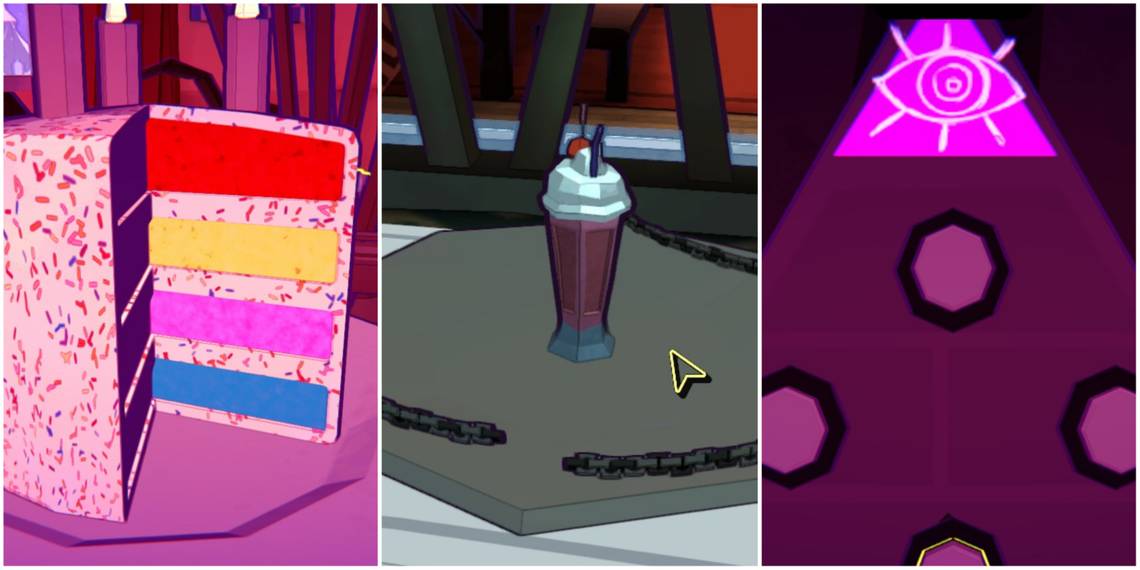
The impetus for this level is Jeb's offer of a tasty, strawberry milkshake that he's placed under a cloche, locked with three padlocks. These are odd padlocks that require you to find three oddly-shaped forks that fit perfectly in them. These can all be found in the kitchen, though the level will open up a bit more in later parts of the level.

The first fork is very obviously placed in the microwave. Of course, metal will destroy a turned-on microwave, but this particular microwave will not switch on unless you input the correct amount of time required for the contents within. How do we find the correct amount of time? Check out the poster on the wall opposite the microwave to find a list of timings - Unidentified Meat goes on for 3:35 - enter this into the microwave's keypad to obtain the first fork.
While checking out this poster, pick up the Fire Extinguisher to the right.
While this will open the microwave for you, it also sets the meat ablaze. Use the Fire Extinguisher to put the fire out and pick up the Funky Fork.

The second Funky Fork is a little more hidden but still very easy to find. Examine the crate of dishes to the left of the cloche and pick up the Funky Fork sticking out on the corner.
The third and final Funky Fork is resting on one of the plates on the conveyer belt that surrounds the room. Just keep an eye on the plates of food that keep traveling past and one of them will eventually have the fork.
With all three forks, head to the cloche and unlock the three padlocks by matching the forks' tines with the padlock shapes. Once revealed, take the milkshake.

Oh, dear.
How To Get Into The Freezer

So, you've been poisoned. That's not very good. There's an antidote hidden somewhere in this level and it's up to you to find it. First things first - you need to unlock the two doors in the kitchen - one that leads to the freezer, and one that leads to the cafeteria.
The freezer door has a combination lock on it with shapes making up the code. To find the code, interact with the toaster on the island counter in the middle of the room. The pieces of bread and donuts will form a code - Square, Empty Circle, Empty Circle With The Top Missing, Square. Use these shapes to get into the freezer.
How To Get Into The Cafeteria

Inside the freezer, interact with the shelves at the end of the room. There's a crate of ice cubes on the bottom shelf on the left - pick up the ice cube that has a key inside. On the right-hand set of shelves, pick up the Kitchen Knife.
Back in the kitchen, place the Ice Cube (With Key) into the boiling sauce on the stove. Pick up the Small Key, which you can then use to open the door to the cafeteria.
How To Unlock The Cabinet

After a quick search of the cafeteria, one of the things you'll notice is a cabinet opposite the kitchen that has a lot of vials of chemicals. As you'd expect, these are what you'll need to create an antidote for the poisoned milkshake.
Another thing you may have noticed is the large poster of today's specials on the left-hand wall. Interact with the poster to reveal some buttons - you'll need to find, yes, another code.
Examine the poster more closely - today's specials are a cheese wheel, an apple, a slab of meat, and some bread. That gives us our first half of the code - an order.
To find out what buttons these foodstuffs correspond to, head back to the freezer. Here, you'll find a food pyramid poster - each quadrant of the pyramid corresponds to one of the buttons that you revealed earlier; imagine them laid out over the poster.
The meat and cheese pictures are in the top quadrant, the apple is on the right, and the bread is on the bottom.
Putting these two halves together, enter the following code with the buttons on the wall: Top, Right, Top, Bottom.

This will reveal a crawlspace. Get inside and flip the switch on your left to send the dumbwaiter down - pick up the Staff Key through the bars, send the dumbwaiter back up again, and then head to the cabinet, using the Staff Key to unlock it. Now you have access to all the ingredients you could possibly need to make an antidote!
The only thing left to do is find a recipe.
How To Find An Antidote Recipe

Head down the steps to the right of the cabinet in the cafeteria to find a cake and a locked present box. The present is locked with yet another combination lock.
To figure out the combination, use the Kitchen Knife that you picked up in the freezer to cut the cake, and then note the order of the colored layers from top to bottom: Red, Yellow, Purple, Blue.
The combination you need for the lock is Red Triangle, Yellow Pentagon, Purple Diamond, Blue Star.
Inside the present you'll find an Encyclopedia of Poisons, how useful! This will let you identify how you've been poisoned.
- Calabar causes yellow-tinted vision.
- Belladonna causes purple-tinted vision.
The milkshake had Belladonna in it. That's handy to know - but we also need the rest of an antidote recipe - mixing up random concoctions could be lethal.

The next thing you need to do is examine the fireplace at the end of the cafeteria. Use the Fire Extinguisher on it to reveal a Dirty Plate. What do we do with dirty plates? Wash them! Take it to the kitchen and turn the tap on, then wash it to get a Cryptic Plate.
The Cryptic Plate has an odd symbol on it - a salt shaker in the middle, surrounded by a sequence of arrows. You can use this in conjunction with the spinning plate in the middle of the head table in the cafeteria.

Interact with the plate and spin it - first to the right, then to the left, and then to the bottom, making sure you do so in the order and the directions that the Cryptic Plate follows.
Remember, you can Pin some clues to the right of your screen; this will make the puzzle easier to follow.
You don't have to be super-precise - just hit the right cardinal directions in the right order and you'll reveal the final key to the puzzle - an Antidote Recipe.
How To Mix Up The Antidote

With the Encyclopedia of Poisons and the Antidote Recipe, you can work out how to cure yourself. Head to the cabinet and follow these instructions:
- Click on the bottle of Belladona Syrup once.
- Click on the bottle of Calabar Extract three times.
- Click on the bottle of Mineral Water once.
- Click on the cocktail shaker next to the glass once.
- Click on the glass to drink the cocktail and complete the level.
You can click on the sink to prematurely dump an incorrect mixture quickly instead of drinking it and taking a time penalty.