Like other From Software games,Sekiro: Shadows Die Twicehas many memorable boss encounters. There are a total of 12 main bosses in the game. A boss is determined by the fact that they gave you a Memory upon defeating them.
These bosses test your true skills as a Shinobi, as many veteran SoulsBorne players will note that it was a completely different experience than the normal “dodge to the side, slash the butt” tactic. Each boss is a unique experience, and they all require aggression and accuracy. Here are all the bosses you'll encounter in Sekiro.
12 Gyoubu Masataka Owina

Gyoubu Masataka Owina is the first true boss in the game and is required to defeat in order to access Ashina Castle. He definitely knows how to make an entrance with his over-the-top dialogue.
For many players, this boss is where the combat system is finally put into perspective. Your Kusabimaru sword can block almost every attack in the game, including Gyoubu’s giant spear. The key to winning this fight is to keep up with him and use your Shinobi Firecrackers to scare his horse, allowing you to get in a few hits at a time. Don’t be intimidated. He’s kind of a pushover.
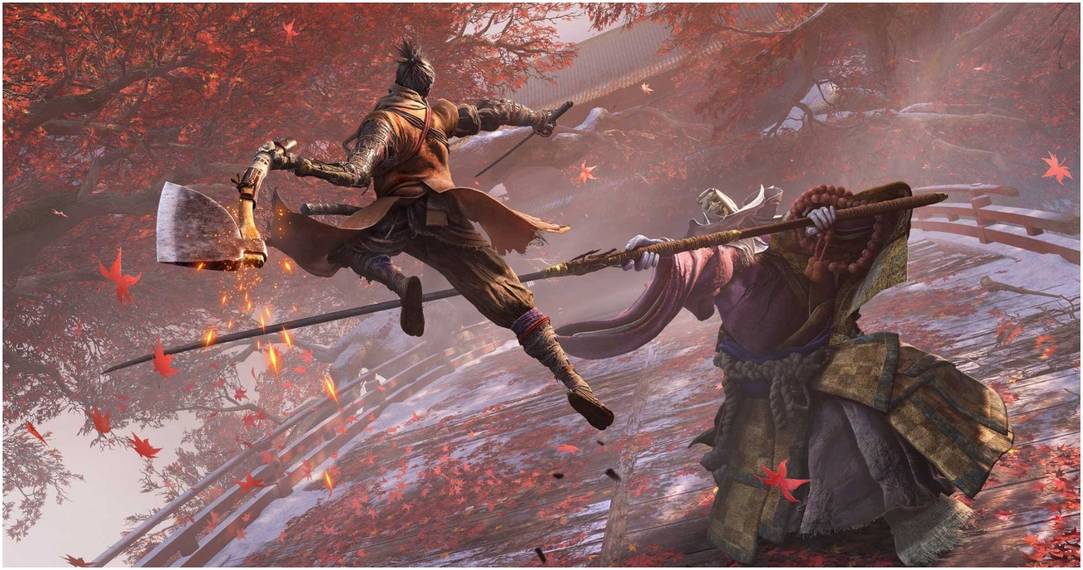
11 Lady Butterfly

Lady Butterfly is encountered at the very end of the Hirata Estate section, and she does not mess around. She’s quick, agile, and can fly. She will constantly spam kunai at you. What you need to look out for is her unblockable drop attacks after she starts flying.
At this point in the game, you should already have the Loaded Shuriken Prosthetic. Your Shurikens are your best friend in this fight as you can throw them at her as she’s about to make a move from the air. She will get knocked down, giving you time to run in and get some hits. Use your shurikens conservatively though, since she has two health bars.
10 Genichiro Ashina

Genichiro Ashina will greet you atop Ashina Castle, and he’s not a happy camper. Genichiro essentially forces the player to adapt to Sekiro’s new combat system, especially for veteran SoulsBorne players.
This is where the combat should finally click, and you'll realize how important posture truly is. His first two health bars are straightforward with attacks that are generally easy to telegraph, but he'll occasionally throw in some thrusts and grabs. His final phase may seem terrifying, but he actually has a smaller posture meter, so you just need to not let up.
9 Folding Screen Monkeys

Almost every From Software game has a puzzle boss fight, and The Folding Screen Monkeys show that they finally got the formula down.
Each of the four monkeys dies with two hits. The challenge is actually finding them. It’s basically a giant game of cat and mouse, or “Wolf and Monkey” if you will. It shouldn’t take more than one try, and it takes advantage of Sekiro’s excellent traversal mechanics.
8 Guardian Ape/Headless Ape

The Guardian Ape feels more like a traditional From Software giant monster. Make sure to bring some firecrackers since the ape is a Beast enemy. His most common move is his poop throw, which can be avoided if you run towards him, giving you a window of opportunity to hit him.
Don’t get too excited after you bring down his first health bar, despite the brutal and satisfying decapitation. He gets up seconds later, and now it’s a two-phase fight. Have fun!
7 Corrupted Monk

The Corrupted Monk, found in the Ashina Depths, is required to defeat in order to find the Shelter Stone. It’s an Illusion enemy, so snap seeds can end this fight quickly. Overall, it’s not a super difficult fight if you keep your distance, which forces her to make an easily avoidable jump attack.
Her attacks are slower than most enemies, making it difficult to time your deflections at first. You’ll soon get the timing down right and if you spam your firecracker, you'll eventually beat her.
6 Emma/Isshin Ashina

If you choose the Shura ending, then this will actually be the final boss fight. Emma is the start of this fight, and she’s extremely tough since she can teleport around the arena. Also, watch out for her grab attack or she’ll take you to Suplex City. Luckily, she only has one health bar.
Isshin Ashina has two health bars, and while he does hit slower than Emma, he tends to delay his attacks and mess up your deflection timing. A good cheese strategy is to bait him into his spinning attack, which you can dodge.
5 Great Shinobi Owl/(Owl) Father

If you choose to stay loyal to Kuro, you will then have to face-off against the man who trained Wolf, The Great Shinobi Owl, a.k.a. Wolf’s father.
Great Shinobi Owl has the speed of a Shinobi but the strength and reach of a beast. His attacks will chew threw your posture bar, so make sure you’re stocked up Gokan’s Sugar. His second phase will also throw poison into the mix, so be sure to avoid the puddles.
4 True Corrupted Monk

Once you enter Fountainhead Palace, you will immediately be confronted by the True Corrupted Monk. She has similar attacks to the Corrupted Monk but has three health bars this time around. Each phase of the fight is slightly different from the last.
The key to this fight is to constantly deflect her slow attacks while simultaneously attacking her large hitboxes. You can actually do a deathblow from above in her second phase if you time itjust right, allowing you to jump straight into the third phase where she sprouts a demon centipede.
3 Divine Dragon

Get ready for the most beautiful boss fight From Software has ever created with the Divine Dragon in Fountainhead Palace. The first phase of this fight is simple as all you need to do is take out The Old Dragons, which can be defeated in swarms after you do a jumping deathblow.
The second phase is the Divine Dragon, and it’s more trivial than actual skill-based. You still need to block and maneuver, but you can swing around trees. You’ll eventually jump towards lightning trees that allow you to use Lightning Reversal, dealing Posture damage. Just keep repeating this until the end of the fight.
2 Demon Of Hatred

Thankfully, this cheap Bloodborne reject boss is optional. The Demon of Hatred is quick and hits hard. If you’re not careful, you will be devoured in fire. You’ll find it in Ashina Outskirts after defeating the Divine Dragon.
Many of its attacks are tough to avoid, and adding fire into the mix also doesn’t help. Your secret weapon in this fight is the Malcontent upgrade for the Finger Whistle Prosthetic. This will cause The Demon Of Hatred to stagger for a few seconds, giving you time to get in some hits. Still, you’ll want to use this sparingly and maybe save most of it for the third health bar.
1 Isshin, The Sword Saint

Here it is. The true final fight of the game. The Isshin final boss is the ultimate test of everything you’ve learned up until this point. He’s aggressive, quick, and his attacks destroy your Posture meter. There are four phases (yes, four) of this fight. The first phase is actually fighting Genichiro, who doesn’t seem to give up. He’s quick to deal with since he doesn’t have his lighting attacks anymore. He has a Mortal Blade, but you have no one but yourself to blame if you can’t dodge it.
Now it’s time to fight Isshin, The Sword Saint. His attack patterns are fast and hard to telegraph. It also doesn’t help that the flowery arena covers his blade, making it difficult to see where its direction is going. The best advice for this fight is just to learn all of his attacks, which sometimes become different variations of each other. The first two phases have many different combos that you’ll need to maintain your Posture for. It’s best to keep your distance and make him come to you. The third phase is also similar, but he gains lightning attacks that you’ll need to counter. You got this!