Final Fantasy VII Remake takes a somewhat different approach to combat than the original game. Rather than using turn-based mechanics, it instead employs an active time battle system that's fairly reminiscent of the one found in Final Fantasy XV.
There's an awful lot to take in, although to the game's credit, it does do a fairly decent job of easing players into it. As a result, it shouldn't take you too long to pick up the basics, although there's a surprising amount of depth when it comes to some of the more advanced combat elements.
Combat Overview

Regular attacks can be used freely by pushing the square button, but more powerful abilities and spells will require the use of an ATB bar. These can be seen in the bottom right hand corner of the screen and are charged in a number of ways. Dealing damage is the most effective, but you can also use things like Haste to speed things up a little. We'll get to that later though. For now, let's just focus on the basics.
Once one of the bars in the ATB meter is full, pressing the X button will bring up the Commands menu and it's here that you'll be able to choose between spells, abilities and any other materia related commands. Most will only require a single ATB bar to use, although there are a handful of abilities that will need two. Several of Barret's will instead use up all of his available ATB bars, so just be careful when using them.
As well as basic attacks, every party member has a unique attack tied to the triangle button. Exactly how these function varies from character to character, but each one can have a huge impact on the way that battles play out. Certain enemy attacks can be blocked by holding R1 and the circle button can be used to perform a dodge roll. That said, simply running out of the way of an attack can often be just as effective; if not more.
You'll be able to cycle through party members with the d-pad, but by using the shoulder buttons it's possible to issue commands to them without having to actually change. Similarly, a party member's abilities can also be tied to the L1 button for quick selection. Locking onto an enemy is as simple as clicking the R3 button and you can cycle between targets by flicking the right analogue stick. If you've assessed an enemy, you'll also be able to see information about their strengths and weaknesses by using the touchpad to access the Enemy Intel screen.
Pressuring & Staggering Enemies

One of the key combat mechanics in Final Fantasy VII Remake is stagger as it can greatly increase the amount of damage dealt to enemies. Each one has its own stagger bar and filling this up will lead to a period of increased vulnerability while also rendering the enemy immobile. Filling the bar is as simple as dealing damage to the enemy, although there are certain abilities that are far more effective at doing so.
Prior to staggering an enemy, you may also induce a pressured phase, during which time it's a lot easier to increase the stagger bar. Abilities are again the best way to do this, although hitting the enemy with elemental spells (particularly ones that they're weak to) can also be incredibly effective. You can find out exactly which element(s) to use by equipping the Assess materia and then using the Assess command on an enemy in battle.
Once staggered, you'll want to hit the enemy with your most powerful spells and abilities until the stagger phase is over. It's even possible to increase the damage percentage multiplier by using some of Tifa's abilities or Aerith's Ray of Judgement. It can go well beyond 300% with the right setup, although most enemies will recover from stagger long before it gets this high.
Blocking & Parrying

Blocking isn't too important in a normal playthrough as it's fairly easy to keep everybody alive with spells and items. In Hard Mode, however, you won't be able to use any items and so will find yourself having to conserve MP in order to successfully reach the end of the chapter. With this in mind, it's best to get into the habit of blocking and parrying as early as possible.
Holding the R1 button while facing an enemy will lead to your party member guarding. Not every attack can be blocked, but the vast majority of physical attacks can. You'll still take damage while blocking, mind, but it will be greatly reduced and can also boost the ATB meter.
While controlling Cloud, you can take this a step further by using his Punisher Mode to parry certain attacks, but more on this later. The Parry materia provides a similar effect, while the Deadly Dodge materia will allow you to unleash a powerful attack immediately after performing a dodge roll.
Filling The ATB Meter

The ATB meter will fill slowly over time, but you can charge it a lot faster by using regular attacks or by blocking and parrying those of enemies. Certain abilities and triangle attacks can also increase the meter, as too can your equipped materia. In certain battles, however, it can be difficult to use regular attacks and this is where Haste can be incredibly useful. It's a spell that's connected to the Time materia and will greatly increase the speed at which the ATB meter passively charges.
It's also possible to enter a battle with a party member's meter partially full, either by equipping the Whistlewind Scarf accessory or the First Strike Materia. Equipping the ATB Boost Materia will allow you to double a party member's current ATB by pressing the L1 and R1 buttons during battle, although there's a rather long cooldown period after each use. Finally, those who would prefer to have three ATB bars rather than two can equip the Refocus materia, but most tend to avoid this as it means sacrificing your limit break.
Equipment & Stats

Each party member has ten key stats; eight of which have a direct impact on their performance in combat. These typically increase with their level, which can go as high as 50 in part one of the remake. HP stands for hit points and is arguably the most important stat as it serves as the party member's health. If this ever reaches zero, they will be incapacitated and will need to be revived either by magic or items.
MP stands for Magic Points and is required for casting spells. It can be refilled using items or by resting on benches during a regular playthrough. On Hard Mode, however, MP can generally only be refilled by turning in side quests or reaching the end of a chapter. There are one or two abilities and materia combinations that can restore MP, but none of these are anywhere near as effective as an Ether.
Strength and Magic dictate the power of physical and magic attacks respectively while Vitality determines how much physical damage a party member will take. Spirit is the magic defense equivalent of the latter and the Luck stat will determine the chances of dealing a critical hit or successfully stealing from an enemy. The final battle stat, Speed, effects how quickly the rate at which the party member's ATB meter will passively charge.
Certain weapons and pieces of armor can also offer bonuses to some of these stats. Each weapon in the game has its own Attack and Magic Attack stats while some armor types can provide additional defense against physical and magical damage. These can be further increased with the use of accessories and it's also possible to increase a party member's HP, MP,Magic and Luck stats by equipping them with the appropriate Complete materia.
Weapons can also be upgraded to provide additional stat bonuses and this is where those two other attributes come into play. SP, or Skill Points, are used to unlock new weapon skills while the Weapon Level stat determines which skills are available to be unlocked. This will rise slowly as party members level up, with additional Skill Points also being added in the process.
You can gain extra Skill Points by collecting Manuscripts, which are typically handed out as story and quest rewards. There are a few available for sale in the Moogle Store too although many can only be acquired while playing on Hard Mode. If at any time you find yourself unhappy with the way that you've assigned your Skill Points, you can easily reset them by visiting Chadley in any of the areas in which he hangs out.
Triangle Attacks

By pressing the triangle button during combat, you'll be able to perform a special attack that's unique to the party member that you're controlling. Each one works differently, but they are typically be a great way to quickly build ATB while dishing out some solid damage. They can also serve a number of other functions though, as you'll see below.
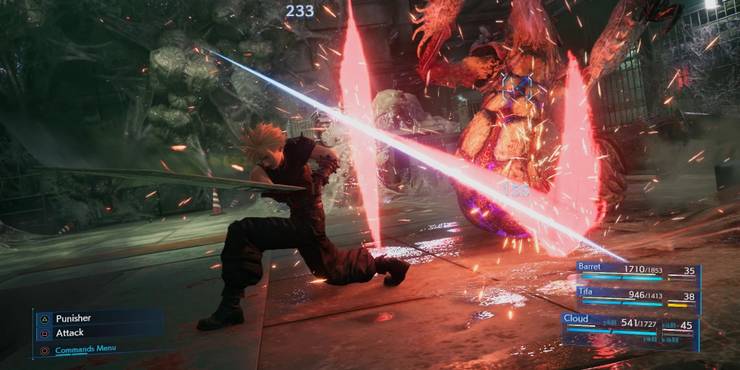
Cloud (Punisher Mode)
Unlike the other party members, Cloud has two distinct battle modes. The default is Operator Mode, which makes him incredibly mobile but leaves quite a bit of damage on the table. By pressing triangle, however, players are able to switch freely between the Operator and Punisher modes. The latter is a lot more offensive, although this increased damage potential does come at a cost.
While in Punisher Mode, Cloud loses a lot of his mobility and so it's best to make the switch when you've already gotten close to your target. Pressing the square button can help to close the gap a little, but only when you're within a certain range. Trying to dodge while in this mode will automatically revert Cloud back to Operator Mode, although equipping the Parry materia can mitigate this problem.
These things aside, Punisher Mode is a great tool for dishing out damage quickly; particularly against staggered enemies. Due to the speed of Cloud's attacks while in this stance, it can also help players to fill Cloud's ATB meter considerably faster. By far the best mechanic of this mode, however, is the ability to counter certain melee attacks by holding the R1 button. Just be mindful though that other types of attack cannot be blocked while in this mode and so when dealing with projectiles, it's always best to switch back to Operator Mode.
Barret (Overcharge)
Pressing the triangle button while controlling Barret will unleash one of his powerful overcharge attacks. Not only will this deal a lot more damage than a regular attack, but it will also fill a significant portion of his ATB meter. As such, you'll generally want to use this attack whenever it's available, which sadly won't be too often due to its long cooldown time.
It is possible to speed things up a little by pressing the triangle button to charge the attack after use, but choosing when exactly to do this can be important. There's a fairly long animation attached to charging and this can leave Barret vulnerable to incoming attacks. You can get around this somewhat though, by using regular attacks and then hitting the triangle button as soon as his gun overheats. It won't cancel the animation completely, but it will make it significantly shorter. Using his Charging Uppercut ability can also lower the cooldown time.
Tifa (Whirling Uppercut, Omnistrike & Rise And Fall)
Which move is assigned to the triangle button while controlling Tifa will depend on her Chi level. By default, it will be Whirling Uppercut, but by using her Unbridled Strength ability, it's possible to raise her Chi level and upgrade the attack to Omnistrike. Using Unbridled Strength twice in a row will instead unlock her most powerful attack, Rise and Fall.
These three attacks are a great way to stagger an enemy and can also be used to increased the damage percentage once an enemy is in a staggered state. Just be aware that using Omnistrike or Rise and Fall will decrease Tifa's Chi level by one and so it's not possible to use the moves repeatedly unless you're recharging with Unbridled Strength in between uses.
Aerith (Tempest)
Aerith's triangle attack is easily the weakest of the four characters', although it does still have its uses. It works like a typical charge attack, meaning that the longer you hold the button, the more powerful the attack will be (up to a certain limit, of course). It's a magic based attack, so, as with her regular attack, it's based on Aerith's magic attack stat rather than her strength. Its damage potential and the ATB charge that it provides are typically greater than a regular attack though and so you'll probably find yourself using it a lot more often.
Abilities

All four party members have access to seven special abilities which can be accessed through the Commands menu. They each start with one, but more can be unlocked by acquiring new equipment. Every weapon has its own ability and while these can initially only be used while the weapon is equipped, using them in battle or meeting certain battle requirements will lead to the abilities being mastered.
This typically requires between five and ten uses, but you can check the exact progress at any time by looking at the proficiency meter on the right hand side of the Equipment menu. Once filled, the party member will be able to use the ability even after its associated weapon is no longer equipped. Some are a lot more useful than others though, so unless you're trying to unlock the trophy or complete Battle Intel Report 17, there's really no need to learn them all.
Limit Breaks
The Limit Break system in Final Fantasy VII Remake is almost identical to the one found in the original game, with the one key difference being that the limit break gauge now resets between battles. Each playable party member has one of these gauges and they can be seen in the bottom right hand corner of the screen near their HP and MP stats. Once this has been filled, they'll be able to unleash an incredibly powerful ability through the Commands menu.
A party member's limit break gauge is typically charged by having them take damage, although there are a few ways to speed up the process a little with the help of accessories. Equipping the Transference Module, for example, will allow you to charge the gauge by consuming ATB while the Spectral Cogwheel will instead fill it whenever MP is used.
There's also an incredibly powerful accessory called the Gotterdammerung which will allow the wearer to enter battles with a full limit break gauge and drastically increase the speed at which it charges again after the limit break has been used. Sadly, however, you won't be able to get your hands on this until the beginning of your second playthrough at the very earliest. Even then, it will not be at all easy.
Each party member has two unique limit breaks during the first part of the remake, but only one of these will be available from the very beginning. The second will need to be unlocked by completing the appropriate challenges in the Corneo Colosseum. It's definitely something worth doing though as they are typically far more powerful than the default limit breaks; both in terms of stagger and damage potential.
Aerith is a little different from the other three party members, as neither of her limit breaks deals damage. Instead, her first heals all party members for 50% of their maximum HP while her second nullifies all physical damage dealt to the party for 80 seconds. Generally, most players opt for the latter; especially as they start to gain access to more powerful curative spells later in the game.
Regardless of which one you decide on though, you'll be able to switch freely between them in the Battle Settings menu whenever you're outside of combat. Just remember that you'll also need to do this for any new limit break manuscripts that you acquire before you can use them in battle.