Quick Links
The Omega Ruins are one of the toughest areas in Final Fantasy 10, containing some of the strongest enemies and bosses in the entire game. The opponents you face here will reduce your health to zero in a hurry if you aren't prepared to face them.
You can access this location in Final Fantasy 10's late-game after you unlock the airship. But, before you begin, make sure you've leveled up enough and are happy with your equipment. You can return to the airship after completing the game's last dungeon, Inside Sin, so use that as an opportunity to grind if you need to.
Overview Of Omega Ruins

Once you've unlocked the game's airship, you can enter coordinates to reach secret locations. Enter the coordinates X72, Y35 to reach the Omega Ruins. Since there's only one save point at the start of the dungeon, grind against some enemies near the entrance until you feel confident you can progress. Otherwise, you'll waste a lot of progress mid-way through.
The Omega Ruins are home to two bosses, Ultima Weapon and Omega Weapon, as well as an RNG-based chest mini-game.
Enemies In Omega Ruins

The enemies in the Omega Ruins can put up a tough fight, especially if you've not prepared beforehand. The Great Malboro will always ambush players and will always cast Bad Breath, a move that inflicts various ailments such as confusion, berserk, silence, poison, and slow. It's certain death for unprepared players. Having First Strike equipped on a party member's weapon will allow you to strike first, even when an enemy ambushes you, allowing you to summon an Aeon with Yuna, or deal with the Great Malboro before it casts Bad Breath. Having confuseproof equipped on a piece of equipment is also a viable strategy.
Master Tonberry is another enemy that can cause some difficulty. Master Tonberry will use Karma in response to any attack, a counter that deals massive damage. After four turns of walking towards your party, it will stop approaching and begin attacking. Cast Hasteaga on your entire party and try to kill it before its four turns are up. It's also recommended to have Yuna in your party to offset any damage done by Karma. Cheesing the fight with an Aeon is impossible since Master Tonberry uses Voodoo to immediately kill them.
The other enemies in the area can be annoying, but not impossible if you have the appropriate stats to take them on. Most of the enemies are surprisingly susceptible to Stonetouch, an equipment ability that can turn enemies to stone after an attack. Omega Ruins can be easily shortened with this method.
|
Zaurus |
|
|
|---|---|---|
|
??? |
|
|
|
Floating Death |
|
|
|
Master Coeurl |
|
|
|
Spirit |
|
|
|
Black Element |
|
|
|
Machea |
|
|
|
Puroboros |
|
|
|
Defender Z |
|
|
|
Adamantoise |
|
|
|
Varuna |
|
|
|
Demonlith |
|
|
|
Wraith |
|
|
|
Master Tonberry |
|
|
|
Great Malboro |
|
|
|
Gemini (Sword/Club) |
|
|
Chest Game Explained

The Omega Ruins contain four groups of chests scattered around, but they work in mysterious ways. Once you try to open any of these chests, they have a chance to either yield a treasure or turn into an enemy Mimic. Once one chest turns into a mimic, all the other chests in the group will disappear. The odds of this happening seem to be based around RNG — in other words, it's completely random. As a result, we recommend saving at the beginning of the dungeon and reloading the save if you get a hostile Mimic.
The first can be found if you follow the corridor to the right of the entrance. The second can be found if you follow the exit left of the entrance. Follow that path then head left again to find the third group. Then take the opposite exit to find the last group of chests. An Al-Bhed Primer can be found next to this last group.
Players need to open all 12 chests in a row to obtain the final prize of x99 Warp Spheres, an item that can move a party member to any node on the Sphere Grid. Arguably, this prize isn't worth the trouble of completing this mini-game since it'll likely take more than a couple of reloads to open all consecutive chests. The rest of the treasure can be found below and will always appear in this order:
- LV.4 Key Sphere
- Defending Bracer
- Turnover
- LV.3 Key Sphere x2
- Defending Armlet
- Friend Sphere x2
- LV.4 Key Sphere
- Phantom Ring
- Cactuar Wizard
- Warmonger
- Teleport Sphere
- Warp Sphere x99
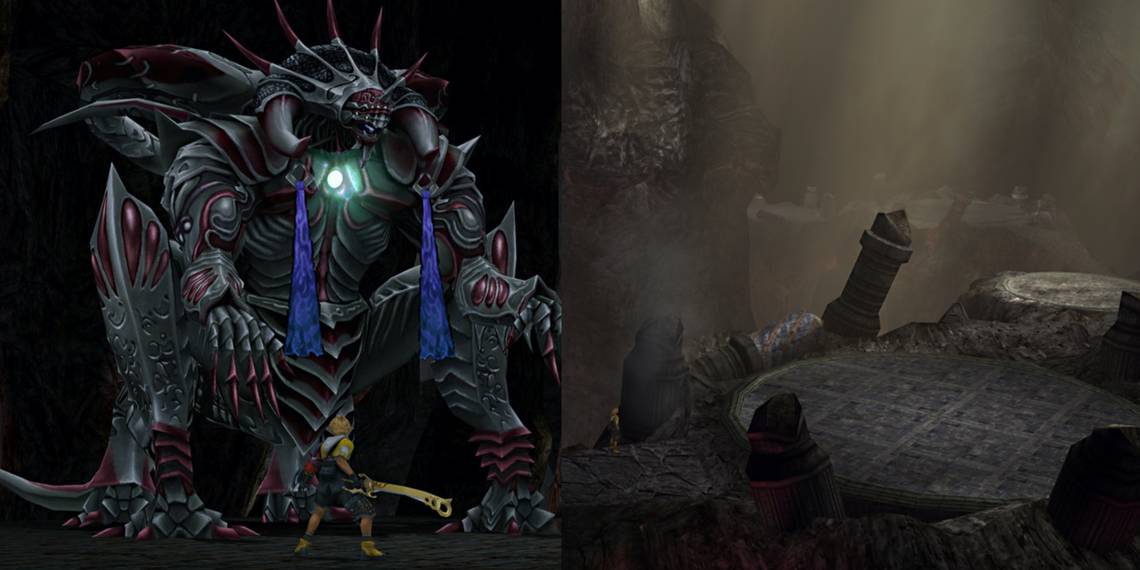
Ultima Weapon Boss

Ultima Weapon is the first boss you'll face in the Omega Ruins, it's spawned by Omega Weapon's hatred. You can find Ultima Weapon at the end of Omega Ruin's first floor.
Strategy
Ultima Weapon's health pool is relatively small compared to Final Fantasy 10's other end-game bosses, sitting at 99,999HP. As a result, the battle against Ultima Weapon can be quickly won using an Aeon's Overdrive move. Anima and the Magus Sisters have especially powerful overdrives that can immediately defeat Ultima Weapon.
If you want to face Ultima Weapon without the help of your Aeons, look out for Ultima Weapon's status-inflicting spells, namely, Silence, Break and Confuse. Casting reflect on your party members or wearing equipment that nulls these status effects is a good idea. As always, cast Hastega on your entire party.
Item Drops
Ultima Weapon will always drop x3 LV.3 Key Spheres. But make sure you use steal to get either x10 or x20 Door to Tomorrows. Door to Tomorrows can be used to put the Overdrive>AP ability onto equipment. This ability converts Overdrive gauge charges into more AP, making it one of the most useful abilities in the game if you want to complete the Sphere Grid.
Omega Weapon Guide

Omega Weapon is the last boss at the end of the Omega Ruins and with a health pool of 999,999HP, it can be considered a superboss. In cutscenes, it's explained that Omega was a priest centuries ago who doubted the teachings of Yevon and was thus executed. Unable to go to the farplane, Omega's hatred turned him into the fiend you now face.
Strategy
Unlike Ultima Weapon, Omega can't be defeated with one or two Aeon Overdrives - unless they've been extensively upgraded. It's still a good idea to save up some Aeon's Overdrives to whittle down Omega's sizeable health bar. Omega will absorb elemental damage so don't bother using elemental attacks or Aeons such as Shiva or Ifrit. If you want the battle to be done quickly, you can also use Yojimbo's Zanmato, which is a one-hit kill.
Omega Weapon's signature ability is called Nova, which deals huge damage to all party members. There's no way to avoid this ability other than to cast an Aeon and let them absorb the hit - casting shell and having a character that's high on HP can soften the blow. You can also use Khimari's Lancet ability to unlock Nova for yourself.
This battle is all about finishing Omega Weapon before it's able to cast Nova and destroy your entire party. So, as always, cast Hastega and use Quick Attack to extend the time between Omega Weapon's turns. Omega Weapon can also cast confuse and break so use equipment that has confuseproof. Obtaining the game's Celestial Weapons are also recommended to deal maximum damage at every turn, but this isn't a requirement.
Item Drops
Omega Weapon will always drop x3 LV.4 Key Spheres. It's also possible to steal x30 Gambler's Spirit. Gambler's Spirit can add the SOS Overdrive ability to equipment. This is an auto-ability that fills a party member's Overdrive gauge when they're low on health.