Chapter two of Floppy Knights introduced the concept of fliers and hazardous terrain. This came in the form of Behemoths, lava, and falling rocks. Air Assault, the third Challenge in the second layer of the Challenge Zone combines all of these in a race against the clock. From the get-go, it’s quite a daunting task.
Air Assault pits an incredibly fast and damaging force, backed by a bunch of Spawners and a Big Mad, against a slow-moving, squishy, ranged force. It’s just as difficult as it sounds, and with multiple failure conditions, it’s very easy to get overwhelmed. This challenge is all about aggressive movement, target priority, and precision.
Challenge Objective

To complete this challenge you need to reach an objective in enemy territory, hold it for two turns, and accomplish that within 12 turns. The pressure of the clock is ever-present, but 12 turns are more than enough to get the job done. You can do it with a handful of turns to spare if you go in with some semblance of a plan and use your limited resource to their fullest.
Understanding You Deck

Your deck is incredibly limited in what it can do. Every enemy in this challenge can one-shot every unit you can summon. The only exception? Vera and she is still killed in two hits. This makes movement and positioning the most important element of this deck, and this challenge as a whole. If you are out of line, you will get punished immediately. Mess up enough times, and that’s game over.
- 1 Vera (Commander)
- 1 Sunbathe (Commander Card)
- 1 Spitunia
- 1 Mend
- 1 Seed Sword
- 1 Reap/Sow
- 1 Regrow
- 1 Uproot
- 1 Attack
- 2 Bamboomer
- 2 Grow
- 4 Move
Vera
Vera is a great commander in regular missions. Why? You can tailor your deck around her healing ability and brute force your way through encounters with relative ease. In Air Assault? Vera struggles. Her healing is useless as all of your units die in one hit, and Vera can’t passively heal herself.
Vera can, thankfully, kill Behemoths in a single hit, and it does take two hits to kill her, making her comparatively tanky. She is also fast, with an SPD of four. This is ideal for pushing her up the flanks and handling side jobs as well as relocating rapidly to support a wavering front.
Sunbathe, her free card, is also excellent. It’s just a movement card most of the time, but it can also be used to heal Vera over time if she takes a clapping from a wayward Behemoth.
Spitunia
Spitunia is your main attacker. Spituna is decently fast with an SPD of three, has enough attack to kill a Behemoth, and has a ranged attack. Providing you can stay out of range of Behemoths, Spitunia will shine. This is especially true when you consider Behemoth AI is incredibly aggressive, and they will head straight at the nearest target - even if that puts them in danger.
Bamboomer
Bamboomers are your main source of damage and long-range support. They are painfully slow with an SPD of two, so ideally you want to wait until you have secured a forward location before you start spawning them in, otherwise, you will waste turns trying to move to where they are needed.
Bamboomers are excellent at covering Spawners, either with their bodies or by keeping their guns in range. Being able to prevent the never-ending wave of Behemoths is always a good idea.
Not only that, due to their high damage, they are perfect for killing Big Mad, and even standing on the Objective as their guns give them a distinct advantage against enemies moving towards them.
Grow
Grow is a fantastic card that, unfortunately, gets destroyed when you play it. You can get around this, however. If you use Grow to upgrade another Grow card, the upgraded Grow (Grow+) loses the “Destroy” trait and instead gains the “Gain One Energy” trait. This lets you slowly buff your entire deck, and generate more resources leading to larger turns.
Reap/Sow
Reap/Sow is a card that can lead to truly wild turns. With 6 Energy, you can use Reap/Sow six times as you don’t discard it when you play it - you merely flip it. What this means in-game is that you can move-attack-move-attack-move-attack. With any unit, this can decimate the battlefield and give you some breathing room.
Regrow
Regrow is an interesting card. You can return a unit to your hand, and then draw 2-3 cards from your deck. You lose battlefield control, but you gain more options. This is excellent for when you are fishing for a specific card, such as a move or attack card, but it shouldn’t be used every turn. You can also use this card to rescue a stranded unit and prevent a Waste card from being placed into your deck.
You can’t use this card on Vera.
Battle Strategy

Due to RNG, we can’t offer a true step-by-step walkthrough. We can give you a general overview of what to expect.
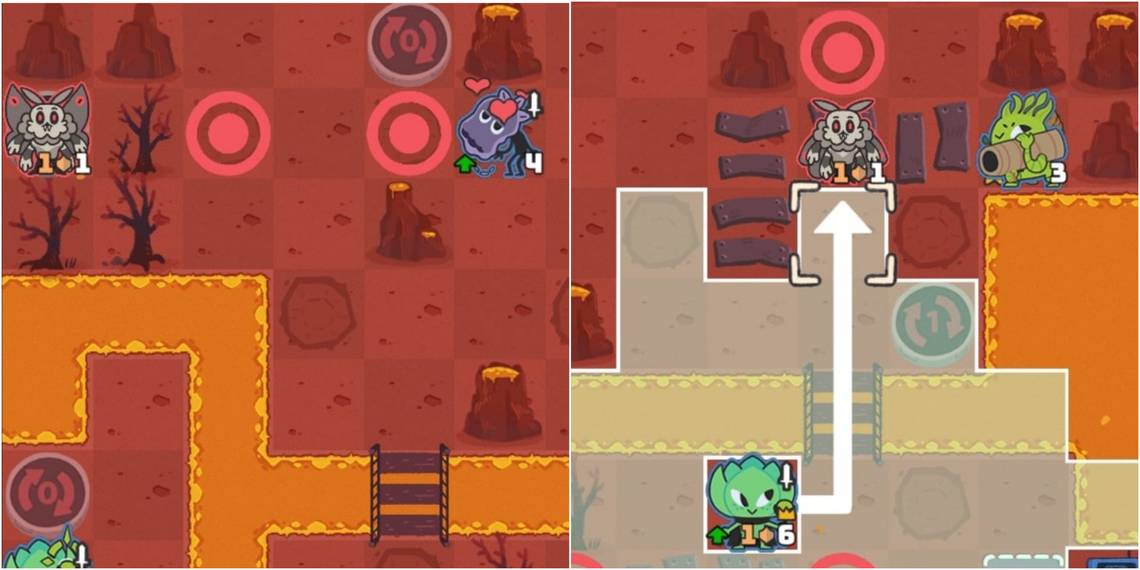
Turn One

Turn one, as is often the case in timed missions, is very important. You want to use this turn to gain momentum in later turns. To do this, you need Vera to accomplish two things:
- Push the red button to extend the bridge
- Kill the left-most Behemoth
This will require 3-4 movement cards to execute, and if you don’t have them, then we advise you to reset the challenge and try again. Completing these two tasks in a single turn, whilst not imperative, is incredibly useful.
Secure The Forward Deployment Zone

Your next objective will be to secure the forward deployment zone. This will take a few turns to do. Aggression is key here. Enemies will be spawning near-constantly, and getting yourself a new base early will help you make a more concentrated push on the final area.
Spitunia is ideal for this as its speed and range are simply perfect. Whilst Spitunia is doing her job, Vera should be moving to block the Spawner on the left flank. This will mitigate how many Behemoths are spawning.
Bamboomber Covering Fire

Once you have secured the forward Deployment Zone, you can start bringing in the big gun - Bamboombers. You want Bamboomer to cover the nearest Spawner. Move them so their gun is covering it, and open fire every time an enemy spawns. This will reduce the number of Behemoths on the field even further.
Take Out The Big Mad

Now that you have stymied the flow of Behemoths, you need to take out the Big Mad. The best unit for this is the Bamboomer as they have the damage to kill it in three shots. You may need to stand in lava to get the perfect shot, but that’s fine as the Bamboomer has enough HP.
You may have to wait for a few turns to generate the right cards to unleash your assault. Don’t be afraid to bring Spitunia or another Bamboomer into range to help if you are concerned about time.
Holding The Objective

Once the Big Mad is down, you need to hold the objective for two turns. This is fairly easy to accomplish, even without many units on the board. Sit a Bamboomer on the objective, and then have your other units defend. You can be aggressive and distract the Behemoths, or you can play defensive. Either way, providing the Bamboomer survives two turns, you win.