Quick Links
Hoyoverse recently brought back Golden Apple Archipelago during the time-limited Summer Odyssey event in Genshin Impact. At first, the islands looked very barren with minimal chests and exploration to them, but as you progress through the main Summer Odyssey quest, every island changes its design and gets filled with areas for players to explore.
Upon finishing the entire time-limited quest line in this event, you can unlock a secret quest called Where The Treasure Dwells, which will take you on a journey throughout this area to reward you with a Luxurious Chest at the end.
How To Start The Quest

To find this quest, players are first required to finish the Summer Odyssey quest line, which is only available during the Version 2.8 update. The quest will take you through Kazuha, Xinyan, Fischl, and Mona's mirages before finally uncovering the secrets lying within the new summer islands.
Once you've finished the quest, all the main islands of Golden Apple Archipelago will change their look and there will be some new Raven Statue NPCs on Fischl's island known as Twinning Isle. To start the quest, you need to head over to the small island with a Waverider spawn point to the Northeast of Twinning Isle.

On this island, you will find a Raven Statue outside the entrance of a cave. Talk to the Statue and it will tell you about its ordeal and about a legendary Secret Pirate treasure that it knows about. Once this dialogue ends, you will have a new quest. You will require four clues to pinpoint the location of the treasure.
How To Get The First Clue

After the dialogue, Captain Night Raven will ask you to defeat a few Hilichurls inside his cave in exchange for giving you a way to pass the fog ahead to find the secret island. Once you've done that, he'll guide you to a rock nearby where you need to follow his lead to get past the fog.

Getting through the fog can be a hard process as you need to keep your eyes at the bottom of the screen where subtitles appear. The Raven will give you directions to get through the area starting from going from right to left of the first rock.
Eventually, he will also ask you to go right through certain rocks and simply cross some others. Follow his directions carefully and once you're at the last rock, he will simply ask you to head over to the island in the distance. At this point, you can look around to find an island engulfed in fog as shown above.

Upon reaching the island, head to the very top of it, and you'll see a Common Chest lying there waiting for you to open it. Here, you'll get your first clue and realize that you'll find the other three clues on the reefs of the other three main islands.
How To Get The Clue In Broken Isle

Once you're finished getting the first clue, you'll be allowed to choose which one you want to go to next. This guide will go from easier to harder puzzles starting from the clue in Broken Isle. Simply select this quest from the quest menu and head to the marker using any nearby Waverider spawn point.
Once you're there, you will find a familiar puzzle including a harp and a bunch of melodic blooms. To acquire this clue, you need to guide the melody that will come from the harp once you Perform, directly to the chest to unlock it.

To do this, interact with the bloom near the harp three times and then interact with the bloom next to it twice to elevate it all the way up. Next, change the direction of the bloom right beside the chest twice and then the one above it twice as well.
Head back to the harp and Perform it. Wait near the chest as the melody reaches it, and you will find the second clue in this long quest.
How To Get The Clue In Minacious Isle

Next, select the quest that leads you to the reef near Minacious Isle and take another nearby Waverider spawn point to get to the marked area. On this island, you need to find a small opening that will lead you to a cave where you won't find anything at first.
Once you're in the cave, use Elemental Sight to find a fragile wall that can be broken using basic attacks from Sword, Claymore, or Polearm users. It breaks the fastest if you use a Claymore or Geo skills like Zhongli's Elemental Skill.
Upon breaking this wall, you will find another Common Chest with the directions to find the next clue. Head back out and get inside your Waverider to start your journey for the third clue.

Head in the Southeast direction from the reef and look up at the sky to spot a circle of Constellation in the distance. This is why you're required to finish Mona's mirage, which is the last one. Head directly to this circle until you see another small rock pile nearby.

As described in the note you got on the reef, the little rock pile will be surrounded by whirlpools. Make sure you avoid them all as this can damage your Waverider, which will disappear upon reaching zero health. Go near the top of the pile after exiting your boat, and you will find a Common Chest with the third clue.
How To Get The Clue In Pudding Isle

Now, you can finally set upon the journey to find your final clue in order to zero down on the Treasure's location. Head to the final reef using a Waverider and you will find some Electro slimes Electro-Charging the water. The best way to deal with this is by using a shield while you defeat them.

Upon defeating the enemies, a Common Chest will spawn that will give you a riddle to reach another note. For this, head back to Kazuha's Bonsai on the Pudding Isle and change the design to Hoverlight Rocks on both the left and the right sides.

Once this is done, teleport to the Waypoint at the top of the main island and jump down towards the South side according to the mini-map. According to the riddle, you will find a tree with red leaves, and you will see a white arrow right below it. Interact with this arrow to find another riddle for the final clue.

For the clue, head back to Kazuha's Bonsai and change the structure of the rocks on the right side to Unyielding Rocks. Now, take a Waverider or just swim to the East end of the Island. Here, you'll see a path leading upwards guarded by some Rifthounds as shown above.

Follow this path upwards, and you will find the final clue at the end of this path on a bridge. This will be highlighted by an aura on the floor and a white arrow pointing down at it.
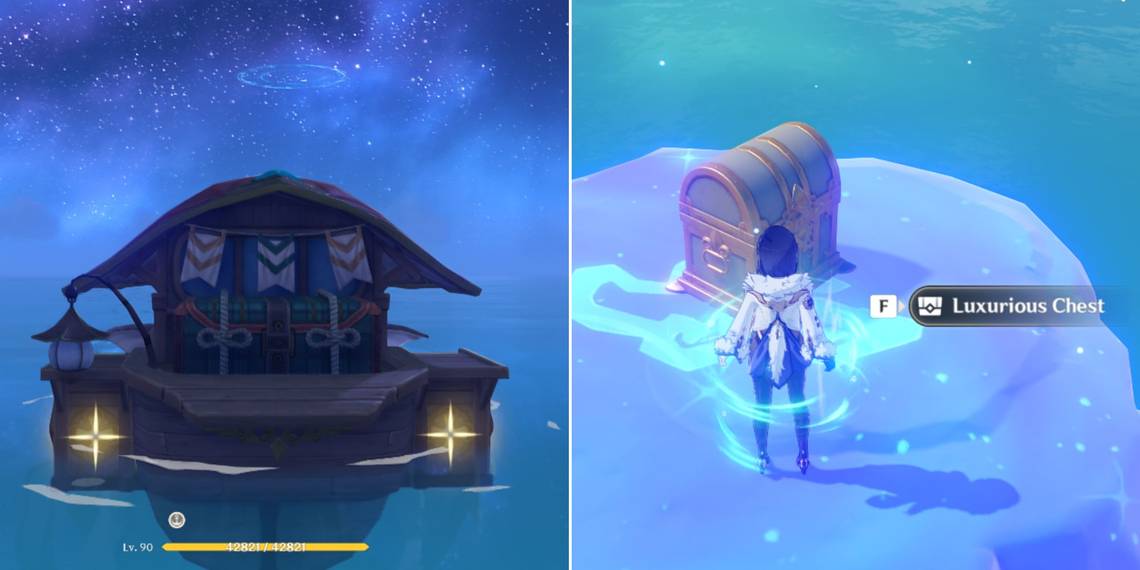
How To Find The Treasure

To find the legendary Secret Pirate treasure, head over to the island in the middle of all four main islands and take the Waverider here from the spawn point. Head towards the Southeast direction and you will see a bunch of whirlpools with a bubble in the middle that keeps popping.

Interact with the bubble to spawn a Parkour puzzle. There are two types of these blue jellyfish in this puzzle. The one that has a symbol in the middle lets you jump higher while the one without a symbol doesn't. Make your way by jumping across these to reach the top of this puzzle.

Once you reach the top, you will be greeted by a Luxurious Chest sitting in the middle. There will be an interesting discussion between the Traveler and Paimon about the treasure. Once you're done with the dialogue, you will receive a total of 40 Primogems, three Hero's Wits, 300 Adventure EXP, 30,000 Mora, and three Mystic Enhancement Ores.