Snow is a common material in Minecraft, but it's very easy to run out of it. Instead of running out of snow, you can build this simple farm for an endless supply! This is one of the easiest farms that you can create, so it's an important addition to your base.
Normally, snow can be found in cold biomes, such as taigas and mountain ranges. Rather than traveling to a place where snow generates, bring the snow generation to you! With the help of a snow golem, you can have all the snow you want.
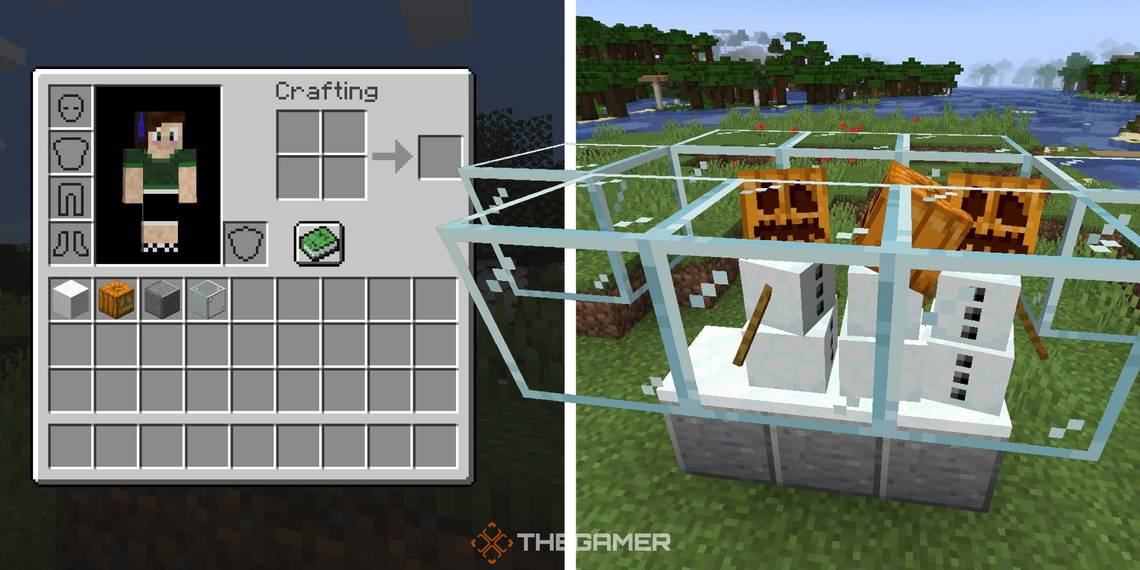
Materials Needed For A Snow Farm

You will only need four different types of blocks to build this farm. Check them out below, as well as how to get them.
- Two Snow Blocks
- One Jack-o-lantern
- One Building Block
- Four Glass Blocks
Before building a snow farm, you will need to have found snow at least once. Using a tool enchanted with silk touch, just gather two snow blocks. If you don't have anything enchanted with silk touch, that's okay. Breaking a snow block with a tool will drop four snowballs. From your inventory, you can craft the snowballs into a block.
To obtain a jack-o-lantern, use a pair of shears on a pumpkin. Pumpkins can be found around villages, as well as any biome that has grassy areas.
With the 1.17 update, we also have the addition of powdered snow. This farm does not work with powdered snow.
Steps To Build A Snow Farm

Now that you have all the materials for this farm, let's get started! Place your building block and then use your glass blocks to frame the top. Above, you can see that the four glass blocks are surrounding the building block.
From the side, you should see the building block, an empty space, and then the glass above.
The glass placement is to prevent the snow golem from escaping. If you place the glass lower, the golem will just jump over and escape.

To create the snow golem, place your two snow blocks on top of the building block. This is the snow golems body.
Be sure that all the glass is in place before continuing on.
Next, place the jack-0-lantern on the snow blocks. The three blocks should now transform into the snow golem.

The snow golem will be confined to this area. Snow will generate underneath the golem, which can be gathered. Gathering the snow will generate more, leaving you with an endless supply of snow. The snow gathered will be in the form of snowballs, but you can craft that into snow blocks.
Unlike other mobs, snow golems take damage from the rain. If your snow farm is out in the open, consider adding a roof to protect the golem. That's all there is to the snow farm! Stand near the bottom to collect the snow.
Tips For Efficiency

If you have built other Minecraft farms, then you know that usually, bigger is better. This is not the case for a snow farm though.
This farm works because it is so simple. To get an unlimited supply of snow, you don't even have to move. An extended farm may look cool, but this will not increase the amount of snow you get. Since the snow spawns instantly, there is no need to have multiple snow generation areas.
Additionally, snow golems will move around. If your farm is too big, the golems may wander, leaving spaces without snow. To maximize the efficiency of this farm, stick to a single snow golem.
Wondering what to do with all this snow? In addition to using it as a white building block, you can also create more snow golems. Snow golems are a unique mob that only attack hostile mobs. This means that they will not attack you, and you can use them to defend or guard a base. You can build yourself a snow golem army with this farm!