It can be hard to progress in Minecraft if you are running low on materials. Once you do have enough material, you may need a way to smelt it all. Fortunately, this guide will teach you how to make your very own super smelter with 16 furnaces.
A furnace is incredibly useful in Minecraft, but sometimes, they just don't smelt fast enough. With this super smelter, you can smelt material simultaneously in 16 different furnaces. All you need to do is place materials and fuel in chests, and the super smelter will do the rest of the work. Smelted material will end up in a chest so you can easily grab everything.
Updated August 16th, 2021 by Russ Boswell: Minecraft is still going strong thanks to the latest Caves & Cliffs: Part I update, and the fact that players are constantly creating new and interesting things. The best designs in Minecraft will require a ton of materials, and smelting down all the ore that players have collected can be a headache. Because of this, it's now more important than ever to have a Super Smelter in Minecraft. What seems insanely complex isn't actually all that difficult for those that follow a step-by-step guide to create a Minecraft Super Smelter and the end result is life-changing for most players. To aid in the creation process, and help new players who are just starting their adventures, the following guide has been updated to include even more information and tips for building a Super Smelter in Minecraft.
Materials Needed To Build A Super Smelter

To make a super smelter, you will need the materials listed below.
- 5 Chests
- 4 Rails
- 36 Powered Rails
- 2 Minecarts With Hopper
- 48 Hoppers
- 16 Furnaces
- 5 Levers
- 13 Building Blocks
These items are fairly simple to obtain early in the game, but you will need quite a few iron and gold bars to craft them.
In total, you will need 286 iron bars and 216 gold bars.
This is a lot, but by mining and exploring the world, you will eventually find enough of each ore. Once you've gathered enough iron and gold, craft the materials and start building your super smelter.
Steps To Make A Super Smelter

Now that you have all the required material, let's go over each step to making a super smelter.
Step One
First, place a chest. Make sure you have enough room. You should have at least 20 blocks of space to work with. This will allow you to move around comfortably while working on the super smelter. After placing the chest, attach 16 hoppers to the side.
Attach the first hopper directly to the chest by clicking while holding shift. Then, attach every hopper to the side of the previous one, until you have a line of the 16 hoppers extending from the chest.

Step Two
Place a furnace on top of each hopper, for a total of 16 furnaces.
From the top of each furnace, attach 16 more hoppers. Finally, you will place the remaining hoppers on the back of each furnace. Remember to keep holding shift while placing hoppers.
Each furnace should be 'framed' by three hoppers. One going in from the top, another going in from the back and one underneath that's part of the hopper chain.

Step Three
Head to the side of the build with the chest. From the hopper row in the back, attach two building blocks going outwards, with an additional block diagonally to the left. Above, you can see the blocks placed in the correct position. Feel free to use an extra support block to form this shape.
Place blocks in this shape extending from the top row of hoppers as well. In total, there should be six blocks placed.

Step Four
On the other side of the build, place blocks in the same pattern. From the top and back row of furnaces, extend two blocks towards the right, and then two additional blocks placed diagonally to the right.
Now, there should be 6 blocks on each side.

Step Five
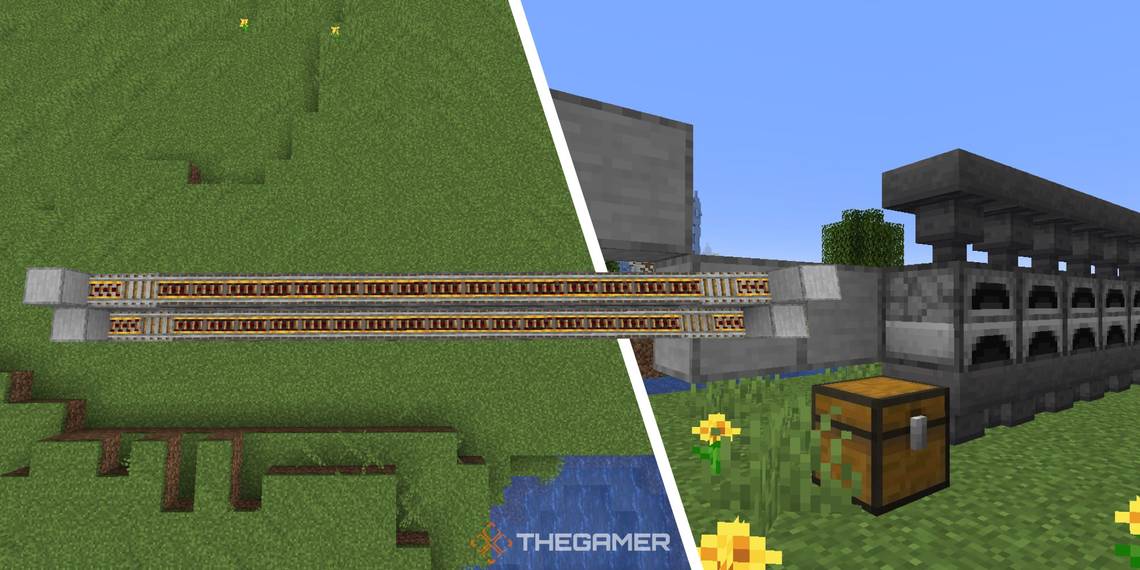
On top of each hopper, place a powered rail. Each row of hoppers should have two building blocks exposed. In the block closest to the hoppers, place a normal rail. Continue to place four rails to 'frame' in the hopper/powered rail space.
In the remaining four spots, place powered rails. This layout can be seen above. Overall, you will use 26 powered rails and four normal rails.

Step Six
Since this build supports an even number of furnaces, there is no middle point. From the backside, you will place a building block as close to the middle as you can get. This should be one space above the powered rail on the bottom row of hoppers.
On the back of the building block, attach a lever. Flip this lever to turn on the powered rails that sit on top of the hoppers. This lever will remain 'on' forever (or until you don't want the smelter anymore).

Step Seven
Now, go to the side of the build without the chest. From the backside, you will place two additional levers on the blocks farthest to the left.
Flip both of these levers. These will ensure that the minecarts will return to the start of the super smelter. Make sure that the levers always stay 'on'.

Step Eight
Return to the side of the super smelter with the chest. On the two blocks farthest to the left, place two double chests.
The first chest should be on top of the building block, and the double chest extension block should be placed going over the powered rails.

Step Nine
You're almost done! Place two levers on the block underneath the first powered rail, as shown above.
Finally, place two minecarts with a hopper on top of the two first power rails. When you flip the switches, the minecarts will run along the rails, dropping material and fuel into the furnaces.
To turn off the super smelter, just flip the levers. You do not have to worry about timing the levers with the minecarts. Since the end power rails are activated, they will send the minecart back to you.
The super smelter should be done now! Place smeltable material in the chest closest to you, and fuel in the back chest. The materials will drop into the minecart. When you flip the levers to turn on the smelter, the minecarts will move across the hoppers, dropping down material and fuel.
You can add two signs near the chests to indicate one for fuel and one for smeltable material, but this is optional.
In total, you will be able to smelt from 16 different furnaces at the same time. This is perfect for smelting a large amount of ore, stone, or netherrack. Use all of your new material to make farms and expand your base!
More Tips For Crafting A Super Smelter

Crafting a Super Smelter can seem like an incredibly difficult task, especially for new players, but it's not nearly as complicated as it seems. The process of creating the actual smelter can be done relatively easily, step-by-step. It's arguably harder to collect all of the materials required to build the device since players will need a lot of Hoppers and Furnaces. Here are some tips that can make farming for the materials a bit easier.
- Many of the items needed for the Super Smelter can be found in abandoned mines or dungeons.
- Locating a Mesa Biome will make things a lot easier thanks to an abundance of abandoned mines.
- Many abandoned mines will give players powered rails, minecarts, and chests.
- Mesa Biomes are also filled to the brim with gold ore, making it much easier to gather the materials to create powered rails.
- Players will need 128 pieces of Cobblestone to make the 16 furnaces needed for the Super Smelter. This will likely be gathered organically if looking for gold.