In a career defined by strange projects, Yoko Taro's Nier Automata is surely in the running for strangest of them all. Developed by PlatinumGames and published by Square Enix, the essence of both companies is visible in the finished product. This is a high-octane action RPG with thoughtful themes strewn throughout, as keen on well-timed counterattacks as gripping characterization.
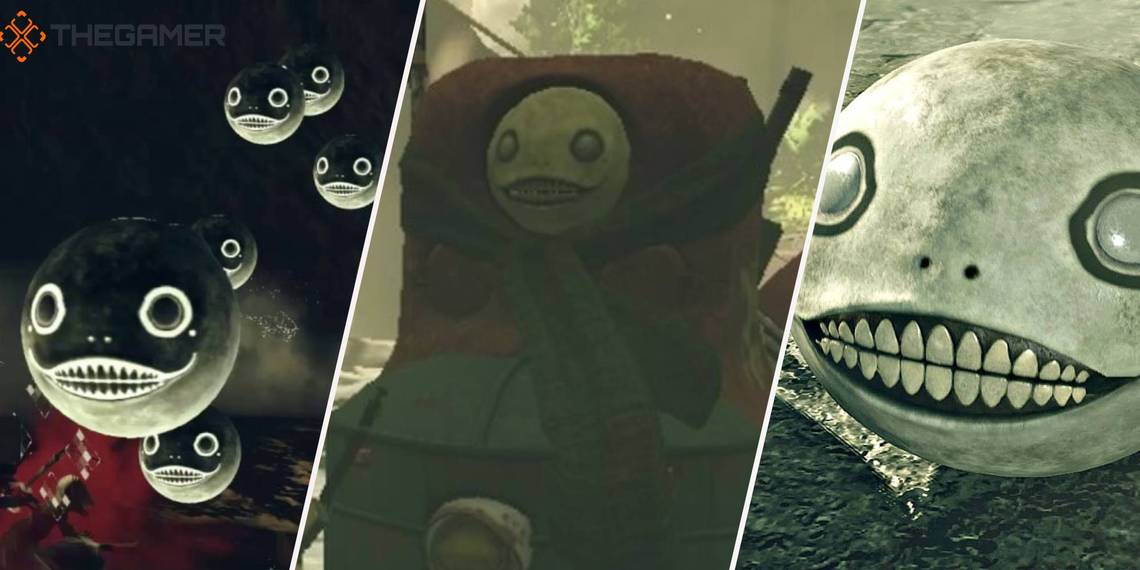
Nier Automata is also the long-awaited sequel to 2010's excellent Nier. The ties that bind these two together are all but invisible at first — but dig deep enough and everything begins to click. One of the most overt examples comes in the form of Emil, a major character in Nier whose welcome return in Automata starts with a perky shopkeeper and concludes with a bang.
That bang comes in the form of a difficult optional boss encounter. Succeed, and you'll obtain the coveted Naughty Children trophy. Fail and, well, try again until you succeed. But with our guide by your side, that shouldn't be an issue.
Note that in order to complete these quests, you must finish the main story at least once to gain 9S as a playable companion.
How to Unlock and Complete Emil's Memories

The first step to earning the Naughty Children trophy is to initiate the 'Emil's Memories' quest. Players with a vested interest in learning more about Emil, as well as the wider world of Nier itself, should have a fine time of things.
Perhaps it's more accurate to say the true first step happens a tad before even that. Meeting Emil, and getting a bit acquainted with him, must take place before the tired truck formally requests your assistance. You can do this at any point after completing the main quest 'The Forest Kingdom'.
Once that's been taken care of, ask Pascal about A2 and then travel to the City Ruins' desert entrance. Your goal here is to shoot Emil. Don't worry, he's used to it. Have a chat with the poor guy. Now venture over to the Near the Tower access point (still at the City Ruins, in case that's not clear), and head toward the Commercial Facility en route to the Forest Region.
A pretty little flower will be sparkling on the ground ahead of you. Approach it. Emil will soon appear, and 'Emil's Memories' will commence in earnest.
Your objective is to collect five Lunar Tears. Their general proximity will be illustrated on the map as large red blotches, but Nier Automata's packed with art assets at every turn. If you'd prefer to get down to business, here's where you'll find each one:
|
Tear Number |
Location |
Notes |
|---|---|---|
|
1 |
Shopping Mall |
Check behind the escalators close to the main entrance. |
|
2 |
The Park Ruins |
Follow the zone's central path, hanging a right toward the vending machine. Look behind it. |
|
3 |
Forest Area |
Travel to the Center access point. Head south past a river. Turn right just prior to the large waterfall, and you'll find a cave with this Lunar Tear inside. |
|
4 |
Desert Area |
Head to the Desert: Camp access point. There's a rather large hill covered in rocks, towering above the rest of your surroundings. You'll find a cave here; jump inside the hole and meander your way through until you're back at the surface level again. Parkour your way ahead en route to a dead, withered tree. To its west is the fourth Tear and a locked chest. |
|
5 |
Flooded Coast |
Go to the Flooded Coast: Coast access point and then begin traveling south. At the end of the platform with the flight units, check the mud in front of the cracked concrete. |
Satisfied with your service, Emil will hand you the Elevator Key. Time to swing by Emil's house with it. As 9S, warp to City Ruins: Center and seek the sizable sewer pipeline nearby. You can't miss it; not only is it large, but water is constantly spilling out of it. Throw caution to the wind, jumping right into it, leading to City Ruins: Deep Cave.
There's plenty to pilfer here, but the important part is that you steal one of Emil's masks. Do that, and you're in good shape to continue your strange journey toward Nier Automata's Naughty Children trophy.
How to Battle and Beat Emil

So, you're a naughty child now. Naughty children like you should head to City Ruins: Center, where you will find Emil driving around in circles near the exit to the desert. According to him, a bandit has been stealing stuff from his house. Odd, that.
Return to Emil's house. A treasure chest is here now, and naughty children know to open treasure chests no matter any moral and ethical issues. Go ahead and hack the chest. On your way out, an anguished Emil decides you're in need of some prime punishing.
Emil is level 99. He shoots lasers all over the place, spinning his body around in wild circles all-the-while for a nightmarish degree of environmental coverage. He even fires dozens of copies of his own head; they bounce around the cave and eventually, invariably, explode.
Hacking Emil is doable, and some players have reported that this is the surefire path to victory. On the other hand, many players find that the degree of difficulty involved in doing so outweighs the challenge of a traditional approach. If you're struggling, give hacking a whirl, but don't feel discouraged if it doesn't seem like your cup of tea for this fight.
Stay close to Emil throughout the encounter. His physical melee maneuvers are much easier to evade than his long-range arsenal. Nier Automata's harder fare frequently boils down to timing; try to time as many dodges as possible so that you can unleash powerful counterattacks in their wake.
The raw power Emil demonstrates at level 99 makes it all but impossible to keep up unless you've reached at least level 70 or so. Higher is, predictably, better — aim for 80-85 for a much easier bout.
Ancient Overlord Level 4's second ability, Bullet Rupture, can be a lifesaver here. If all those floating, exploding heads seem liable to tear 9S to shreds, tapping into Bullet Rupture's considerable area-of-effect power will knock them all down.
Get ready to obliterate Emil when he's low on HP. Once he's in critical condition, his rapid spinning will go into overdrive. You have a handful of seconds to finish the job before the Ray of Death attack does its dirty work. The good news is, this shouldn't prove too difficult if you've managed to survive up until this point. Just don't, you know, randomly let up on the assault now.
With Emil's reserves thoroughly exhausted, that promised punishment for 9S is simply never going to happen. Tough break, friend. The Naughty Children trophy, as well as the unique weapon Emil's Hands, are both yours for the taking.