Fishing is a great way to earn some money in Nier: Automata and is also required for accolade hunters wanting to earn the "A Round by the Pound" trophy/achievement received for catching 20 different kinds of fish.
Additionally, fishing is the only way to find two special items in the game — the Iron Pipe small sword weapon and Pod B. If you're looking to ensure you catch every kind of fish to get 100% intel, or you want to know what to fish to earn the best money, we've got a handy guide for you just below about where to find every fish and item in the game.
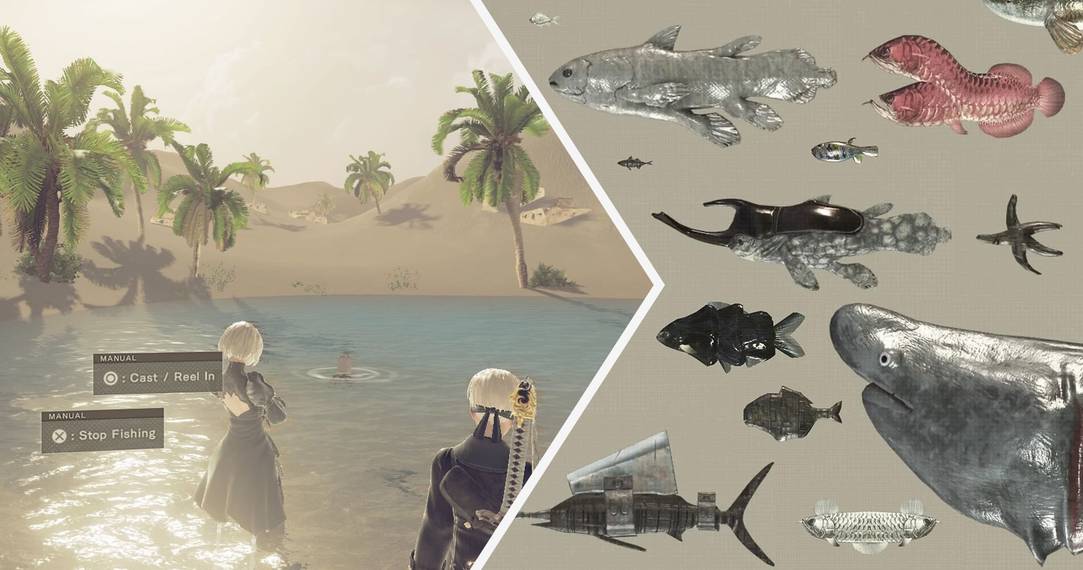
How to Fish

Regardless of which android you are playing as you can fish at specific bodies of water throughout the game by using your faithful pod companion. A prompt will appear on-screen whenever you are able to fish, and you can begin fishing by using the action button, then choose where you want to cast your pod by moving the reticle that appears.
Be sure to keep your pod in view while it is fishing, as you need to be aware of when it dips below the water or suddenly goes against the current to know that you have a catch. Tap the action button to reel in your catch and discover what your pod has caught for you.
Locations Where You Can Fish

There are various places that you can fish during your travels, so just below we've made a handy guide about each area and the different kinds of fishing holes you can find, including tips on where they are for the most obscure ones.
- City Ruins Streams/Waterfalls
- City Ruins Ravine — the ravine under the wooden bridge near the Tower Access Point
- City Ruins Sewers — in the sewers that connect the City Ruins to the Amusement Park
- City Ruins Underground Lake — the body of water found next to Emil's house
- Desert Zone Oasis — just past the Center Access Point
- Desert Zone Oil Field — the giant oil spill next to the Desert Oil Field access point
- Amusement Park Bridge
- Forest Zone Waterfalls/Rivers
- Forest Zone Castle Front
- Flooded City Waterfall/Pond — near the Coast Access Point
- Flooded City Missile — near the missile (the location for the Missile Supply Mission) with many players recommending the waterfall area near the missile
- Flooded City Coast — there are a few coastal areas, but you should always fish near the submerged buildings to ensure you can also get the rarest catches
Fish/Items You Can Catch

There are 41 different types of fish in the game that you will need to catch if you want to get 100% intel, but you only need to catch 20 different kinds for the "A Round by the Pound" accolade. There are also two additional special items that you can catch, a weapon and a pod, but neither of these count towards the fishing achievement/trophy.
Like most games, your catch is entirely dependant on RNG, so even if you are in the right location, it might take you quite a while to land the fish you're after. Perseverance is the key.
Arapaima — 4,000G
- Forest Zone Waterfalls/Rivers
- Forest Zone Castle Front
Arapaima Machine — 4,000G
- Amusement Park Bridge
- City Ruins Ravine
- Forest Zone Waterfalls/Rivers
- Forest Zone Castle Front
Arowana — 1,500G
- City Ruins Underground Lake
- Desert Zone Oasis
- Forest Zone Waterfalls/Rivers
Arowana Machine — 2,000G
- City Ruins Ravine
Basking Shark —6,000G
- Flooded City Missile
Basking Shark Machine — 6,000G
- Flooded City Missile
Battery — 1,500G
- City Ruins Sewers
- Desert Zone Oil Field
Beetle Fish — 7,500G
- Desert Zone Oasis
Bloat Fish — 2,500G
- City Ruins Underground Lake
Bloat Fish Machine — 3,000G
- City Ruins Ravine
- Desert Zone Oil Field
- Forest Zone Waterfalls/Rivers
- Forest Zone Castle Front
Blowfish — 2,000G
- Flooded City Missile
- Flooded City Coast
Blowfish Machine — 2,000G
- Desert Zone Oil Field
- Flooded City Missile
- Flooded City Coast
Bream — 3,000G
- Flooded City Missile
- Flooded City Coast
Bream Machine — 2,000G
- Desert Zone Oil Field
- Flooded City Missile
- Flooded City Coast
Broken Firearm — 1,500G
- City Ruins Sewers
- Amusement Park Bridge
Carp — 1,000G
- City Ruins Streams/Waterfalls
- City Ruins Ravine
- City Ruins Underground Lake
- Desert Zone Oasis
- Amusement Park Bridge
- Forest Zone Waterfalls/Rivers
- Forest Zone Castle Front
- Flooded City Waterfall/Pond
Carp Machine — 2,500G
- City Ruins Streams/Waterfalls
- Desert Zone Oil Field
- Forest Zone Waterfalls/Rivers
- Forest Zone Castle Front
- Flooded City Waterfall/Pond
Coelacanth — 3,500G
- Flooded City Missile
- Flooded City Coast
Coelacanth Machine — 3,500G
- Flooded City Missile
Freshwater Ray — 4,000G
- Amusement Park Bridge
Freshwater Ray Machine — 5,000G
- Amusement Park Bridge
Fur Carp — 3,000G
- City Ruins Ravine
- Forest Zone Waterfalls/Rivers
- Forest Zone Castle Front
Gas Cylinder — 1,500G
- City Ruins Ravine
- City Ruins Sewers
- Forest Zone Waterfalls/Rivers
- Forest Zone Castle Front
Horseshoe Crab — 1,500G
- Flooded City Coast
Horseshoe Crab Machine — 1,500G
- Flooded City Coast
Iron Pipe (Small Sword Weapon)
- City Ruins Sewers
Killifish — 1,000G
- City Ruins Streams/Waterfalls
- City Ruins Underground Lake
- Desert Zone Oasis
- Desert Zone Oil Field
- Amusement Park Bridge
- Forest Zone Waterfalls/Rivers
- Forest Zone Castle Front
- Flooded City Waterfall/Pond
Killifish Machine — 500G
- City Ruins Streams/Waterfalls
- Forest Zone Waterfalls/Rivers
- Forest Zone Castle Front
- Flooded City Waterfall/Pond
Koi Carp — 2,500G
- City Ruins Streams/Waterfalls
- City Ruins Underground Lake
- Desert Zone Oasis
- Amusement Park Bridge
- Forest Zone Waterfalls/Rivers
- Forest Zone Castle Front
- Flooded City Waterfall/Pond
Koi Carp Machine — 2,500G
- City Ruins Streams/Waterfalls
- Desert Zone Oil Field
- Amusement Park Bridge
- Forest Zone Waterfalls/Rivers
- Forest Zone Castle Front
- Flooded City Waterfall/Pond
Machine Lifeform Head — 7,500G
- City Ruins Streams/Waterfalls
- City Ruins Underground Lake
- Desert Zone Oil Field
- Amusement Park Bridge
- Forest Zone Castle Front
- Flooded City Missile
- Flooded City Coast
Mackerel — 500G
- Flooded City Missile
- Flooded City Coast
A mackerel can also be received from the NPC Jackass, and if the player consumes the fish it will result in Ending K.
Mackerel Machine — 500G
- Desert Zone Oil Field
- Flooded City Missile
- Flooded City Coast
Oil Sardine — 3,500G
- Desert Zone Oil Field
Pod B
- Flooded City Missile (is the recommended area)
Starfish — 1,000G
- Flooded City Coast (near submerged buildings only)
Starfish Machine — 1,000G
- Desert Zone Oil Field
- Flooded City Coast
Swordfish — 5,000G
- Flooded City Missile
Swordfish Machine — 5,000G
- Flooded City Missile
Tire — 1,500G
- City Ruins Sewers
- Flooded City Missile
- Flooded City Coast
Twinfish — 2,500G
- City Ruins Underground Lake
Twoface — 2,000G
- Flooded City Missile
- Flooded City Coast
Water Flea — 500G
- Flooded City Missile
- Flooded City Coast