Shortly after your first visit to the desert city Facade in Nier Replicant, you will be tasked with traveling to the Barren Temple in order to save the prince. You'll be led to this new location by Fyra, but once you're inside the temple, you'll be on your own.
The Barren Temple has a series of puzzle rooms that you must complete while obeying the set rules laid out in each one. You'll largely be following a linear path to the next room as you complete each one. Just below is a breakdown of the rules and solutions to each trial room.
The objective in each one is to reach and destroy the pink/red glowing cube on the other side of the room. If you break any of the rules while trying to achieve this, or get hit by a projectile, you will get sent back to the beginning of the room and have to start again.
Note: Blocks that shoot projectiles can be destroyed by attacking them or jumping on top of them, but they reappear a few seconds later.
Barren Temple First Trial

Prohibited Actions:
- Leaping Rabbit (You're not allowed to jump)
As the Leaping Rabbit rule is in place, you cannot jump in this first room. However, it's easy to complete.
- Move the first block you can push to block the projectiles on your left.
- Push the next movable block forward to access the next section.
- Avoid the projectiles, grab the northernmost movable block and pull it down and to the right, so it is blocking the projectiles firing northwards.
- Push the next moveable block to the right so you can get into the next section.
- In the next area, when it comes to the two blocks next to each other, pull the right one down and then left to block the projectiles.
- Then push the left block left to get into the next section.
- Dodge the projectiles and attack the pink/red cube to complete the room.
Barren Temple Second Trial

Prohibited Actions:
- Leaping Rabbit (You're not allowed to jump)
- Stationary Owl (You're not allowed to stand still)
This room is very easy. Just run forwards, dodging the projectiles, and attack the glowing block are the far end of the room. You can attack the blocks to destroy them if you want, but we found this room easy enough to dodge.
Barren Temple Third Trial

Prohibited Actions:
- Racing Wolf (You can't run)
- Evasive Mouse (You can't use your evasion roll)
- Magic-Spewing Bat (You can't use magic)
This third puzzle room in the Barren Temple is the one stumping people. Despite not saying you can't guard, if you attempt to guard and move forwards toward the end of the room, you'll get warped back to the beginning as soon as you stop guarding.
You must move carefully in this room, nudging your analog stick only a little so that your character is walking and not running the entire time.
What you want to do is head to the row of blocks on the left and either jump over them or walk behind them if possible. You'll need to dodge/time crossing a couple of the projectile streams, then you can just slowly walk over towards the glowing box and destroy it.

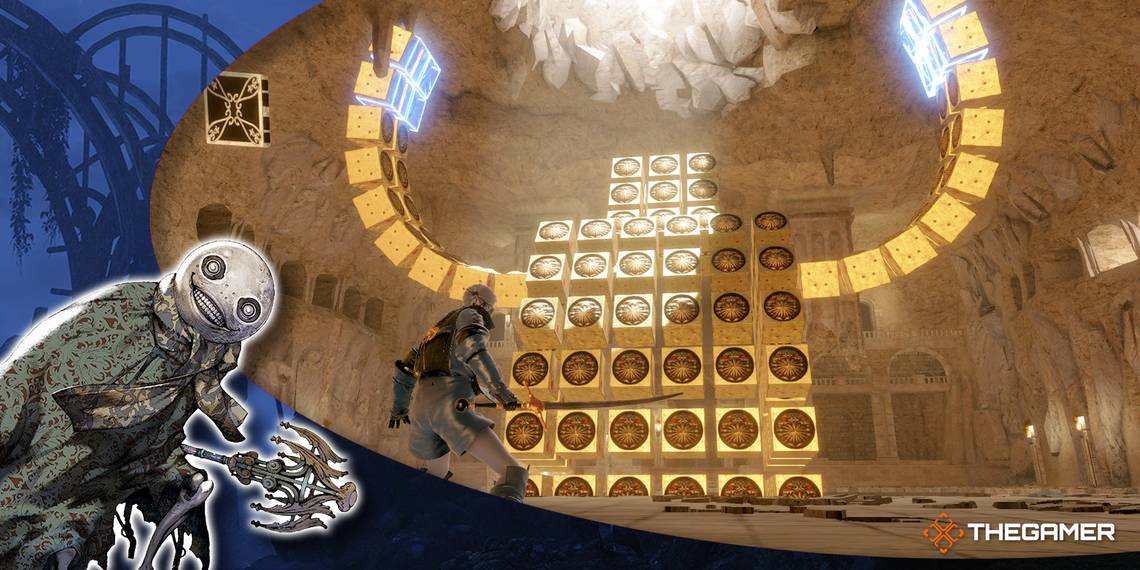
Barren Temple Fourth Trial

Prohibited Actions:
- Protected Turtle (You can't guard)
- Magic-Spewing Bat (You can't use magic)
There are a bunch of movable blocks in the center of the room, so position these in a diagonal line as far as you can to block the projectile streams. The block on the far right needs to be pushed forward at least once and then align the rest diagonally, as shown above.
After that, you can simply jump onto the upper left block you have positioned, then jump over the projectile streams to get to the glowing box and destroy it.

Barren Temple Fifth Trial

Prohibited Actions:
- Evasive Mouse (You can't use your evasion roll)
- Magic-Spewing Bat (You can't use magic)
This room is easier than it looks, you can jump onto the blocks and avoid projectiles that way. Jumping on the blocks on the left-hand side of the room seemed to be a better route for us. If you have to jump down, just be careful of projectiles.
Remember, jumping on the projectile-spewing blocks will make them disappear, so move fast. They will reappear shortly after being destroyed.
Once at the glowing block, destroy the nearest projectile box to you in order to stop it from getting you, and then quickly destroy the glowing box.
Barren Temple Sixth Trial

Prohibited Actions:
- Blade-wielding Tiger (You can't use your sword)
Move around the room shooting all of the glowing boxes with your magic skills while avoiding projectiles. It's not as hard as it looks, just keep your character moving or in safe spots.
Barren Temple Seventh Trial

Prohibited Actions:
- Evasive Mouse (You can't use your evasion roll)
This room challenges you to defeat shades instead of solving box puzzles. It's really straightforward, you just can't use your evasive roll move.
Barren Temple Boss

Finally, you're done with annoying trial rooms, but now you have a boss to defeat. If the puzzle rooms taught you anything, it's to aim for the red/pink glowing boxes!
Keep destroying the red glowing boxes until all of the boss's rings are depleted. This will then make the boss change form. Initially, you can't really do much damage to it, so try and avoid its moves until Kaine returns.

Once Kaine has rejoined the fight, simply continue targeting the glowing red squares as they appear to whittle down this boss's HP and defeat it.