After completing the quest Radio Free Monarch in The Outer Worlds, a cut scene will be prompted of a ship crash landing in the distance on the current planet, Monarch. Radio intermissions will be interrupted by both leaders of groups MSI and the Iconoclasts in an attempt to persuade the player to help either of them get what they want most. The targeting module from the gunship.
"A UDL gunship has crashed on Monarch, and both MSI and the Iconoclasts desperately want it."
8 See Where The Ship Lands

Before the player makes any big decisions, it's best to check out what all that ruckus was about. The gunship crash lands in an unmarked area. The closest travel point is Terra One Publications. From there the player walks by foot.
"This targeting module controls the gunship's weapons system. Without it, the ship is effectively useless in combat. So much power in something so small."
On the way there, encounters from Rapidon's can be found at each corner. Traveling through the newfound sulfur pits will lead you to the UDL gunship.
7 Retrieve The Gunship's Targeting Module

When standing at the gaping hole made within the ship, also the only entrance, any equipped companions inform the player that they will wait outside while the targeting module is retrieved.
The companions' choice to be left behind may seem a little sketchy, but no guns need to be drawn inside the ship. Inside, the ship is lopsided (which may make some players motion-sick) and tight-knit. All the player has to do is interact with the first terminal and then continue forward until you find the module. Take it and leave.
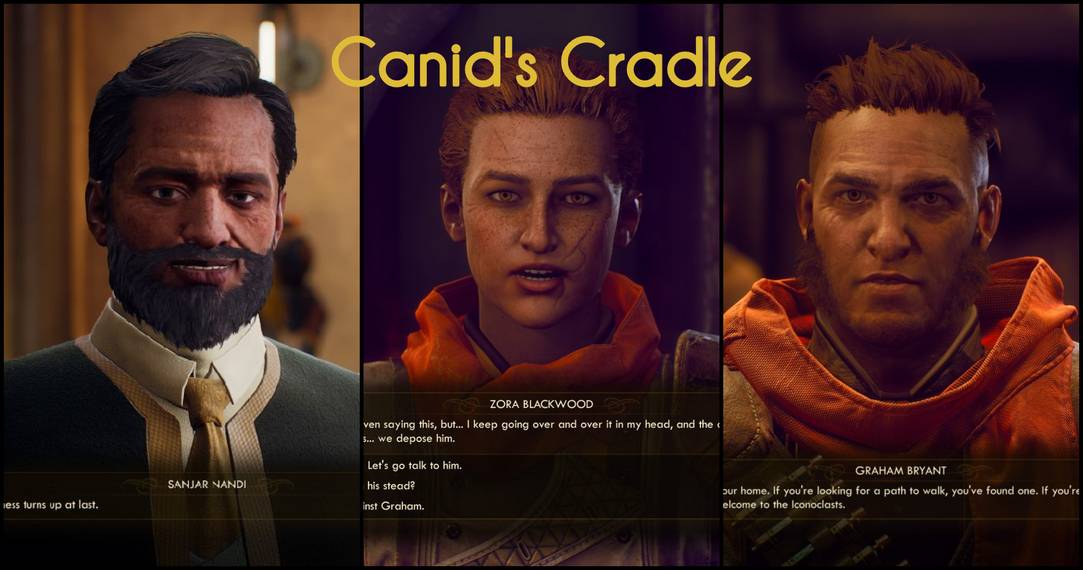
6 (Optional) Give The Targeting Module To Sanjar

Sanjar works for the Monarch Stellar Industries (MSI). He has a bright future of freedom in the galaxy, focusing on democracy. The MSI used to be under The Board and Sanjar used to work for them. He was a very loyal employee to The Board and wants to focus on worker-rights without destroying what's already been in place.
Giving Sanjar the targeting module means that the MSI have power and hold on all of Monarch to do with what they will.
5 (Optional) Give The Targeting Module To Graham

Graham founded the Iconoclast movement himself and is its main leader. He focuses heavily on spreading the word of the Iconoclast movement like a virus at any cost whatsoever. Even if men have to unnecessarily die for it. Upon further investigation the player can find out Graham was the cause of the Amber Heights massacre.
Giving the targeting module to Graham means that he has control over both Stellar Bay and Amber Heights for his own plans to spread the Iconoclast message even further.
4 (Optional) Give The Targeting Module To Zora

Zora is Graham's right-hand-man and medical professional for the Iconoclasts. The two of them have been butting heads on what should be priority for the group. Zora believes that people's lives matter and their soldiers shouldn't be constantly used as expendable messengers for the sake of spreading the good word.
Giving the targeting module to Zora means that Graham has been disposed of and she is the lone leader of the Iconoclasts. Zora will have the power over Monarch to go on about her plans for the Iconoclasts as she sees fit.
3 (Optional) Have The MSI and The Iconoclasts Negotiate

Arguably the better option due to less bloodshed and negativity, the MSI and Iconoclasts can agree to work together in peace and harmony. For this option the player has to be able to convince both parties using previous found information and persuasion. Sanjar and Graham have a past, but making Zora negotiate with him instead is the key.
To do this, the player has to prove to Sanjar that Zora has reputable work behind her. The player must read a terminal in Cascadia to have proof of Zora's past work. Sanjar will be satisfied with working with Zora then, but Zora must be in control of the Iconoclasts to make any decisions in the first place.
To put Zora in charge, the player has to have helped Zora before Canid's Cradle. They then must help her some more. Helping her more means, after speaking to Sanjar about negotiating, Zora gives the player a new quest seeking supplies and information. This reveals that Graham was responsible for the Amber Heights massacre. The player must give Zora some space to reflect. After this, she confronts him which results in Graham's death and her leadership.
The only way to proceed after all of that is to have about 55 in Persuasion to keep the two going until the end of the negotiation. The targeting module stays with the player which can be sold. The MSI and the Iconoclasts share Monarch.
2 Siding With The MSI

Choosing to give the module to Sanjar and side with the MSI means that every Iconoclast met afterward will be hostile. Though the player is not forced to go to war and kill every single Iconoclast, they themselves will attack if they see you.
Going back to Amber Heights means one more massacre for the town.
1 Siding With The Iconoclasts

If the player chooses to give the targeting module to either Zora or Graham, you are forced to get rid of Stellar Bay's force and leader. They want Stellar Bay and Monarch. Without pursuing negotiation, Sanjar won't just give up all he's created.
The player must kill Sanjar and his associates during the quest, leaving Stellar Bay in bloodshed for the Iconoclasts to clean up and take.