Quick Links
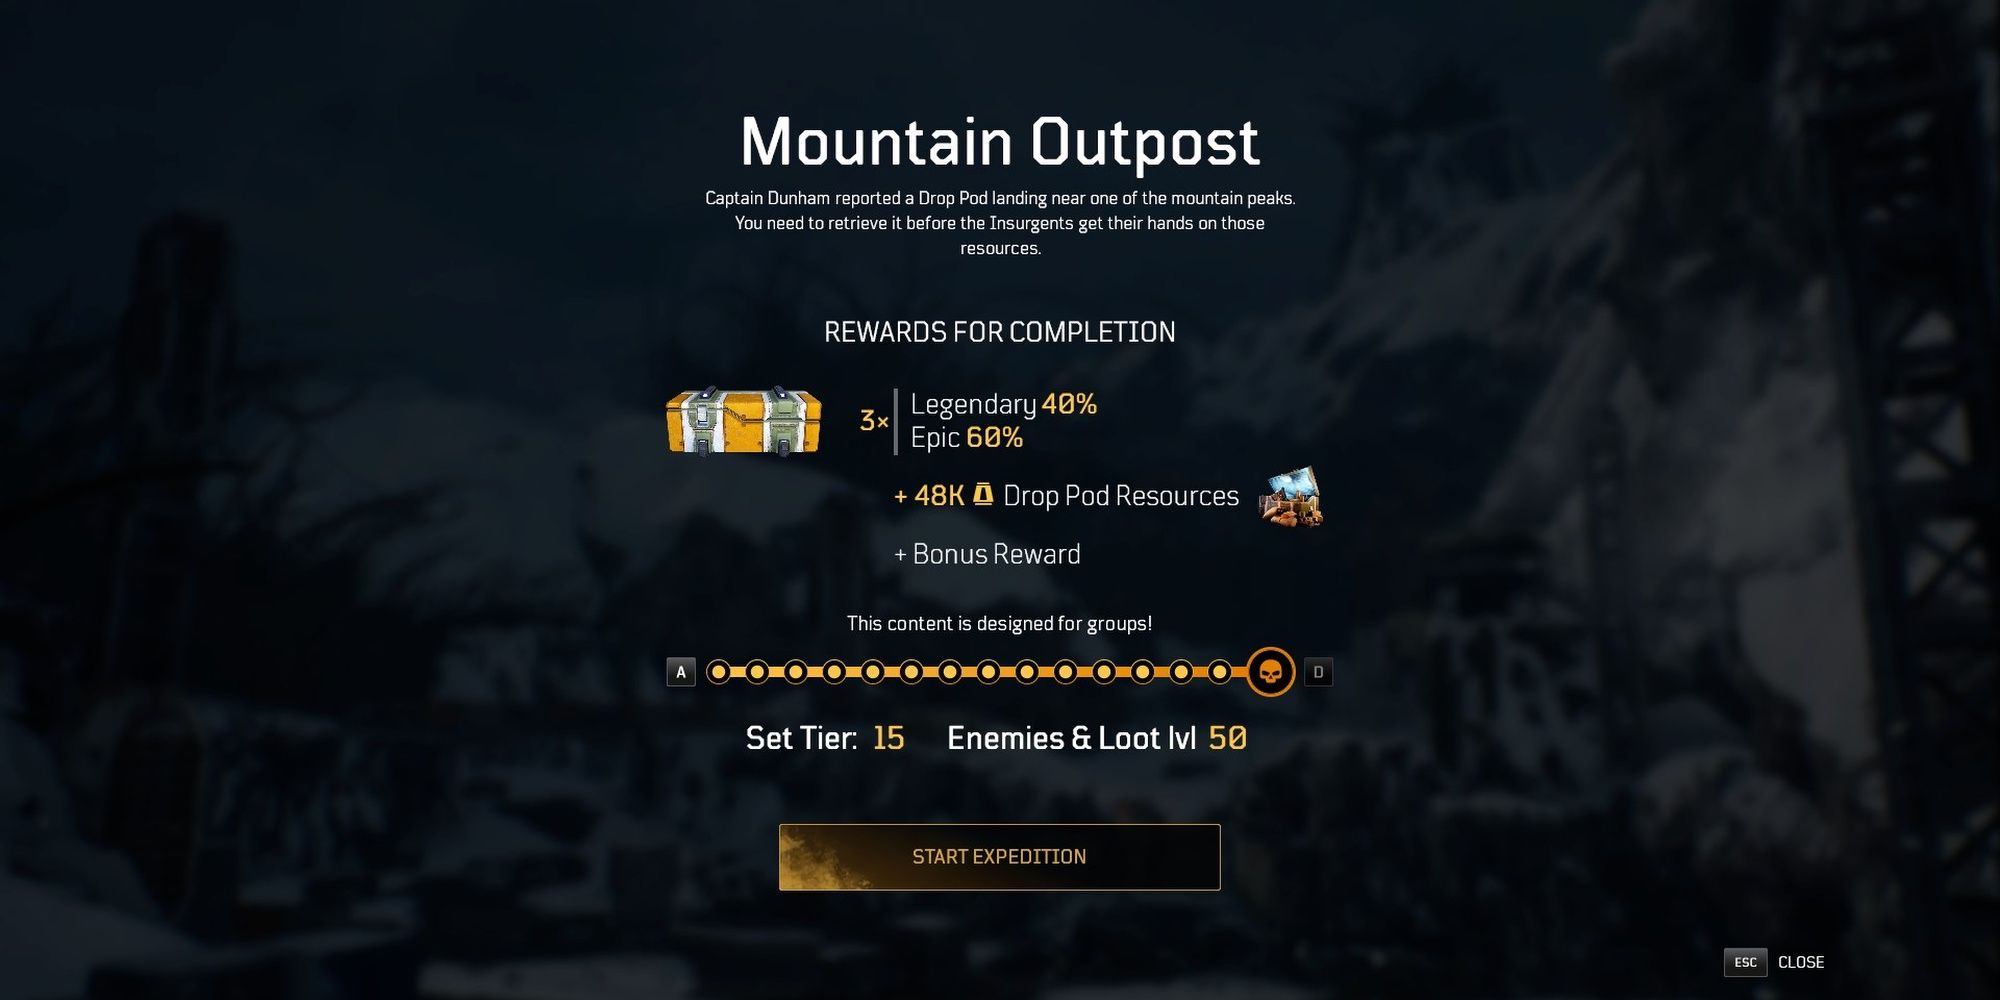
Mountain Pass is one of Outriders' longer Expeditions. Tasked with defeating a boss at the top of a mountain, players will have to bring strong builds that can clear hordes of enemies quickly if they wish to farm this mission.
While it can be tough for certain builds, Mountain Pass shouldn't be too hard to clear on higher Challenge Tiers. Those that haven't cleared this mission before will want to know of a few things before they dive in, mostly which enemies you'll be facing. Bring some crowd control weapons; you're going to need them. Here is a complete guide to the Mountain Pass Expedition in Outriders.
Updated December 5th, 2021, by Charles Burgar: The removal of timed Expeditions has made Outriders' endgame much more relaxed. The floodgates for strange, more niche playstyles have opened up. To help reflect the changes made in New Horizon, we've updated this guide to include the new loot drop percentages and suggest some good skills and mods that will make the Mountain Pass Expedition a little bit easier. Some organizational changes were also made to make navigating this article a little easier.
Mountain Outpost Enemies
The first encounter consists of Insurgents, although every encounter afterward contains Beasts. Crowd control is especially important here, as Beasts tend to swarm you in large numbers. Screechers and Alpha Perforos are also common enemy types in this level, so a mid-range weapon is highly recommended.
Recommended Skills and Mods

Devastator
Gravity Leap should be equipped for this mission. There is plenty of empty space and ranged enemies that can easily kill you. Impale isn't a bad idea to stay alive during the latter half of this mission, especially during the final boss fight.
Pyromancer
F.A.S.E.R. Beam has room to breathe in this mission, provided you have some form of crowd control to deal with the Alpha Perforos. Ash Blast and Overheat can easily take care of that for you.
Technomancer
Blighted Rounds is the way to go as a Technomancer, especially for this mission. Use a Tactical Rifle to burst down just about every enemy you'll stumble across. You don't have much cover for this mission, so either keep your distance or play aggressively.
Trickster
Temporal Blade is a good choice for this mission, killing most Beasts that charge you. To help deal with flying enemies, you might want to use Venator's Knife or use a weapon infused with Twisted Rounds. Anomaly and Firepower builds should do just fine here, provided they stay aggressive.
Mods
Snowsquall is an excellent mod for this mission, allowing you to freeze every enemy you've damaged upon reloading. Bullet mods that Freeze or inflict Ash are also great for adding some crowd control to your build. AoE weapon mods like Shadow Comet deal solid damage here as well. For armor mods, Mitigation from Death is a solid pick for enhancing your survivability.
Insurgent Base

Right as you enter the base, you'll be faced with a few fodder Insurgents and a couple of Breachers up the hill. Be careful during this section. There's a Marksman nested in a tower to your right. If you have a rifle or any long-range weapon, take him out before you proceed.
Rush up the hill to take out the Breachers and other Insurgents. Waves of enemies will spawn on top of the hill, near the bridge, and one or two odd Breachers will flank you from the base of the hill. Kill the flanking enemies first, then run back up the hill to take out the rest.

Three Elites will break a wall shortly after you kill everyone. These units are rather tough and love to chain slams if you get too close. Focus your damage on one at a time, preferably the Cremator since you can detonate his fuel canister. Past the trio, waves of Insurgents will spawn directly across from you and near the sniper tower. Either stay near the wall for cover or push them head first, killing any Elites that pose a threat. A Captain will spawn near the sniper tower during this part, so prioritize killing him before it inflicts a deadly status effect on you. Defeat all of the enemies, run to the waypoint, clear out the small pack of Insurgents, then start the generator to make your way up the mountain.
Mountain Path

Right as you start the generator, a wave of Beasts will start to charge you. The Alpha Perforo can stunlock you if you aren't careful. If it starts to leap at you, don't roll. Melee instead. Meleeing makes you immune to staggers during the animation, making it a better alternative to rolling past an enemy-seeking attack. Regardless, kill the Perforos, push forward, kill the second wave, then destroy the debris pile to reach the next proper arena.

After a brief cutscene, you'll be facing a wave of Perforos. Most of them are fodder, so this shouldn't take long to clear. The second wave is much harder, consisting of three Crawlers. These Crawlers can easily kill you if you aren't careful. Focus on killing them first. When this wave is dealt with, clear out the rubble at the end of the path.
Near The Apex

On your way to the mountain's apex, an Alpha Perforo and smaller Perforos will charge you. Clear them out, then continue forward. Head straight to your right.
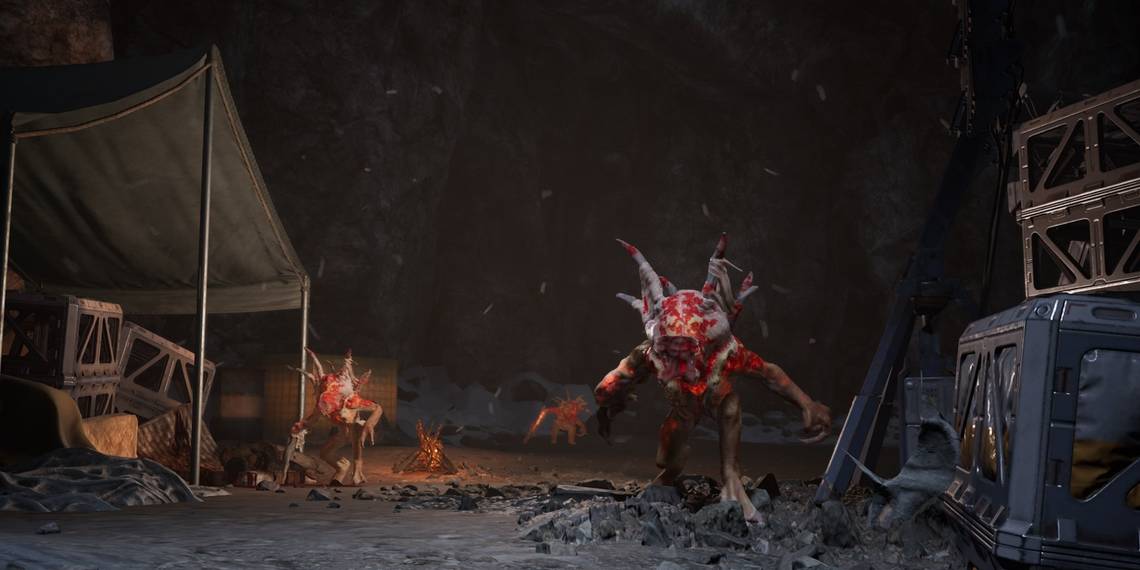
A Brood Mother will spawn alongside a wave of Maulers and fodder Perforos. This Brood Mother should be your top priority. There isn't much cover to work with here, so crowd control and raw damage are your only means of taking it down.
Past that wave, you'll have to face a multitude of Screechers and other Beasts. These Screechers apply a substantial amount of pressure with their AoE attacks, so try to take them down first. If you're a close-range build, shoot them a few times while they're flying. When they take enough damage, they'll be forced to land. Clear out the waves to unlock the path to the apex.
Apex

This encounter combines the tough aspects of previous encounters, pitting you against Crawlers, Screechers, and Alpha Perforos simultaneously. The first wave is a few Alpha Perforos, although the second wave consists of Screechers and Crawlers. Clear these enemies out as soon as possible. Quite a few enemies will spawn during this section, but you have quite a large area to work with. Creating distance isn't a bad idea; just be ready to counter Crawlers when they try to freeze you.
Boss Fight

You'll have to kill a Behemoth and accompanying Beasts to beat this mission. The Behemoth boss is nothing special, using the same charge attacks you've seen in previous Expeditions. The boss will immediately attempt to charge you. Use an interrupt to stun it briefly. It has a fairly high amount of armor, so consider using Anomaly damage against this boss.
If you can't kill the Behemoth quickly, focus on killing the Screechers instead. These birds will make it near impossible to position yourself. The easiest way of killing the Behemoth is to shoot it from the back. Besides a telegraphed kick attack, it will have to turn around before it can hit you. As with the Alphas, remember to use your melee attack to make yourself stagger immune when the boss tries to knock you down. Kill every Beast in the arena to finish the mission.