Quick Links
Roki is an adventure game that follows Tove, a young girl who travels fairytale lands searching for her younger brother that an ancient monster of legend has kidnaped. Throughout Tove's journey, she must overcome challenging puzzles and fight formidable foes looking to stop her in her tracks.
This guide will cover the back half of Roki's third chapter, which involves finding Keystones for the Sundial, solving the Sundial puzzle itself, and the game's finale. As expected, there will be story spoilers near the end of this guide due to it being the last area of the game. However, we tried to avoid any spoilers up until the Forest Walkthrough section!
Keystone Locations

Most Keystones are found on the critical path throughout The Raven Castle but require you to solve the other puzzles throughout the castle, making the Sundial puzzle best left alone until everything else gets completed. While it is possible to obtain every Keystone then beeline directly to the Sundial, ignoring everything else, we strongly advise against it!
With that said, the following guide will focus on where to find the Keystones and solve the Sundial puzzle, but with the assumption that you have followed the first half of our Roki: Chapter 3 walkthrough. If you have yet to do so, some areas, terminology, or items may be unavailable to you.
Dusk Keystone

After getting past the two gates and gaining access to the castle's courtyard (complete walkthrough here), you will see a climbable wall to the left of the main castle gate. Climb the wall as Tove, then walk to the right to find yourself in the Tower Room.

There will be a dead vulture on the ground with a spear underneath it. Grab the spear, then make your way back down the wall and to the well in the courtyard. Once there, switch to Hendrik and use the spear on the well's grate to pry it open.

Next, switch to Tove and climb down the well. Once at the bottom, turn to the left and search the bucket behind you to obtain the Dusk Keystone! After grabbing the Keystone, make your way to the Sundial for the next steps.
Midnight Keystone Location

Once you reach the Sundial for the first time, you will see stairs to the right of it, leading up to the castle's wall. This area is where the Vulture Cage puzzles start (Vulture walkthrough). Switch to Hendrik and look for a crate beside a large tree root, directly underneath where he obtains the second Climbing Piton.

You will see a gold disc sitting on top of the crate. Pick it up to receive the Midnight Keystone! Next, head up the steps and across The Vulture Castle wall. Make your way to the right tower you unlocked via the Vulture Cage puzzle.
Noon Keystone Location

For the Noon Keystone, you must complete the Vulture Cage puzzles and access the right tower (Vulture walkthrough). Once inside the tower, you will see a large chest on the right side of the room with a padlock on it.

Switch to Hendrik and use the hammer to smash open the lock of the crate, revealing the Noon Keystone. Take the Noon Keystone, leaving one last Keystone remaining! From here, head to the Torch Room as Hendrik for the next Keystone.
Dawn Keystone Location

The Dawn Keystone will be accessible to you after completing The Raven Castle's Sluice Machine puzzle and Torch Room puzzle (complete walkthrough here). When you finish both of those two puzzles, switch to Hendrik and go to the Torch Room.

Once in the Torch Room as Hendrik, there will be a loose stone in the floor towards the bottom. Lift the stone to reveal the fourth and final Keystone, the Dawn Keystone! Now, you can head back to the Sundial if this was the last Keystone you needed.
Sundial Puzzle Walkthrough

After you have obtained all of the Keystones, make your way back to the Sundial. Bring both Tove and Hendrik to the Sundial as you will need both of them to solve the puzzle. Once that is done, it is time to set Keystones in their proper places!

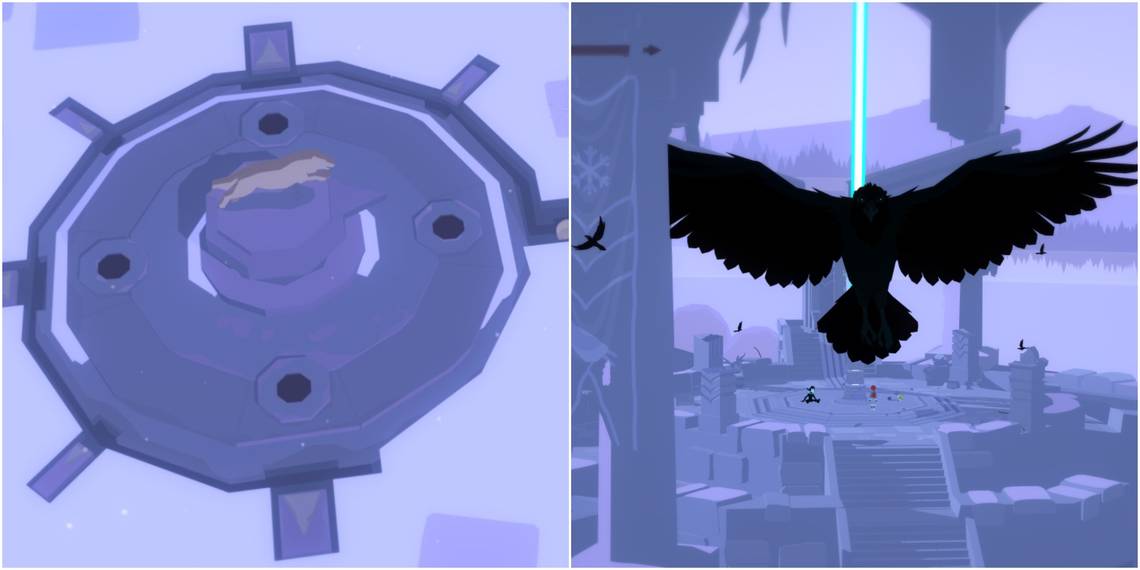
The Sundial will have a statue of a wolf in the middle of it, looking like it's running to the right. You will see a small orb to the wolf's right, which indicates the sun's current position and offers a massive hint for the puzzle.
Starting from the orb and going counter-clockwise, the placement of the Keystones will go as follows: Right - Dawn, Top - Noon, Left - Dusk, and Bottom - Midnight. The Sundial will lock in the Keystones and raise, revealing a lever and a second part of the puzzle if done correctly.

Now for the second part of the Sundial puzzle. It is time-based and will come down to the wire. You will now see thin sliders accompanied by large sliders beside them, alternating in that pattern all around the Sundial. The goal here is the pull back the thin sliders with Tove and the large ones with Hendrik.
The catch, however, is only one large and one thin slider can get pulled back at any given moment, meaning you cannot race around the Sundial and pull back every single slider to have the orb smoothly circle the board.

The strategy here is to pull the first thin and large slider back before pulling the lever to activate the orb. Then, as soon as the orb passes the first thin slider, pull back the next one and do the exact same process for the large sliders. Do this the entire way around the board until the ball circles the whole way around the Sundial.
Essentially, if you pull back a large slider as Hendrik, run to the next one and wait until the orb passes the currently opened large slider. As soon as the orb passes the slider, pull back the new one you're standing in front of, doing the same for Tove's thin sliders. You will be rapidly switching between Tove and Hendrik. It can be tricky to pull off at first, but it isn't too bad once you get its rhythm!

After successfully having the orb travel around the Sundial, a staircase will open up, leading underneath it. Only Tove can squeeze into the gap between the stairs and the Sundial. Switch to her and make your way down to the ground.

Once on the ground, make your way to the left until you are in a cell with a vulture. Search the vulture to find a Green Ring. Pick the ring up and continue to the next step!
Ring Puzzle Walkthrough

After having both the Green and Red Ring in your inventory, head to the courtyard of The Raven Castle. You should have two shortcuts opened that lead to the left and right towers at the top of the courtyard. If you didn't open the shortcuts, you would have to send Hendrik through the Dining Hall to reach the tower, and Tove will have to cross through the Vulture Cage area to get to the tower.

Next, send Hendrik to the left tower (where the bookshelf is) and Tove to the right tower (where the Summer Tile was). There will be a doorway in both towers that takes you above the main gate in the courtyard. Take that exit with Tove and Hendrik.

Once in the following area, you will see a large chain mechanism with a socket on either side. Switch to Hendrik and place the Green Ring in the left socket. Now, as Hendrik still has his ring in the slot, switch to Tove and place the Red Ring in the right socket.

If done correctly, the center gate will open, allowing Tove and Hendrik to take the long pathway up to the Utangard Tower.

From there, have Tove and Hendrik walk up the long stairway until you reach the end. You will see a lift on the right, step inside of it as Tove, and send it up with Hendrik to continue to the final part of the game.
Forest Walkthrough

After sending Tove up the lift, a cutscene will play out, eventually cutting to Tove in The Deep Forest. There will be a pathway of tire tracks through the snow ahead of you. Next, follow the tire tracks until you reach a car with your mom and dad in front of it.

Your dad will yell at you to find a payphone and call for help. Turn around and run down through the trees, following the dark blue path until it splits off to the left and right. Take the left path to find the payphone on the second tree. Approach the payphone to get teleported back to the car.
Once back at the car, make your way back through the forest, taking the right path this time around. You will get teleported back to the car once more.

From here, make your way through the forest again. However, this time, continue heading straight through the forest rather than going left or right. The payphone will be on a tree slightly to the left near the bottom of the path.

After answering the payphone, shadow versions of your family will appear in the forest, along with gravestones. Make your way up the forest and back to the car, interacting with the shadow beings along the way.

Once you reach the car, it will start moving away from you, prompting Tove to chase after it. Sprint after it until it finally stops, leading to another cutscene. After the cutscene ends, the game look will flash on the screen, but it isn't quite over yet.

You will find yourself at the start of the game, in front of the lake. Lars will run back to where you played hide and seek, with you running in front of him. You will see papa there, which says he made everyone supper.
One final cutscene will play out before cutting to the Roki's credits, concluding our complete Roki Walkthrough!