Quick Links
Roki's dense, complex world is full of challenging puzzles, fascinating characters, and formidable foes that are more than willing to test Tove's limit. And, with the handful of dungeons present in Roki, they combine all of those elements to create an exhilarating and emotional experience that is sure to keep you glued to the screen.
This guide will walk you through every puzzle and interaction leading up to the Wolf Dungeon, as well as everything in the dungeon itself. You will need an item from the Nokken Dungeon before accessing the final leg of the wolf's, but everything before that is accessible after Tove sharpens her dagger.
Reaching The Wolf Ruins

Once you have your dagger sharpened, head back to where the sunken cabin is and cut down the red vines to the left of it. After doing that, you will see a trail leading deeper into the mountains, follow it back into the next area.

You will see many wolf statues and a winding staircase leading up to the Wolf Ruins in the following area. Follow the stairs and enter the ruins to begin the first section of the Wolf Ruins, which we will detail further below.
The Wolf Ruins - Statue Puzzle

After heading inside the Wolf Ruins, you will see a large eye crest on the ground, followed by four wolf statues in front of it, along with four wolf "shadows" following them. Your goal here is to line the statues up with their shadows, making them match perfectly with one another when standing on the eye crest.

To do that, move the furthest statue on the left up four spaces (towards the shadows) and the one directly beside it down two spaces (towards the eye crest). Next, head over to the other two on the right and start with the statue on the far right side. Move this statue up two spaces (towards the shadows), then move the one beside it down three spaces (towards the eye crest).
If done correctly, the door will automatically open, and you can move on to the next puzzle in the Wolf Ruins!
The Wolf Ruins - Constellation Puzzle

After solving the statue puzzle, you will head through the large door that opened before you and get faced with yet another dilemma. This time, it's the Constellation Puzzle, which can be more trial and error than the last one, but we will try our best to explain the mechanics of it all.

As you enter the room, you will see three dials Tove can turn, along with four rocks with constellations on them. Your goal is to recreate one of the constellations found on the rocks with the dials on the ground, which is easier said than done. However, the constellation you are looking for is in the back right, which will help you out tremendously.

The dial on the right will turn the outer ring of the constellation and should be the first one you turn to match the one on the rock in the back right. Once that is done, it's time to move on to the tricky part. The bottom and left dials move the inner rings together, meaning you will have to predict where it will land and try lining it up with the outer ring and match the correct constellation.

For this section, we recommend getting the outer ring locked in first, then moving the bottom dial until the lines on the right connect. From there, move the left dial until the lines on the left side connect and almost complete the constellation. Finally, head back to the bottom dial and move it roughly five times until it creates the complete constellation.
If everything goes according to plan, a large door will open, allowing you to continue to the next area!
The Mountain Plateau - Wolf Staff

Once you reach the Mountain Plateau, you cannot progress forward to the Wolf Dungeon until you obtain the Wolf Staff. Unfortunately, the Wolf Staff isn't available until after you complete the Nokken Dungeon. However, the good news is that you had to first get through the steps above to start the Nokken questline anyways, so it isn't all bad.
Additionally, if you are here because you have the Wolf Staff and want to know how to complete it, the section below will walk you through the Wolf Dungeon. Furthermore, if you want to learn how to obtain the Wolf Staff, please refer to our Nokken Dungeon Guide!
Reaching The Wolf Dungeon

After obtaining the Wolf Staff, head to the Mountain Plateau and insert it into the slot directly across from the other one. Then, rotate the staff until the wolf statue in front of you aligns with the ones behind it, doing the same for the other Wolf Staff if you haven't done so already.

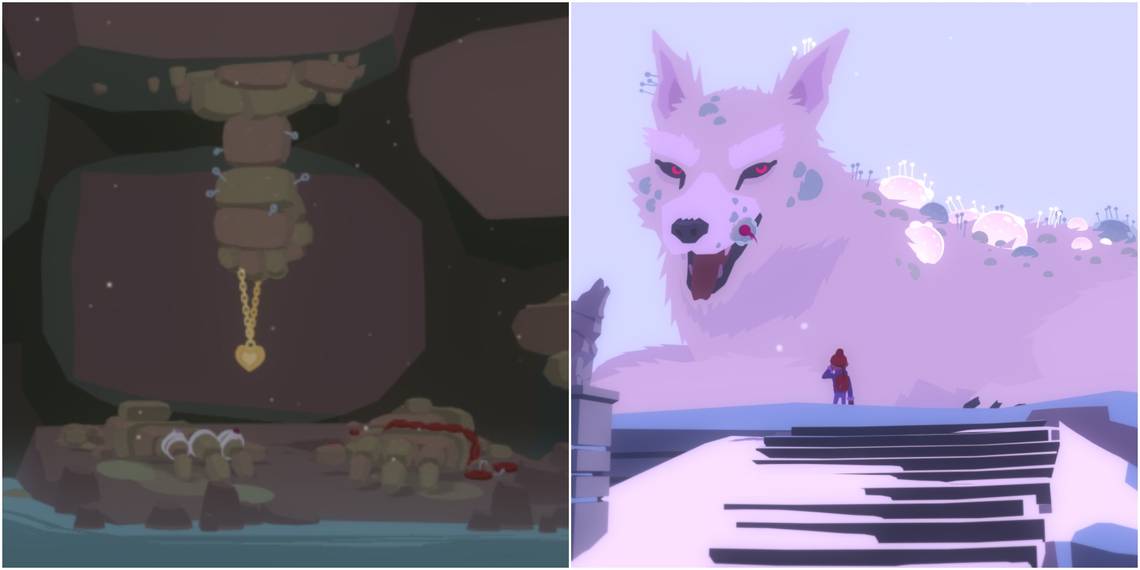
Once the wolf statues are aligned, a bridge will emerge out of the wall allowing you to cross over to the other side of the plateau. From there, follow the series of stairs up until you see a large sleeping wolf at the top, covered in disease.

Blow the horn at the top of the steps twice to wake the sleeping wolf, and then after a few lines of dialogue, you will enter an alternate reality via the Nattamare Parasite on the wolf's face. Once inside of the wolf's vision, the dungeon will begin!
The Wolf Dungeon Walkthrough

The Wolf Dungeon will start you outside your home, with your dad looking bummed out beside the well. Head towards the back of the well, untie the rope, and descend into the next area of the dungeon.

In this section of the dungeon, you will see several hands scattered around the inside of the well, along with family photos spread across the walls. The general gist of this dungeon is that you need to obtain your mother's locket from one of the hands but need to solve a few puzzles to do it.

The first order of operation is to grab the pencil to your left, then use it on the hairbrush in the water, turning it into a paddleboat. From there, look for a bottle of red nail polish located to the northeast and paddle your way there.

Once there, pick up the red nail polish and then observe the photo beside it. Upon viewing the picture, you will get transported to a memory of Tove's. The memory is of Tove's birthday party, where she received her cat Stoker as a gift.

Collect the following things while in this memory, the blue ring biscuit on the table, the straw from the red cup on the table, the other straw on the counter beside the stove, and the cat's collar, which is on the cat itself. Next, before leaving, view the calendar on the fridge to reveal Tove's birthday. While there is no month, the day is essential, so keep in mind the number 17.

Now, exit the memory by clicking on your mom's camera, which will transport you back to the well. From there, paddle straight across to another island with a photo of Tove's family camping. There will also be a ring directly above the image, perched on a ledge.

Examine the image to transport to the memory of the camping trip. When in the memory, collect the following things, the straw from the yellow cup beside the tent and the comb from your dad's shirt pocket. Before leaving, however, examine your dad's fishing box to reveal the last two numbers of the combination, which are 05. Exit the memory by clicking on your mom's camera.

Before hopping back on the raft, go to the hand hanging out of the wall on the right. Open your inventory and give it Stoker's Collar you picked up earlier. The hand will now be distracted by the cat's collar, allowing you to slip past it to grab the ring you saw earlier.

After obtaining the ring, head back to the raft and paddle to the north island where a large white pearl necklace is. Grab the necklace to get transported to another memory. Just approach yourself and listen to the dialogue as there will be nothing to collect here.

Next, sail back to the island you started on and offer the hand any item that isn't the straws or rope, then slip past it whenever it becomes distracted by the object. Once you're past the hand, combine the rope and straws to tie the straws tightly together.
Then, place the tied straws across the gap to create a bridge, allowing you to access the final picture. Which also contains the last object you need to obtain your mother's locket from the hand in the well.

Once you are inside the picture, look for your dad's fishing box located towards the front of the boat. Using the information you gathered from the previous memories, the code needed to unlock it will be 1705. Open the fishing box, take the fishing hook from it, and exit the memory by clicking on the camera.

Whenever you're back outside, cross the straw bridge and get on the other side of the hand. Retrieve whatever you gave it, then open your inventory. Combine the red nail polish with the pearl necklace to change their color to a dark red.

Following that, sail over to the middle island, where there are two hands covered in jewelry, and give the hand on the left the ring and the one on the right the pearl necklace you just made red. Once that is completed, head to the island right beside it on the right, where you originally obtained the pearl necklace.

Now, walk up to the wall and use your dad's comb to create a ladder, allowing you to climb to the top of the wall, giving you an excellent overview of the hand holding onto your mom's locket.

Next, use the fishing hook on the hand holding your mom's locket to have Tove pierce the hand with the hook, making it drop the locket. From there, climb back down the comb and sail back over to where the locket is and pick it up.

Pick the locket up, which will play one last memory before kicking you back out to the wolf. You will notice the wolf has been cured of its disease, and you will receive the Nattamare Parasite on its face that caused the chaos and sickness. After a few cutscenes and some dialogue, you will officially complete the Wolf Dungeon in Roki!