The Wyrm is one of the most eye-catching locations in Sable — how could the fossilized remains of a giant Sandwyrm not get your attention? The Wyrm isn't tied to any specific questline, but getting into the Wyrm and completing its series of puzzles will net you rewards. Accessing the Wyrm can be pretty tricky, but thankfully we've got you sorted.
Progressing through the Wyrm will reveal the story of someone who got trapped in the creature and built a habitat inside, and details his journey through Pyrausta — what they call the Wyrm. So, make sure you keep a lookout for the left-behind notes that will reveal this narrative throughout.
Where To Find The Wyrm

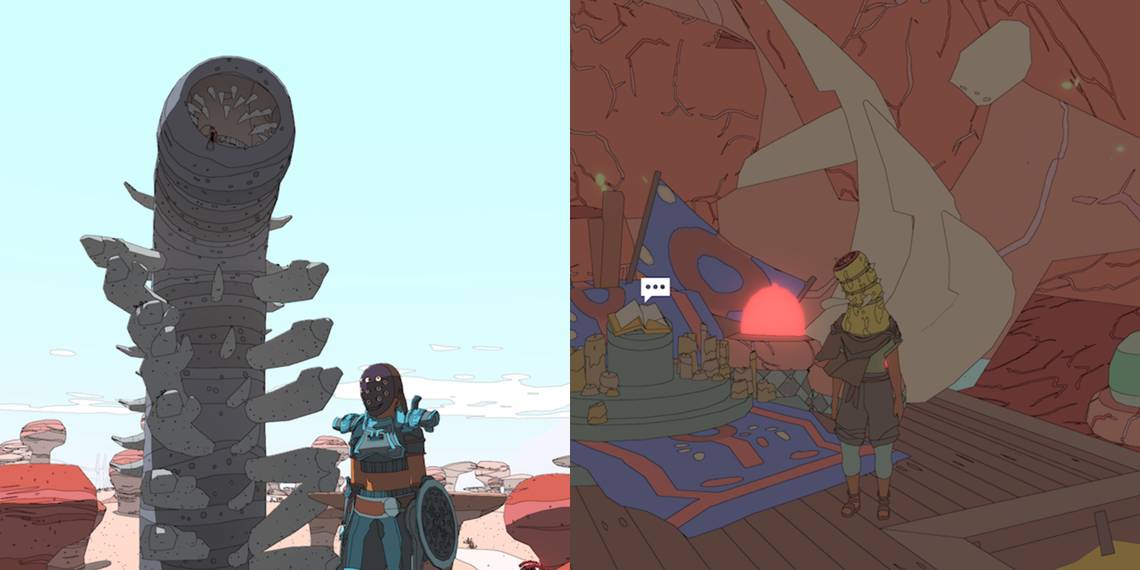
The Wyrm is located in the southeastern portion of the map, in an area called The Wash. You'll know you're close when you begin to see the skeleton graveyard desert. Once you reach this area, the remains of the Sandwyrm shouldn't be hard to spot since it towers over the environment. Look for a tall, gray, static monster.
How To Enter The Wyrm

The Wyrm's mouth remains open, so you'll need to climb up it to enter. You might need more stamina to get up the Wyrm comfortably, so use the monster's scales to take regular breaks and climb up slowly.
Once inside the Wyrm's mouth, you'll notice its throat is closed and needs to be opened. You'll also notice a small pool of colored fluid and a couple of green sacks in its mouth — these will be recurring puzzle pieces for the rest of the Wyrm.
You'll need to whistle next to the sacks — the same button you use to call your Hoverbike — at which point, they'll eject a ball. Carry this ball into the puddle of fluids, and the Wyrm's throat will open up.
How To Get Through The Wyrm

Once you jump down the Wyrm's throat, you'll encounter several puzzles that all utilize the same mechanics. It should be noted that opening different holes (doors?) is only temporary when you mix the balls and puddles. This gives you a limited time to get through.
The first puzzle you encounter has sacks on the left side of the room and a puddle on the right, separated by water. Jump to the left platform, throw the balls back to the other side of land, and then throw them into the puddle. This will temporarily open the door in the middle.

The second puzzle room has a group of sacks and a puddle on the left side and another puddle and the door on the right, separated by another hole in-between them. Use the ball and puddle on the left to open up the gap in between. This will let you throw a second ball through the opening, which you can use to unlock the exit.

The third room is the most straightforward. There are sacks close to the entrance and a pool of fluids across the wooden bridges. Just carry the balls and throw them across to open the exit. There are some containers filled with loot at the top right corner of this map; all you need to do is climb up to them.
The fourth room is the largest one, but it's not too complicated either. Most of the room will initially be submerged in water. There'll be a platform with another sack and puddle next to the entrance, but ignore these for now.
Swim across to the end of the room to the other piece of land. Use the sack and puddle here to lower the water and open a door on the floor. Run through it to the next area. If the water is still gone, you'll be able to loot another container on the right side of this room. The puddle here has an exit on the opposite side, along the wall — this means you'll need to climb through in time.

Once you're up, you can leave the area if you turn right or crawl through a space to the left for some hidden containers. Going left will take you to the beginning of the fourth room, just above where you started. There are sacks on this higher ground; throw them to the other side of the piece of land, across the water. There'll be several holes in the ground here, one directly above the puddle you ignored at the start of the fourth room. Drop the ball through the hole, and a secret room filled with loot will open.

In the fifth and final puzzle room, there are two puddles separated by a body of water. Activating the first puddle will lower the water, revealing a path to walk on. However, you will need more time to be able to carry a second ball before the water rises again. Simply remember where the footpath is, and you'll be able to walk on the path, regardless of the water.
This completes the Wyrm dungeon, rewarding you with the Sandwyrm Mask.