Quick Links
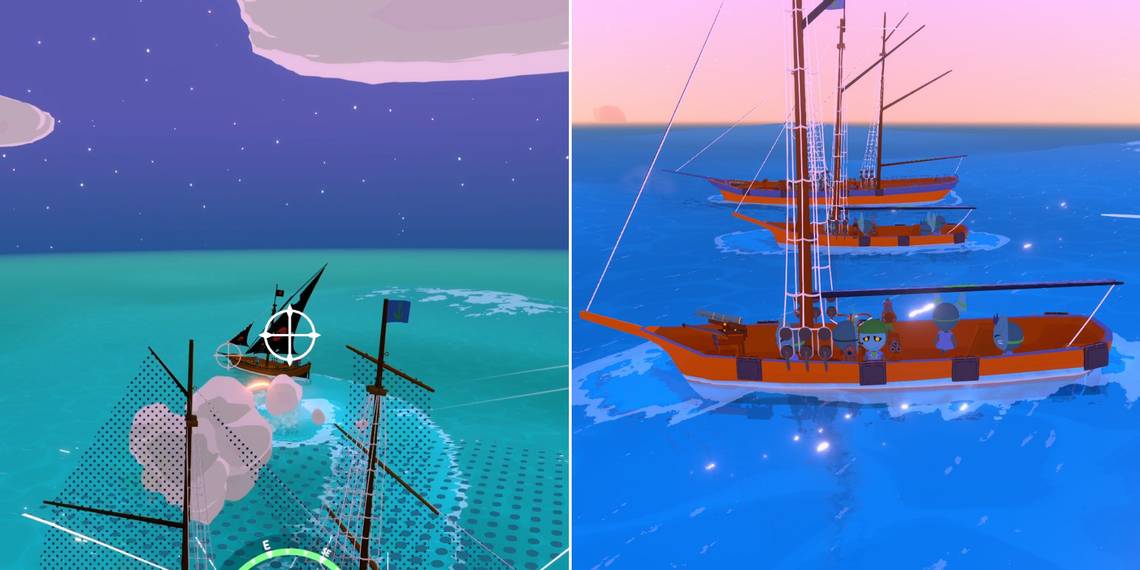
It's all calm and quiet while you're sailing across the horizon in Sail Forth until you get a vessel or island that's trying to sink your ship. For these instances, the game has given you cannons that can be placed on all four sides of a ship depending on the kind of ship you have.
Most of the bigger ships will let you have multiple cannons on the side, and you can even have one on the back if you build a Brigantine. While you can have a lot of firepower in your fleet, it is also important to know a few tricks that can make combat much easier and intuitive.
Building Your Fleet Correctly Is Important

The first and most important step when it comes to combat is how you build different ships in your fleet. While this might not make too much of a difference in battle at the start of the game, it will be the deciding factor as you get harder enemies in higher numbers. There will be times when you'll be fighting over three enemy ships at the same time.
When you visit the Shipshape shop, the person with a fish tank for their head will let you build any type of vessel you want for the right price. You can check out the properties for a vessel that you're trying to build when you hover over it, and you can get blueprints for new vessels if you capture new ships.
You can have up to four ships in your fleet, and each of them will have a specific number of sails, cannons, and crew members. Depending on the type of ship, you can also attach one or more mods to it. These mods can give a slight buff to the ship.
For example, the Burning Ammunition mod has a chance of inflicting burn damage whenever you attack another ship, while the Water Logged mod makes your ship 25 percent more resistant to fire.
If you're getting a small ship that is hard to hit for the enemy, you can attach mods that increase your cannon damage and rowing speed. On the other hand, a large ship like Brigantine might need more armor plates and defensive mods to counter the lack of movement and large area making it easier for the enemies to hit you.
Moreover, you should always inspect your enemy before starting a battle with them. Depending on the vessel size of enemy ships, or the space you have while fighting a boss, you can make changes to your fleet and decide which ship you want to control. The dynamic fleet management option helps a lot in these scenarios.
You can change the cannons, crew members, and mods on any ship at any point in time by simply going to the radial menu and clicking on Fleet Management. Here, you can select the ship you want to manage and change anything you need.
Pay Attention To Crew Member Buffs

Sail Forth starts you off on a tiny ship with one crew member. After going through the tutorial, you'll be able to get a better ship with a second crew member. These members are more than just people controlling your ship since they have specific buffs attached to them.
You can find these buffs by heading over to the Fleet Management menu once again. After selecting the ship you want to edit, click on Crew Management and you'll be able to see the buffs of your current members. Crew Members can have different kinds of buffs like:
|
Attack Strength |
This buff will increase the attack strength of the ship the crew member is assigned to by five percent. |
|---|---|
|
Fast Repair |
This buff can reduce the time to repair the respective ship by five percent. |
|
Increased Weight |
Every ship has a weight limit that cannot be exceeded unless you have this crew member on the board. The weight limit will prevent you from placing too many heavy cannons on the same ship. |
|
Decreased Reload Time |
Some rare crew members can decrease the reload time of your cannons by up to 10 percent. These can be great on ships that have strong cannons with high reload time. |
While none of these buffs seem game-changing by themselves, it can make quite a difference when they're stacked correctly on a certain ship. For example, a Brigantine can have up to six crew members, which will let you stack up to 30 percent attack strength on that ship. It will essentially become a sailing war machine.
There might be times when you pick up a crew member, but they instantly disappear because your ship had maximum capacity. You don't have to worry since this crew member still gets added to the list and you can choose them when you're managing your crew.
To change any of your members, simply click on them and select the member you want to exchange them with from the list.
Try To Isolate The Enemy Ships

One of the most common enemies you'll face while sailing is the Skull Clan vessels, or Merchant vessels if you decide to attack them. The Skull Clan vessels belong to a formidable group of enemies that have plagued the world of Sail Forth. These can be marked on a certain island in the world map if you get enough map fragments.
As you progress in the game and get to different sets of islands, these vessels will start appearing in large groups that tend to stay close together. With the fleet mechanics in the game, you will mostly be fighting these ships with your main ship, and there will be some help from the AI ships in your fleet.
Merchant vessels usually stay in a fleet of two ships, and both of them will attack you if you pick a fight with one. The isolation tactic can help you in this scenario as well.
To win battles like this, you need to isolate one of the enemy ships and constantly shoot at them. This can be done quite easily if you're fighting near an island since you can block a ship's path and force them to run into the island. Try to do this as you're on the side where the enemy ship's cannons can't target you.
If you successfully isolate a ship, you can stop your ship and bombard them with your cannon fire until they sink. Alternatively, this also gives you a chance to Harpoon the enemy and take control of their ship if you have enough crew members with good buffs.
Switch Between Different Ships Readily

Even with the isolation tactics, most of your battles will be in open seas with no island around, especially when it comes to fighting the final boss of any particular area. During these times, you need to take advantage of having four ships in your fleet by keeping an eye on the other ships as you shoot the enemy with the one you're currently controlling.
Stopping at a certain point might not be a good idea when you're fighting a boss, and that's why there's a mechanic to switch between different ships whenever you want. When the enemy goes out of the line of fire for the ship that you're controlling, you can look around and find a ship in your fleet that still has the line of fire.
If you can find any ship like that, you can simply press the required button to switch to that ship and instantly start firing at the enemy again. This makes the battle a lot more dynamic since you have complete control of your entire fleet.
Moreover, it might not be a good idea to rely on the game's aim assist mechanic if you want to live a true pirate life. When you toggle your cannons near an enemy, you can aim at a certain marker to guarantee the hit on the enemy. Although, there is no such marker when you're fighting other random ships on the horizon.
If you want to plunder everything in your way, it might be better to learn the projectiles of your cannon and sailing mechanics to finish off the enemy without too much damage to your fleet.
Repair When Necessary

While the repair mechanic seems quite straightforward in Sail Forth, there are a few tactics you can use for resource conservation. The first thing is that each of your ships will have a repair threshold that can be changed in the Fleet Management menu. The ships will repair themselves when their health reaches below this threshold.
If the ship you're controlling reaches below its repair threshold, it won't repair itself. This is because the game gives complete control of the ship to the player. To avoid losing the ships, you can either keep an eye on their health at the top-left or regularly switch between different ships.
Whenever a ship starts repairing itself, it will always be repaired to full health when the process is done, even if you take damage during the process. If you're in a situation where you know that you will take a ton of damage in a short period, you can start the repair process early, which will consume fewer wooden planks.
This tactic will allow you to save some of your planks while you also get your ship fully repaired.