Quick Links
Salt and Sacrifice starts to get a lot more challenging once you take your first steps on Dreadstone Peak. The enemies hit harder, the platforming challenges are more difficult, and the mages you have to fight are some of the most brutal opponents the game has to offer.
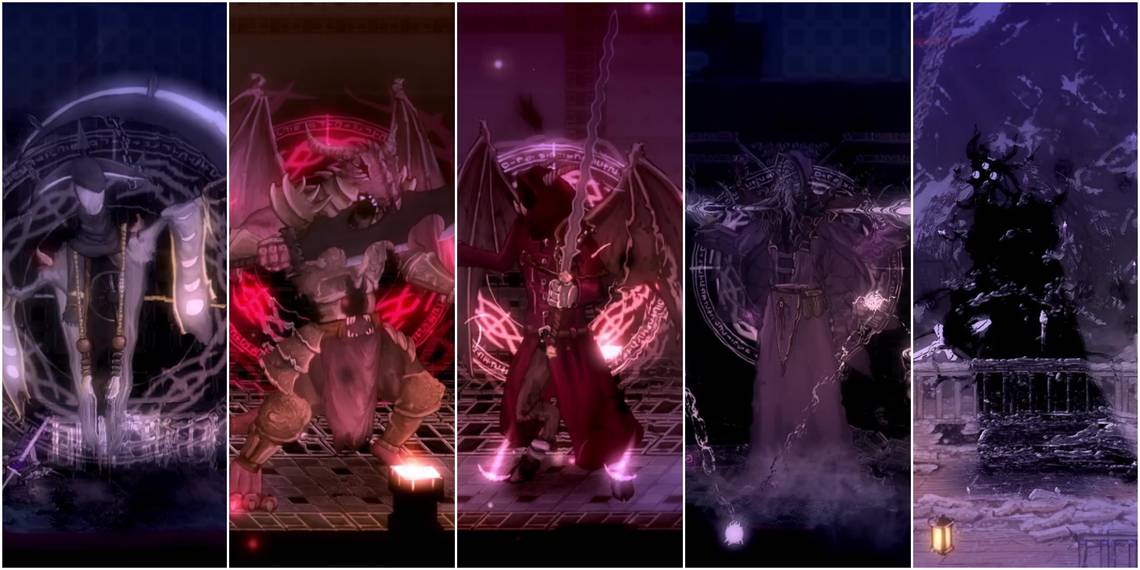
There are five mages to be fought in Dreadstone Peak, from the creepy Neuromancer to the absolutely chaotic Umbramancer. By now, you should have honed your skills on weaker foes, but even then, these opponents might give you some trouble.
Neuromancers // Zyzak Zuun, The Curse-Riddled Mind

|
Poison / Light |
|---|
The introductory mage fight in Dreadstone Peak isn't too tough. You'll fight the following creatures during the chase sequence:
- Scatterminds, easily squished brains with four legs.
- Royal Minds, large, floating brains that don't pose too much of a threat.
- Gray Nobles, annoying, thin foes who can disrupt your attacks quite easily.
The Hunt For Zyzak Zuun
The hunt for the Neuromancer is located in the Temple of Eleven, accessible after beating the Two That Remained and the Ethercloth Bolt. Make your way up the temple and you'll find the clue on the western side, underneath a grapple point.
Neuromancer Attacks


- Light Threads: Conjures some orbs that get connected with thin threads of light. You can easily roll through the damaging threads.
- Mind Pulse: The Neuromancer emits a blast of psionic energy from his forehead. This is a big attack but is quite easily recognized.
- This attack may be used from the ground or in the air. If used in the air, the boss follows it up with a slamming attack that causes a burst of energy around him and summons a ring of Light Threads that expand outwards.
- If you get hit by this attack, you'll be inflicted with some confusion status buildup. If the bar fills up, you'll end up confused and your controls will be reversed.
- Whip Tendril: The mage unfurls a tendril from his sleeve and whips it at you twice. If the first hit connects, so will the second.
Neuromancer Strategy
- Neuromancers aren't too tough to beat. Once you realize that they over-rely on their Light Threads - that don't do too much damage - you can quite confidently take them on quite aggressively.
- Getting hit by enough Mind Pulse attacks will confuse you, muddling up your controls. Try not to panic if this happens and make decisive, thought-out rolls away from the boss to wait out the status.
- Just be on the lookout for melee attacks, and you should be fine.
Dracomancers // Draeaxenerion, The Scaled Nobility

|
Fire / Poison |
|---|
Dracomancers are incredibly aggressive foes with gigantic swords. If that wasn't intimidating enough, they can also summon these reptilian foes during a chase:
- Drakelings, small dragons that look imposing but aren't too dangerous.
- Darkscale Wyrms, larger, dark dragons that should be taken care of as soon as they appear.
The Hunt For Draeaxenerion
Once you've beaten the Neuromancer, you can explore the dungeons beneath the Temple of Eleven. You'll find the hunt for the Dracomancer in the Old Annex, which is directly beneath the temple and found just to the west of the first fall down.
Dracomancer Attacks


- Double Swipe: After raising the sword up to his chest for a moment, the Dracomancer takes two easily-dodged swings to his front.
- Melee Combo: The Dracomancer swings his sword at you three times. Each sword swing tracks you individually, so the boss will turn around if you roll through the attack.
- Shockwave Combo: The dragon mage will leap into the air and slam his sword down, which creates a red, horizontal shockwave. This is followed by the Melee Combo.
- Bursting Combo: The mage gathers some energy into his sword and then plunges it into the ground, causing a large area of effect explosion. This is followed by the Melee Combo.
- Fire Beam: The Dracomancer holds out his hand and shoots a beam at the ground that travels from one side to the other. It creates a trail of flames. Both the beam and the flames will deal a lot of damage. This attack can be used on the ground and in the air, with the latter variety having more range and being followed up with a Shockwave Combo.
- Fire Ball: Exactly as above, but instead of a beam of fire, the mage fires a simple fireball that explodes on impact.
Dracomancer Strategy
- This mage is incredibly aggressive and will barely give you a chance to heal. If you want to succeed in this fight, you need to learn how to dodge the melee attacks used in the Melee Combo and the Shockwave Combo, as they're the attacks you'll be seeing most often.
- The safe times to attack are just after the third strike of a Combo, the very beginning of the Bursting Combo, and when he's using the Fire Beam or Fire Ball attack while standing on the ground.
- Don't try to attack him in the air unless you're using ranged attacks from very far away - the melee attack that he uses to come back to the ground has some decent homing qualities that he'll use to snipe you.
- This fight is all about abusing your invincibility frames and getting close. Keep an eye on your Stamina bar and consider taking your armor off until you hit the lowest equipment load category to improve your rolling.
Diablomancers // Nephael Mos, Knight Of The Chasm

|
Dark / Fire |
|---|
While they look cool and powerful, Diablomancers end up not being that much of a challenge after a little practice. You're more likely to have trouble with the residents of the Blasphemer's Vault and the enemies that the Diablomancer summons:
- Inphyrean Drones, bugs that don't take much effort to destroy.
- Chasm Lords, large orcs that do take a bit of effort to destroy.
- Red Baronets, huge demons that are extremely threatening. They take a lot of effort to destroy.
The Hunt For Nephael Mos
This hunt begins in Pilgrim's Respite, the area between Whitecrag Path and the Old Annex. Head west from the entrance from the Old Annex, and you'll find the hunt on the upper level.
Diablomancer Attacks


- Crossbow Glyphs: The mage summons one to two small glyphs that each fire three bolts of light into the ground in your general direction. The bolts will stay in the ground for a while and damage you if you touch them. These can be tricky to avoid will all the dodging you'll have to do in this fight.
- Cannon Glyphs: The mage summons one to two very large glyphs that will hang in the air for a while, facing you at all times, before launching a large burst of light at you. This is easily rolled through if you have the opportunity.
- Giga Cannon Glyph: There is a larger version of this attack that fires a far larger explosion and deals far more damage, but it has worse tracking.
- Bolts of Light: The mage summons six bolts of light behind him before firing them in an arc to the front. These will damage you before, during, and after the actual firing animation, so you'll have to time and place your roll perfectly to avoid damage.
- Sword Slam: A simple overhead swing. It's fast, though. It may be followed up by a swift plunging attack.
Diablomancer Strategy
- Theoretically, this fight should be quite simple - none of the Diablomancer's attacks are particularly hard to dodge, except for certain arrangements of the Bolts of Light attack. The problem is that when you do get hit, the attacks hit hard. Be very liberal with your Hearthen Flask and stay healthy at all times.
- It's very easy to get greedy in this fight, as the boss will spend long periods of time standing still, wide open for attacks. The problem comes when all of his Glyphs and Bolts start firing, and you're staggered into a devastating melee combo. Don't get greedy.
- The best way to avoid a Giga Cannon Glyph is simply to move away from it. It can only fire at a small angle beneath it.
Chronomancers // Zaruman Tam, The Wraith Temporal

|
Physical / Fire |
|---|
Fighting against a Chronomancer involves a whole mess of time-slowing effects and devastating physical and ranged attacks. In addition, you'll face the following monsters during the chase:
- Glasskeepers, floating skeletons with hourglasses strapped to their backs. They can be annoying - use ranged attacks to shoot them down.
- Pendul Deacons, tall monsters with large scythes that are very dangerous.
- Larval Samayavoras, horrible bugs that take quite a beating.
The Hunt For Zaruman Tam
You can find the clue for the Chronomancer Hunt behind the sealed door at the top of the Temple of Eleven.
Chronomancer Attacks


- Pillars of Frozen Time: Conjures three pillars in a row. Anything that moves through these will be slowed down immensely.
- Sphere of Frozen Time: A large, circular version of the above.
- Scythe Slam: A simple overhead slash with the gigantic scythe, which is followed up with an upwards slash in your direction - even if you rolled through the mage.
- Rising Scythe Slam: The mage floats into the air before slamming down into the above attack. This has good tracking, so be very careful when rolling.
- Portal Blades: The mage opens up a portal in one part of the arena. Sharp blades start slashing through randomly.
- Portal Arrows: The mage opens up a portal in one part of the arena. A rain of arrows comes flying out in the direction the portal is facing. This attack deals a ton of damage as it doesn't stagger you into invincibility frames.
Chronomancer Strategy
- Do not under any circumstances enter a Pillar or Sphere of Frozen Time. As soon as you get slowed down, it's too difficult to break out of the effect, and you'll be a sitting duck for the mage's attacks. If it's unavoidable, try to make sure you're healed up beforehand.
- The slowed time effect will also affect your arrows and other ranged attacks, so be wary of that before trying to be clever.
- Learning the timing of the mage's melee attacks and staying close is a good strategy; only move away when you're in danger of being slowed down or being destroyed by Portal Arrows.
- Despite the gimmicks of the fight, Chronomancers are quite squishy.
Umbramancers // Vodin Tenebre, The Lurking Shadow

|
Dark |
|---|
Umbramancers are possibly the hardest foes you'll face at all in Dreadstone Peak. In addition to their brutal boss battle, they summon these hard-to-see enemies:
- Darkrits, small shadows that don't take effort to beat.
- Umbral Witches, floating shadows that can fire ranged attacks at you.
- Hulking Shadows, shadows with the frames of giants that can do a lot of damage and even spew fire.
The Hunt For Vodin Tenebre
As you might expect, you'll find the Umbramancer hunt in the darkest part of Dreadstone Peak: Sentinel Caves.
Umbramancer Attacks


- Sword Slam: This attack begins with the sword being lifted overhead before being swung down quickly in front. This is followed up with a very close-range swipe in your direction that will send you flying if it connects.
- Sneaking Slash: The Umbramancer sinks into the ground and very quickly bursts out underneath you, swiping upwards. You'll have to roll as soon as the mage disappears to avoid this.
- Sword Beams: This is the mage's most dangerous attack. It consists of two slashes that shoot blades of light at you, a pause, and then another two slashes that shoot blades of light. The best way to avoid all four of these attacks is to roll through the mage twice - rolling through a set of blades but not the mage itself is likely to get you struck with the followup blades. The attacks track you, so you'll have to dodge through the mage and then roll back again.
- Thrusting Blade: The Umbramancer lunges forwards with its sword summoned. This attack is quick, but one of the easier ones to roll through.
- Shards of Darkness: Conjures a purple light that shoots a mass of light shards at you. These are weak, but can leave you staggered and unable to defend yourself against one of the mage's stronger attacks.
- Sword Explosion: The mage throws its sword into the ground, causing an explosion of tiny swords all around it.
Umbramancer Strategy
- As with Dracomancers, the challenge with Umbramancers comes from how aggressive they are. There's very little time to breathe between attacks, and healing becomes a very dangerous activity.
- Consider crafting and equipping the Ever-Parched Ring, which is unlocked once you've defeated a Diablomancer. It increases the speed you drink from your Hearthen Flask.
- Learning how to avoid Sword Beams is the key to winning this fight, as this is the most likely cause of death. The trick is to stay close to the Umbramancer at all times, only rolling through it to dodge, not away from it.
- Stamina-boosting accessories and a low equipment load would be fantastic for this fight.