Highlights
- Sekiro: Shadows Die Twice posture system and focus on parry makes it the most difficult modern FromSoftware game.
- The Mist Noble and Folding Screen Monkeys are unique boss fights, emphasizing atmosphere and mechanics over difficulty.
- The Gauntlets of Strengh (boss-rush mode) added more tough versions of already difficult bosses.
Sekiro: Shadows Die Twice is an outlier in FromSoftware's successful Soulslike formula. In most other From Software games, boss fights take place in closed-off arenas where your goal is to take out all their HP before they manage to drain yours.

Every FromSoftware Souls Game, Ranked
FromSoftware may have the best Souls games, but which are the best of the best?In Sekiro, this back-and-forth works just a bit differently thanks to the posture system. It's a truly unique system that no other Souls-like game has managed to imitate yet. So, with that in mind, let’s go through every single boss of the game (both regular and mini) and rank them from weakest to strongest.
Updated on April 15, 2024, by Marco Vito Oddo: Sekiro: Shadows Die Twice remains one of the best FromSoftware games of all times. Instead of reusing the RPG elements of Dark Souls and Bloodborne, the game instead goes full-action to offer the best sword-fighting combat in the industry.
Unsurprisingly, Sekiro is also known as the hardest FromSoftware game, as there's no way to level up to beat a challenge. You have to "git gud" and master the Posture and Vitality mechanics. Sekiro's skill cap got elevated even more by the addition of Inner bosses, the master of the Gauntlets of Strength.
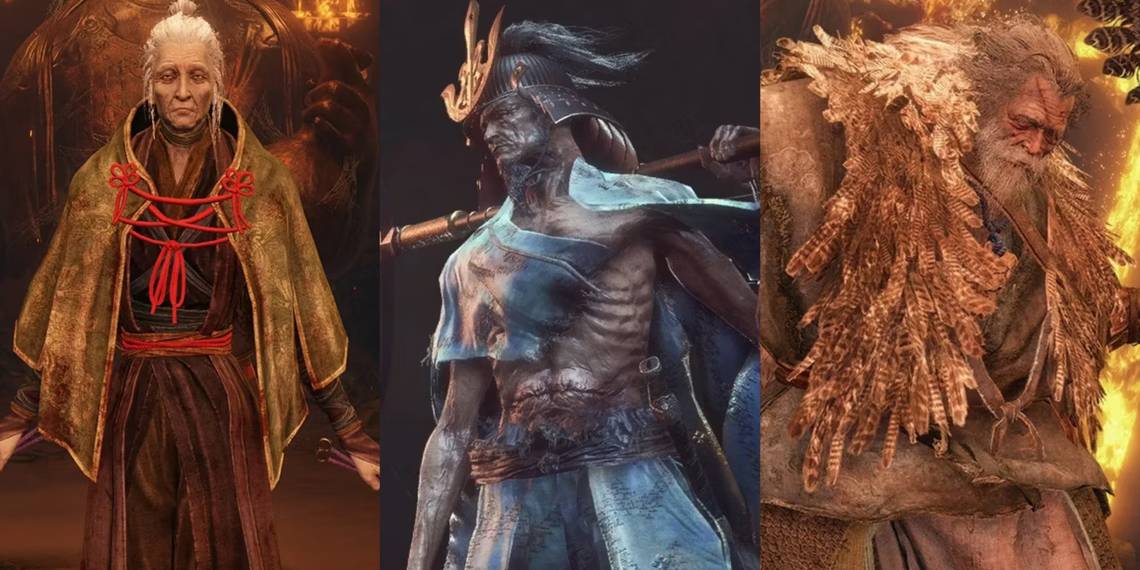
32 The Mist Noble

The Mist Noble is less of a mini-boss and more of a switch you stab with your sword to turn off all the mist and illusions in the area. There’s really nothing to this fight at all, considering you drop in from below and deathblow it, then chop away at it until it dies.
To be fair, the Mist Noble can actually attack, it’s just pitifully easy to deflect. This boss is so simple, it’s become a running gag among the fans.
31 The Folding Screen Monkeys

First and foremost are the Folding Screen Monkeys. These "bosses" are probably one of the most unique in the entire FromSoft catalog since each one of them is designed around a stealth mechanic. The arena itself is atmospheric, the designs of each room are highly varied, and the overall concept is amazing, but there's no difficulty in this fight other than the amount of time it takes to get it done.

The goal is to use the environment to avoid detection by monkeys that see all, hear all, or just use a gong to warn the others. It's a nice challenge for your first run that becomes trivial once you understand what's happening.
30 The Sakura And Blazing Bulls

The Two Bulls that show up near the beginning and end of Sekiro are a textbook example of From Software’s classic move of reusing a particularly annoying boss fight. They did it with the Smelter Demon, Champion Gundyr, and the Asylum Demon. The Blazing Bull is another one of these boss fights, and it’s not particularly exciting or fun in any way.
The Sakura Bull of the Fountainhead Palace is even less diverse than the reused bosses in other games. They aren’t interesting, they aren’t exactly fun to fight, and they surely aren’t too difficult compared to other bosses on here
29 Leaders And Generals

There are a ton of mini-boss encounters spread throughout the game that basically boil down to fighting a slightly more difficult basic warrior enemy. These are called Elite Warriors, and they break down into two types, Leaders and Generals.
There’s really only one “Leader” in the game, and it’s Leader Shigenori Yamauchi, the first real enemy you fight coming out of Kuro’s tower. Of course, this guy is absurdly easy, considering he’s meant to be a tutorial into how deflecting and poise works. But, the Generals are a different story.
Sekiro has three of these General fights spread throughout the game, Matsumoto, Kawarada, and Tenzen Yamauchi. And, while the Generals themselves are a tad difficult, the main challenge of these mini-boss encounters is getting rid of all the mobs around them as effortlessly as possible. Then, once you can 1-v-1 these guys, all you really have to look out for is their unblockable sweeping attacks.
28 Snake Eyes Shirafuji And Shirahagi

Both the Snake Eyes fights play out pretty similarly, the only big difference between them is the environment you fight them in. Shirafuji is in a relatively small area of rock covered by snow, while Shirahagi is in a big arena with poisonous water spread throughout.

10 Best Optional Boss Fights In Gaming History
Some of these are weird, others are really hard. But they are definitely the very best.To beat both of these mini-bosses, really you just have to stay close, dodge their one unblockable attack, and make sure to dodge when they take aim to fire their guns. Otherwise, it’s just a simple pattern of deflecting their basic combo until they’re ready for a Deathblow.
27 The Chained Ogre

The Chained Ogre is the first big barrier of Sekiro. This is a mini-boss that demands that you deflect it, forces you to watch out for the unblockable attacks, and will not give you any chance to breathe. But, after getting more than a few hours into the game, the Chained Ogre is absolutely nothing special in comparison to later bosses or even later basic enemies.
That said, it can still decimate any players who are overconfident, especially when it reappears again near the end of the game.
26 Gyoubu Masataka Oniwa

The ex-bandit leader Gyoubu "Bridge Guardian" Oniwa is many players' first real "introduction" to the boss fights in Sekiro. His fight has everything a Sekiro boss fight should have and is overall a great middle-ground quality standard to use for the other bosses.
Gyoubu is one of the Seven Ashina Spears, and he shows it through sheer dedication to decimating Ashina’s enemies and his obnoxious screams throughout the course of his boss fight.
25 Juzou, Tokujiro, And Shigekichi

There are technically three different versions of this one mini-boss, with each one switching up the formula for this attack. But, for all of them, the general tactic is simple, learn the timing of their attacks, avoid these telegraphed grabs, and chip away at them while they drink.
Juzou is the first one, first showing up just outside the Madame Butterfly boss fight at the Hirata Estate. Because of the enemies surrounding Juzou, this fight can be overwhelming. But, since it’s easy to clear all these weak mobs out while avoiding Juzou’s attacks, you’ll almost always be able to fight one on one. Juzou really isn’t difficult, the hardest part of his attacks is getting used to the odd timing of them. But, other than that, he’s not bad at all

Ranking Every FromSoftware Soulslike From Easiest To Hardest
It can be incredibly tough ranking which of the Soulsbourne games is hardest, especially with titles like Dark Souls and Sekiro: Shadows Die Twice.Tokujiro is almost the exact same encounter as Juzou, just in a smaller arena, and with monkey mobs around him rather than other soldiers. Like Juzou, take out the mobs then focus on him. The smaller space may make things a tad more difficult, but not by much.
Shigekichi is the largest deviation in terms of design and attacks, but it’s still pretty much the same fight. Sure, Shigekichi uses fire-based attacks rather than poison ones, but thats about it.
24 The Armoured Warrior

Next, we have the Armored Warrior, a guy whose death-cry became a running joke for the fanbase, but is actually a really tragic character once you piece together his backstory. The Armoured Warrior is initially quite confusing as a fight because the usual Deathblow tactic doesn't work, rather, the guy seems invincible.
Once his attacks start breaking the guardrails of the bridge, people connect the dots quite quickly. It’s an enjoyable fight with a unique twist, but there's not much difficulty once you understand how to beat this unbeatable foe.
23 The Long-Arm Centipede Giraffes

The Long Arm Centipede mini-bosses are exceptionally easy, but they sure don’t seem that way the first time you go up against one of them. In fact, these claw-barraging beasts are pretty overwhelming. But, once you understand that you’re meant to spam the deflect button and jump over its one unblockable attack, this fight sort of becomes a cakewalk.
If you’re still having any trouble, the Shinobi Fireworks once again is a perfect tool for giving you a second to breathe.
22 Both Ashina Elite

If the Centipedes were meant to test your ability to parry a lot of incoming attacks, the Ashina Elites are absolutely meant to test your reaction speed. Both Jinsuke and Ujinari are elite Ashina warriors who rely on Iaijutsu, a technique of unsheathing their blade, attacking, and re-sheathing it, all in one lightning-fast movement.

The Divine Dragon is Sekiro's Easiest And Best Boss Fight
The Divine Dragon is a blend of everything that makes a FromSoft game great.You can absolutely get through these fights without deflecting much, but being able to expertly deflect their insanely fast attacks is oh-so-satisfying. That said, while they might seem tough at first, this is honestly one of the easier minibosses in the game for anyone who has the deflect mechanic figured out.
By fast spinning the Loaded Umbrella - Magnet Prosthetic tool, you can fill the Ashina Elite's Posture bar in seconds, as the boss tries to hit you in vain. So, even if you are still having a hard time parrying all of his attacks, there's still an easy strategy that trivializes this fight.
21 The Shinobi Hunter

The Shinobi Hunter is the flagship example of a standard enemy encounter that feels like a boss fight. By all accounts, it's just a guy with a spear. But, he has such long reach, such a wide variety of attacks, and is so aggressive that for new players this spearman feels insurmountable.
Once you realize that the guy staggers easily and is incredibly susceptible to the Mikiri Counter, this fight sort of becomes a cakewalk. In your first playthrough, the Shinobi Hunter will be a real thorn in your side, but on NG+ you'll likely breeze right past him.
20 The Three Lone Shadows

The three Lone Shadows are the Ministry’s most trusted agents, and each one apparently has a specialty. These are elite purple-clad enemies you find in various places throughout the game, each one has a relatively similar movepool, with a few variations depending on what weapon they use.
The first one players will usually stumble across is the Swordsmen, found in a secluded area of the Ashina Resovoir. The swordsman is the easiest one and can be stealth attacked for a free Deathblow. But, just because this one is the easiest of the three, doesn’t mean that this fight is easy in general. There are a ton of attacks to parry, and that kick attack is deadly, but once you’ve got the pattern down it’s pretty manageable.
The next Lone Shadow is found in the same area where you fought, Jinsuke Saze, one of the Ashina Elite, a bit later into the game. Unfortunately, there’s another purple assassin that fights with him, but luckily players can either stealth kill this extra enemy, or puppeteer ninjutsu him in order to get a big leg up in the Vilehand fight. Otherwise, this fight is pretty similar, though Vilehand likes to use poison-based attacks as well, so keep an eye out for those
The funny thing about the Spearman Lone Shadow is that he actually doesn’t use a spear at all. For the most part, this guy actually fights a lot like Vilehand, complete with Poison attacks as well. Turns out that their names are translated poorly, and that it’s likely each one was meant to have kicks that are like a spear, or as long-reaching as a spear, and so on. In any case, you can fight this guy twice, once at the Serpent Shrine, and again in the Owl Memory of the Hirata Estate. Out of the three, this guy is the most annoying, simply because he can summon dogs to help him in a pinch. Luckily, he can be interrupted while whistling for them, canceling the summon altogether.
19 The Divine Dragon

It’s a bit shocking, but the true narrative final boss of Sekiro, the Divine Dragon, is absurdly easy. All you have to do is just repeat the same series of actions a couple of times, deathblow it to cut out some tears, and you're done!

10 Best Parry Mechanics In Gaming
Turn your opponent's attacks back on them with these powerful parries.The Divine Dragon seems massively imposing during the cutscene and also has one of the most beautifully designed arenas in the game. But, on a mechanical level, all of its moves are clearly telegraphed, there’s no complex pattern to learn, and damaging it is almost too easy.
18 Lady Butterfly

If Oniwa was the first "real" boss, Lady Butterfly is the first real "wall" you’ll probably encounter. Many, many people in their first playthrough of S: SDT got stuck on Lady Butterfly for quite a while because of her long combos, aerial maneuvers, the ghost summons, and also the fact that you had to fight/run through Juzou and his troops before getting to her each and every time.
She's a fantastically fun minor challenge once you're used to the game, the deflect system, and the enemy AI, but a seemingly impossible one if you're not.
17 The Two Remaining Seven Ashina Spears

While the name might imply that Sekiro would be going up against all Seven of these Ashina Spears over the course of the game, he really only fights two. The rest of them have long since died, and only Shume and Shikibu remain (though technically Gyobu Oniwa is one as well).
Yamauchi is fought alone, and is found near the same tower where you first rescued Kuro at the start of the game once the Ministry launches their attack on the Ashina Castle. Now, while he might just seem like a well-armored elite enemy, Yamauchi is actually a pretty difficult fight.
The guy has tons of range thanks to his spear, a lot of unblockable attacks, and tears through your posture bar like its paper. But, if you’re pretty decent with the Mikiri Counter, it can be quite an easy fight with expert timing. Shume, on the other hand, can be a bit more annoying.
There simply isn’t a lot of space for either of these fights, and Shume has a general that fights alongside him. Luckily, you can sneak up and deathblow or even puppeteer this general. In terms of combat, Shume fights pretty similarly to Yamauchi, and there are plenty of ways to cheese this optional mini-boss if you find him too difficult.
16 The Corrupted Monk Illusion

And now here's the intro course for the True Corrupted Monk, one of the best fights in the game. The Corrupted Monk Illusion only needs one Deathblow compared to the actual version of her (yes she is a woman) which needs three.

Honestly, use this boss as a tutorial for how to fight the True Corrupted Monk, since that is one of the longest and most arduous fights in the game. If you can’t seem to learn her odd attack patterns, using items like Fistfuls of Ash and the Shinobi Firecrackers as a bit of a crutch should work just fine.
15 All Headless Variants

The Headless are the ultimate gimmick bosses in Sekiro, requiring you to use Divine Confetti in order to even damage them. They pop up in random areas all throughout the game, and their fights vastly differ in strategy depending on which one you fight and where.
The regular Headless aren’t so bad once you get used to fighting them, but the initial attempts are painful when Divine Confetti isn’t plentiful. The stress of using a limited resource combined with their awkward attack timing and Terror Status makes for a very tense fight.
In comparison, the Shichimen Warrior is like the mage-type version of the Headless. This one uses a staff rather than a sword and is bent on using Terror-inflicting projectiles to insta-kill you. Some people find this variant easy than the default Headless, but most find it a lot more aggravating.
You would think that the Underwater Headless fights would be more difficult, considering underwater combat is rarely executed well. But, for the most part, these confrontations are actually easier and don’t even require Divine Confetti! That said, they are still intensely awkward fights, but they’re not nearly as bad as you would think when first finding a Headless hanging out under the sea.
14 Emma, the Gentle Blade, Shura Ending

Technically the two Shura ending entries are part of the same fight, but they're big NPC's with completely different movesets, so we'll split them up. Emma is an amazing fighter for one who never seemed to show a hint of aggression up to this point.
She attacks in a flurry, overwhelming her opponent with split-second slashes or tons of them at once. But, her fight isn't anything too hard, basically just treat her like an Ashina Elite or O-Rin and try to be as aggressive as possible due to her low posture and you'll be fine.
13 O-Rin Of The Water

O-Rin is technically considered a mini-boss, but she's so different from every other miniboss in the game and such a hurdle for many people that we felt we should talk about her anyway. Her constant flurry of on-beat attacks troubled a lot of people who had been forcing their way through the game with raw aggression and items rather than relying on the deflect and posture systems.

Wo Long: Fallen Dynasty Vs. Sekiro: Shadows Die Twice – Which Game Is Better?
Wo Long: Fallen Dynasty and Sekiro: Shadows Die Twice are both soulsborne with fast-paced action and Eastern inspirations, but how do they compare?Learn her timing, rely on parrying to break her posture, and Wolf will be done with her quite quickly. Like other speed-centric enemies (such as the Ashina Elites or the Long-Arm Centipede Giraffes), it might seem overwhelming at first, but once you build up a bit of muscle memory for her attack timing, it should be pretty easy to overcome.