Tactics Ogre: Reborn branches in three directions. The route you'll take is dependent upon the choices you make. If you took the Lawful path at the end of the first chapter, you're locked into that course. But, if you took the Chaotic path at that same moment, your story will diverge once more — at the conclusion of the second chapter.
Did you stay the course, refusing Leonar's terms? You've eschewed the opportunity to swing over to the Neutral path, meaning you're full speed ahead for Chapter 3 (Chaos). Just as we've been doing for other chapters, we'll guide you through the main decisions, as well as provide an overview of every battle Denam will soon face.
Story Battle: Port Asyton

|
Enemies |
Leader: Gannon (Berserker) |
|
|---|---|---|
|
2x Archer, 2x Terror Knight, 1x Wizard, 1x Rune Fencer, 1x Clay Golem |
||
|
Deployment |
10 Units |
|
|
Guests |
N/A |
|
|
Victory Condition |
Defeat Gannon |
|
|
Difficulty |
★☆☆☆☆ (1/5) |
|
Chapter 3 Chaos isn't easy, but at least it has the good graces to start off that way. What separates this clash at Port Asyton from the previous one is that you have the high ground. On a map like Port Asyton, that counts for something.
- For the most part, you can hunker up around your team's spawn location and await the enemy. Just be sure to gather tankier units toward the front, especially those with Rampart Aura and the like.
- Position your 'softer' units a couple of lines back from where they begin. Between this and the front line, it will be fairly difficult for the enemy Archers and Wizard to get to you until you are within range to strike first.
Story Battle: Xeod Moors

|
Enemies |
Leader: Feinatorre (Knight) |
|
|---|---|---|
|
2x Ninja, 2x Valkyrie, 2x Warrior, 2x Wizard |
||
|
Deployment |
10 Units |
|
|
Guests |
N/A |
|
|
Victory Condition |
Defeat Feinatorre |
|
|
Difficulty |
★★★☆☆ (3/5) |
|
The issue with this Xeod Moors fight is... it's Xeod Moors. It's handily one of the most open battlefields, so naturally, the enemy is loaded with ranged units. Your best bet is to do the same, at which point it's something of a pitched clash.
- If you're rather low on ranged friends, refrain from charging forth. Instead, seek to meet the enemy within the third or so of the map that's 'yours' (near where you spawned). This way, you can more easily pull back if needed.
- It's not often we advise this, since it splits teams up too much, but consider moving individual units forward at angles to deal with one foe each. This mainly applies to your bulkier party members, but they should be able to handle one melee unit and one ranged unit per member, so long as they've brought a full supply of healing items and your Cleric is toward the center of your side.
- Feinatorre doesn't typically come at you until later into the fight, which is a bit aggravating. Once he does, no matter how the rest of the enemy is faring, focus on heading to him. Since he's a Knight, it's best to use spells (and Finishing Moves when available).
Story Battle: Coritanae Castle

Coritanae Castle is customarily well-defended, but not the full-fledged choose-your-way-in castle siege that you've seen before and will see multiple times this chapter. It's a two-fight affair, with a fairly easy bout followed by a not-so-much.
Stronghold Battle: The Gates Of Coritanae

|
Enemies |
Leader: Gildora (Witch) |
|
|---|---|---|
|
3x Archer, 2x Berserker, 2x Wizard, 1x Stone Golem, 1x Knight, 1x Cleric |
||
|
Deployment |
10 Units |
|
|
Guests |
N/A |
|
|
Victory Condition |
Defeat Gildora |
|
|
Difficulty |
★☆☆☆☆ (1/5) |
|
This fight's fun, and we don't mean that ironically for a change. Crank our difficulty rating up a couple of stars if you want to meet the foe over the bridge, but it's a relative cakewalk if you pick the other route, over the separated stones and the water as you'll see in our (flawless victory!) screenshot.
- As soon as the battle erupts, begin funneling your full army, tanks first of course, across the lower path. The troops that deploy up north should cross the bridge slowly enough that they won't come to bear on your flank too hard. In fact, we did this fight twice, and both times, the enemy Knight just sort of hung out too far to do anything to us.
- The Stone Golem's the only full-fledged threat, so keep it occupied with Knights/Terror Knights and pave your way to Gildora.
Nice last-second change of heart there, Gildora.
Stronghold Battle: Coritanae Ward

|
Enemies |
Leader: Xaebos |
|
|---|---|---|
|
2x Terror Knight, 2x Cleric, 2x Rune Fencer, 2x Archer, 1x Dragoon, 1x Warlock |
||
|
Deployment |
10 Units |
|
|
Guests |
N/A |
|
|
Victory Condition |
Defeat Xaebos |
|
|
Difficulty |
★★★★☆ (4/5) |
|
If Gildora was a warmup, Xaebos is the sudden ten-mile sprint that follows. At the onset, seeing Xaebos and his forces gathered on the far end of the map, it won't seem so bad. It's not like there's a hundred of them or anything. But between the Clerics and his own wild defense keeping Xaebos breathing easy, and the excellent vantage points the rest of his troops have, this is far from a cakewalk.
- You're going to want to bring tanks galore. Have two of them to meet the Terror Knights head-on, but be aware that Xaebos himself will soon join the fray up there on the raised center platform. If you can spare a third, bring them. Buffer them all with your best attackers, preferably mages, because Xaebos will seldom leave this area.
- As for the other lanes, the lowered spots to the north and south of the platform, the Rune Fencers like to come through the southern one, with Archers behind them. If you have Arycelle (and you should), keep her on your end of the southern lane, using Slumber Shot whenever she can to temporarily eliminate the Rune Fencer threats.
- The Clerics we mentioned really do excel at maintaining Xaebos' health. Since we don't advise trying to bring any units to the far end where they spawn, not even Canopus as he's needed elsewhere, don't attack Xaebos until you can bring him down in two turns, preferably just the one, with Finishing Moves.
Story Battle: The Reisan Way

|
Enemies |
Leader: Cassandra (Necromancer) |
|
|---|---|---|
|
2x Familiar, 1x Archer, 1x Juggernaut, 1x Hoplite, 1x Wizard, 1x Rogue (1x Knight, 1x Terror Knight, 1x Wizard, 1x Warrior, All Stilled) |
||
|
Deployment |
10 Units |
|
|
Guests |
N/A |
|
|
Victory Conditions |
Defeat Cassandra |
|
|
Bonus Objectives |
Win with a Cleric in the party. |
|
|
Perform an action to exorcise an enemy. |
||
|
Obtain a buff card. |
||
|
Difficulty |
★★☆☆☆ (2/5) |
|
Suddenly, the guide includes bonus objectives, we know. We'll add them for the battles behind this (as well as everything in Chapter 2 Chaos) as soon as we can. Anyway, this is a rad bout, isn't it? With four Undead, all Stilled, from the jump. They'll rise in three turns, as per usual, and there are more you'll have to Still along the way to Cassandra.
- Cassandra herself is a glass cannon. If you can get two strong units to her with Finishing Moves at the ready, and especially if either of them has fetched a Physical Up Card, you can end the fight practically before it begins. If not, just know that this is how you can bring her down in due time.
- Don't waste turns trying to reach every Undead before they resurrect. Instead, focus on the ones to the south, closer to you, and let it happen elsewhere. Taking Donnalto with you here will obviously speed things up nicely.
- You'll likely end up bumping into the bulk of the enemy forces around the center of the stone bridge, so this is a good time to 'sneak' a few over to Cassandra and nuke her.
Story Battle: Bahanna Highlands

|
Enemies |
Leader: Hektor (Knight) |
|
|---|---|---|
|
2x Frost Dragon, 2x Cleric, 2x Archer, 1x Gryphon, 1x Dragoon, 1x Wizard, 1x Terror Knight, 1x Beast Tamer |
||
|
Deployment |
10 Units |
|
|
Guests |
N/A |
|
|
Victory Conditions |
Defeat Hektor |
|
|
Bonus Objectives |
Perform an action to debuff an enemy. |
|
|
Perform an attack with 100 percent accuracy. |
||
|
Obtain a buff card. |
||
|
Difficulty |
★★★☆☆ (3/5) |
|
Hektor's basically a weaker Xaebos, and the map is far more forgiving toward mistakes. That said, there are enough dangerous enemies here to be on your guard.
- Don't try to rush Hektor. Doing so involves moving all your units to the western edges of the map, and while you're performing that diagonal march, Hektor's units will be in good shape to box you into corners.
- If you have any Flame Dragons, deploying them against the Frost Dragons will make short work of them. Well, as 'short work' as any Dragon, so it will still be several turns, but easier. If you don't, but you do have a bulky monster or two, deploy them against the Dragons (and Gryphon) instead.
- It becomes a protracted fight against these creatures otherwise, but Knights and Terror Knights can hold them off. Dragoons are natural-born beast killers, especially Dragons, so they're an exceptional pick.
Story Battle: Brigantys Castle

No matter which stage you choose for the initial skirmish, bring Canopus along for some entertaining banter throughout the battle.
Stronghold Battle Choice A: Brigantys West Curtain Wall

|
Enemies |
Leader: Orgaeu (Beast Tamer) |
|
|---|---|---|
|
2x Octopus, 2x Archer, 2x Wizard, 2x Hoplite, 2x Cleric, 1x Juggernaut |
||
|
Deployment |
10 Units |
|
|
Guests |
N/A |
|
|
Victory Conditions |
Defeat Orgaeu |
|
|
Bonus Objectives |
Win with a Dragoon in your battle party. |
|
|
Obtain a buff card. |
||
|
Difficulty |
★★★☆☆ (3/5) |
|
At first glance, this sizable map will seem more intimidating than it is. We recommend this route over the other one, unless you have several fliers to back up Canopus. More on that in a bit.
- Tactics Ogre: Reborn is pretty merciful about bonus objectives. Obtaining buff cards is ever-handy, and bringing a Dragoon or two is a good idea to combat those Octopi.
- Speaking of the Octopi, dispatch your best beast-killers to meet them head-on in the water (or, ideally, on the icy platforms dotting the lake).
- Most of the enemy party will either be slow to reach you or straight-up remain elevated on the far side of the map for the bulk of the battle, popping Magical Leaf items like they're going out of style.
- They will come to greet you whichever path you take — the one to the north or the one to the south. Either way, pick one path and stick to it, bringing everyone not preoccupied with those beasts. We had an easier time with the south path, as the right one gives more enemy units a longer-lasting opportunity to stymie your progress toward Orgeau.
Stronghold Battle Choice B: Brigantys South Curtain Wall

|
Enemies |
Leader: Kakrinoros (Wizard) |
|
|---|---|---|
|
6x Archer, 1x Knight, 1x Terror Knight, 1x Witch, 1x Cleric, 1x Wizard, 1x Berserker |
||
|
Deployment |
10 Units |
|
|
Guests |
N/A |
|
|
Victory Conditions |
Defeat Kakrinoros |
|
|
Bonus Objectives |
Perform an action to restore an ally's HP. |
|
|
Perform an action to debuff an enemy. |
||
|
Difficulty |
★★★★☆ (4/5) |
|
Yes, this one's a bane. As you can see, you start off in an exceptionally low, semi-enclosed, area. Since the South Curtain Wall is so high up, it stands to reason that the enemy would have Archers, and boy, do they have Archers. They will immediately begin raining down hell upon your party, and the Witch and Wizard aren't far behind.
- If ever there were a battle that's simplified with fliers, it's this one. Even if all you have for flying units is Canopus, send him up at once. If he has backup, you're in far better shape.
- The best approach is to get to Kakrinoros with the fliers and take him out early in the game. He'll be healed, sure, but as a Wizard, he's not very sturdy. Even if he gets buff cards (and he will), at least there's no Defense Up buff.
- If you can't risk sending fliers to Kakrinoros, this will be a much more prolonged fight. This likely goes without saying, but get your team to a higher elevation ASAP.
- Your saving grace in this scenario is that the Archers will probably still be over near the edge of their wall, where they were picking you off at the start. This should afford you just enough time to do some real damage to the other foes before they have the chance to get to you again, at which point you'll be better off heading to Kakrinoros.
Stronghold Battle: Brigantys Hall

|
Enemies |
Leader: Xaebos (Knight) |
|
|---|---|---|
|
2x Stone Golem, 2x Cyclops, 2x Archer, 2x Cleric, 2x Terror Knight 1x Wizard, 1x Witch |
||
|
Deployment |
10 Units |
|
|
Guests |
N/A |
|
|
Victory Conditions |
Defeat Xaebos |
|
|
Bonus Objectives |
Win with an Archer in the battle party. |
|
|
Perform an attack with 100 percent accuracy. |
||
|
Perform an action to debuff an enemy. |
||
|
Difficulty |
★★★★★ (5/5) |
|
Xaebos is not going out on a whimper. Everything we said during the Coritanae Ward clash with him holds true here, except amplified in every sense. Let's get to it.
- There's no 'center platform' and 'lowered paths' here, so the idea of splitting your team up as much is out of the question.
- Quickly send tanks and strong strikers to meet the quartet of horror that is the Stone Golems and Cyclops. You should try kiting them toward the north wall, preferably between two suits of ornamental armor, getting them out of the way and keeping them occupied.
- Leave the remainder of the party fairly close, and prepare to handle those Archers, Terror Knights, and spellcasters by deploying your own Archers, and ideally some Ninja, alongside either Warriors or Rune Fencers/Valkyrie. If you have a powerful enough Beast Tamer, and at least one monster to justify bringing them along, remember that their Finishing Moves are spectacular.
- Apart from our recommendation for the Stone Golems and Cyclops, you're going to be wanting to smack the enemy as soon as the fight ensues — don't dawdle positioning yourself much, because they sure won't.
- Xaebos' Cleric protection is back with a vengeance, so our advice about only trying to harm him once you have several Finishing Moves prepped is also back. Denam, Canopus, and ideally one more unit, combined, should do the trick. If not, hurry to make up for whatever the Clerics cast upon him the following round.
Story Battle: Bahanna Highlands (Again)

|
Enemies |
Leader: Modiliani (Warlock) |
|
|---|---|---|
|
2x Ninja, 2x Berserker, 2x Wizard, 2x Archer, 2x Rogue, 2x Cleric |
||
|
Deployment |
10 Units |
|
|
Guests |
N/A |
|
|
Victory Conditions |
Defeat Modiliani |
|
|
Bonus Objectives |
Win with an Archer in the battle party. |
|
|
Use magic to remove a debuff. |
||
|
Difficulty |
★★☆☆☆ (2/5) |
|
If you want Hobyrim, you're going to have to rescue him. And even if you don't care about him as a character (which would be a shame, because he's awesome), you should care that he's an ace addition, especially if you lack a Swordmaster.
- Between his high evasiveness coupled with counterattacking in the form of Preempt, the distance he begins with from the enemy, and his likelihood of scoring a hit or two and then retreating back, keeping Hobyrim around isn't as hard as some other NPCs.
- Since he'll probably come to you, don't leave him unattended. Seize the chance to form a barrier near him, but dispatch your attackers further on toward the enemy. The Ninjas will toss some of their summon spells at your group, so keep distance between your units to avoid being hit for all that's worth.
Craft a ton of Mending Essences, or at least Mending Salve +3s, if you can. You'll want four for Denam during the second battle, if you are dueling Leonar.
Story Battle: Coritanae Castle, Part Two

You don't have to accept Leonar's offer to a duel once you've breached Coritanae's walls here, but depending on what sort of player you are, and your feelings toward Leonar as a character, you may feel completely compelled to do so. We get it.
Stronghold Battle: The Gates Of Coritanae
|
Enemies |
Leader: Marino (Terror Knight) |
|
|---|---|---|
|
2x Archer, 2x Beast Tamer, 1x Witch, 1x Cleric, 1x Flame Dragon, 1x Flood Dragon, 1x Cloud Dragon, 1x Arc Dragon, 1x Octopus |
||
|
Deployment |
10 Units |
|
|
Guests |
N/A |
|
|
Victory Conditions |
Defeat Marino |
|
|
Bonus Objectives |
Win with a Knight in your battle party. |
|
|
Win with a Dragoon in your battle party. |
||
|
Difficulty |
★★★☆☆ (3/5) |
|
As frightening as this stage seems, we've been through worse. In a reversal of your initial foray at The Gates of Coritanae, you should consider heading north, up the bridge. It's the path of least resistance, if not by much.
- Position your tanks on both ends of the team to ward off the approach from the other enemy squad, because they will get to you before you've completely carved your path to Marino.
- So long as you can maintain a bulwark to protect your soft center, you'll only need to worry much about the Archers and Witch. Pick them off by diverting your attention to them first, though wiping out even just one of them should do to make the trek to Marino substantially less taxing.
Stronghold Battle Choice A: Coritanae Ward
We'll have coverage of this version of the Leonar fight soon. For the time being, know that it functions mechanically similar to both Xaebos battles, albeit closer to the first (easier) one than the second (borderline-nightmarish) one.
Stronghold Battle Choice B: Coritanae Ward (The Duel)

|
Enemies |
Leader: Leonar (Knight) |
|
|---|---|---|
|
N/A |
||
|
Deployment |
Denam |
|
|
Guests |
N/A |
|
|
Victory Conditions |
Defeat Leonar |
|
|
Bonus Objectives |
Win without any incapacitated units. |
|
|
Obtain a buff card. |
||
|
Difficulty |
★★★★★ (5/5) |
|
We've got to hand it to this one's bonus objectives. Granted, there's not much else they could have chosen for a one-on-one, but when the first objective is 'don't get a game over', and the follow-up is 'do the one thing that will let you win', it's still worth a chuckle.
- Don't do this with a non-tank class. Heavens above, it's doable, but it's an absolute catastrophe.
- Honestly, just... do it with a Knight. Don't think twice.
- This is the Vyce duel 2.0, but harder. Meander around the map, picking up buff card after buff card. Whenever Phalanx activates, that's your time to strike. Whenever it does not, keep running.
- Courtesy of Tactics Ogre: Reborn's Union Level gating off excessive grinding you're almost guaranteed to be unable to survive more than two hits from Leonar without Phalanx active, and then only barely. Bring a four-stock of the most powerful healing items you have crafted, preferably Mending Essences.
- The fight's a five-star affair in our book, but only because Leonar is the powerhouse that he is. If you're unlucky with the RNG on buff cards, it might take you a long while to get enough to seal his fate, and if Leonar himself is especially lucky, things can get even uglier, and quickly at that.

Enjoy being sad.
Story Battle: Mount Weobry

|
Enemies |
Leader: Ganpp (Beast Tamer) |
|
|---|---|---|
|
2x Gryphon, 2x Cockatrice, 2x Archer, 2x Juggernaut, 1x Cleric |
||
|
Deployment |
10 Units |
|
|
Guests |
N/A |
|
|
Victory Conditions |
Defeat Ganpp |
|
|
Bonus Objectives |
Win with an Archer in your battle party. |
|
|
Obtain a buff card. |
||
|
Difficulty |
★★★★☆ (4/5) |
|
If you're wondering why so many of our screenshots feature our Flame Dragon, Nabudis, the answer's simple. He's fast as heck, so if we snap a screenshot at the start of a battle, there he is, basking in the attention, knowing that a dragon named after a Final Fantasy 12 town will be seen by hundreds of people, if not thousands.
- If you slay Berda, Ganpp's Attack increases, and the entire party suffers Breached. If you slay Obda, Ganpp is healed, and the party's Weakened. Banga's death inflicts Falsestrike on the party, and Zanga's causes everyone to suffer from Staggered.
- Further complicating matters, Ganpp's linear approach to your side of the map gives him plenty of time to trigger Berserk, as well as collect buff cards. If he gets more Attack Up, in conjunction with Berserk and the Berda death boost, this dude is nigh-unstoppable.
- The solution is simple, but somewhat difficult to achieve. You want to be able to occupy all of Ganpp's beasts with a mixture of units whilst maneuvering units with your best Finishing Moves both to the bottom of cliff and on to the rock platforms on the left and right of the narrow stone path that Ganpp crosses to meet you.
- If he's at risk of ascending the cliff too early, get some Knights, Terror Knights, or Dragoons along the wall. Unleash a flurry of Finishing Moves from the platforms as well as ahead of him, knowing there's a good chance the unit in front will get knocked out by a retaliatory blow. It's an all-in-one gambit.
Story Battle: The Arkhaiopolis of Rhime

|
Enemies |
Leader: Hiram (Terror Knight) |
|
|---|---|---|
|
3x Knight, 1x Octopus, 1x Warlock, 1x Beast Tamer, 1x Cleric |
||
|
Deployment |
10 Units |
|
|
Guests |
N/A |
|
|
Victory Conditions |
Defeat Ganpp |
|
|
Bonus Objectives |
Win with an Archer in your battle party. |
|
|
Win with a Knight in your battle party. |
||
|
Difficulty |
★☆☆☆☆ (1/5) |
|
For once, there's not much to say about a battle. This has to be the easiest fight this chapter. At least there's dialogue ahead of it establishing these blokes as canonically weak. Just treat this like a training battle, because it really is that easy.
Welcome aboard, Gildas and Mirdyn. Both upstanding gentlemen are White Knights, which are essentially Knights cranked up to 11. You'll want them in your active party more often than not. You'll be given five White Knight Marks, but sadly, their usage is limited. They're mainly there in case you need them after swapping the lads to another class, which you probably shouldn't bother doing in the first place.
Ravness makes a great White Knight, but you surely understand why she's not an option on this run!
Story Battle: Boed Fortress

|
Enemies |
Leader: Oz |
|
|---|---|---|
|
11x Templar (!) |
||
|
Deployment |
10 Units |
|
|
Guests |
N/A |
|
|
Victory Conditions |
Defeat Oz |
|
|
Bonus Objectives |
Perform an action to debuff an enemy. |
|
|
Obtain a buff card. |
||
|
Difficulty |
★★★★☆ (4/5) |
|
As befits a Dark Knight of Lodis, Oz doesn't mess around. His penchant for doling out pain also seems to come with a near-guarantee that he won't be harmed in the process, because this guy's brought 11 Templars with him. Not only is that a wild number, but this is your first time against them, too. Quite the first impression.
- Templars are souped-up versions of other classes that share some similarities in the stats department (and, clearly, have a different look). The closest class the Templars are uniformly akin to is Terror Knights, but they come with an assortment of weapons and elemental spells.
- Start by sending everyone up Boed Fortress' east 'stone stairway' (for lack of a better term). Single-file, with Templars having area-of-effect spells, sounds more dangerous than it is; you'll only play victim to their antics for a couple of turns before you can take the fight to them directly.
- The Templars are, we don't want to say fodder when they're fairly strong, but still susceptible enough to your own magic to warrant targeting them with it. They aren't stocky enough to withstand things like Arycelle's Finishing Moves, either. Having your long-range party members tucked behind your tanks is as savvy as usual. Focus your fire on the Templars one by one.
- As for Oz, he's deadly. The characters you select to finish the fight by defeating him will be buffeted by his strong special moves. It's likely at least one will get knocked out before he goes down.
Story Battle: Phidoch Castle

Chapter 3C is nearing its end, but before you can kiss it goodbye, you must go through a lopsided gauntlet: it's another stronghold situation, in which you choose from two possible routes into a castle. The ways in are deceptively breezy next to the much harder interior finale.
Stronghold Battle Choice A: Phidoch West Curtain Wall
|
Enemies |
Leader: Mercure (Swordmaster) |
|
|---|---|---|
|
2x Stone Golem, 2x Iron Golem, 3x Archer, 1x Rune Fencer, 1x Cleric, 1x Warlock, 1x Berserker |
||
|
Deployment |
10 Units |
|
|
Guests |
N/A |
|
|
Victory Conditions |
Defeat Mercure |
|
|
Bonus Objectives |
Perform an action to restore an ally's HP. |
|
|
Obtain a buff card. |
||
|
Difficulty |
★★★☆☆☆ (3/5) |
|
Crushing damage of any sort is your best friend here. That, coupled with ample spells, is how you'll bypass the quartet of Golems who will quickly rush you when the fight begins.
- Split into two groups, each with a couple of tanks at the forefront, followed directly by melee fighters, with healers at the rear.
- Take the more offensively-capable team up the side of the map as our screenshot demonstrates. The turbulence they'll face won't be as bad as the team that heads up the center, with the unenviable task of staving off the Golems.
- You will need to mix them up a bit before you can reach Mercure; a unit or two from the offensive team may well have to take a detour to help the defensive center crew at some point. Don't get too distracted for too long, because you want to reach Mercure in swift order.
Stronghold Battle Option B: Phidoch South Curtain Wall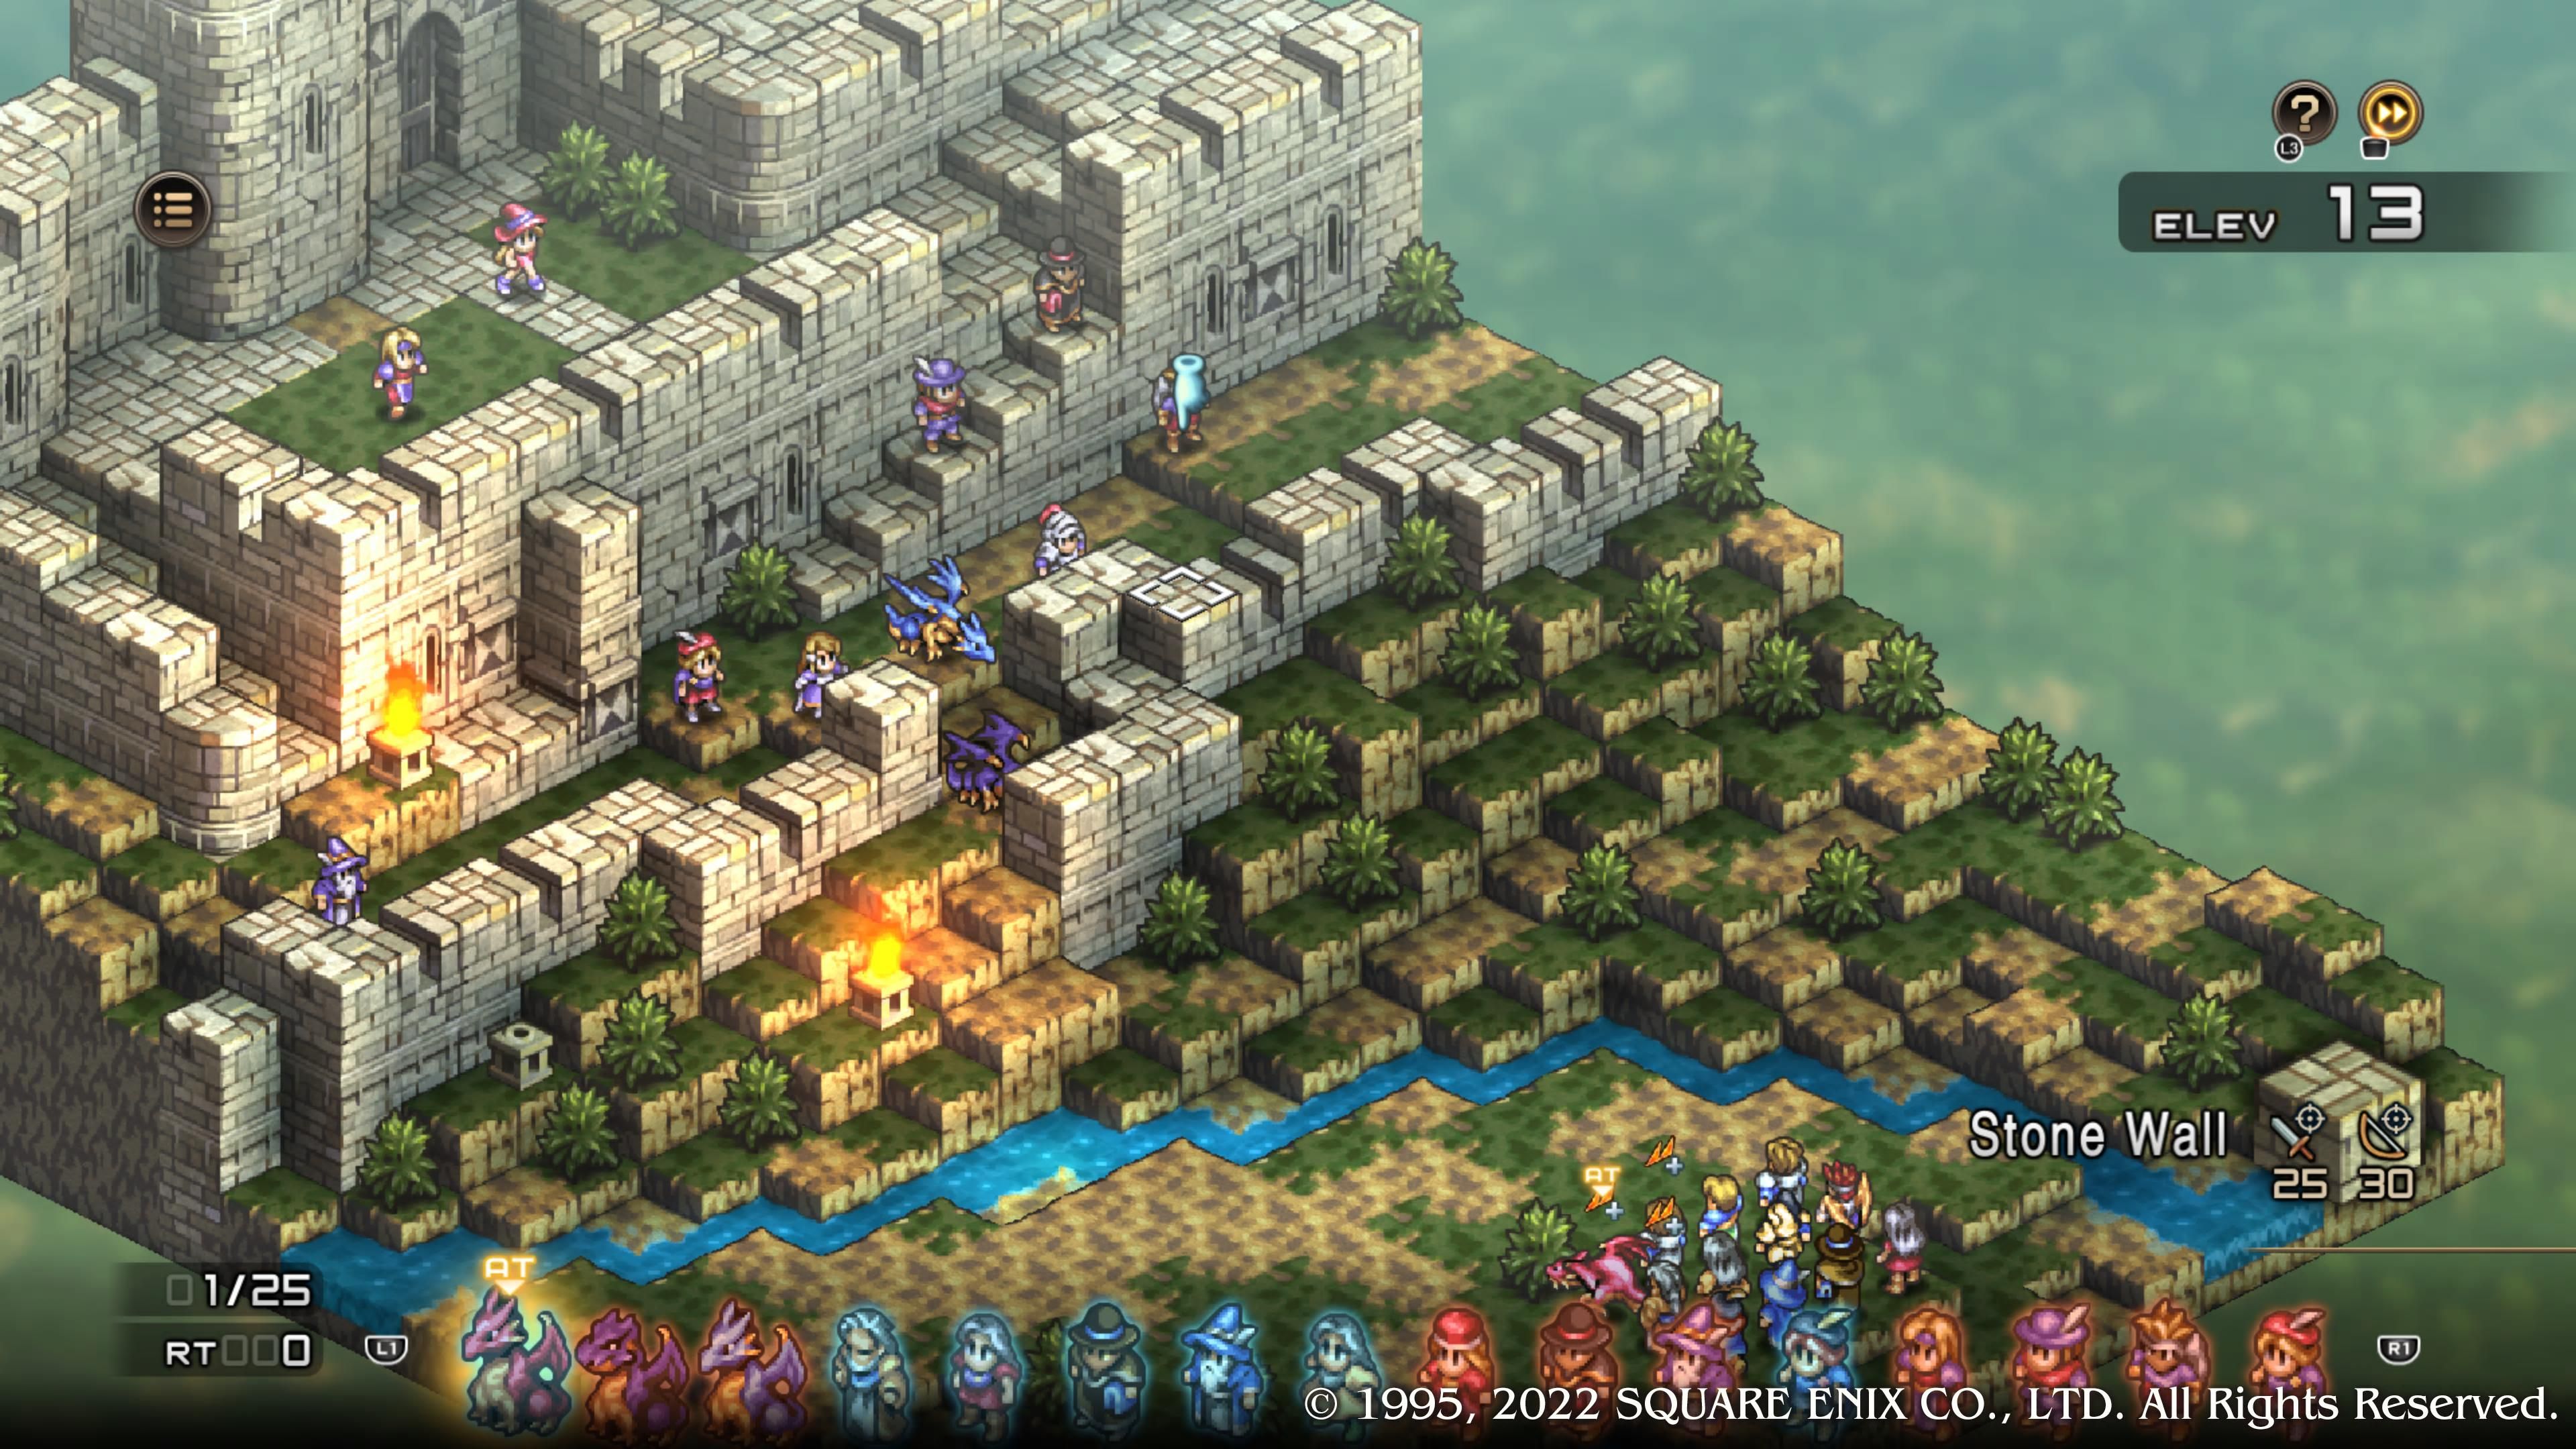
|
Enemies |
Leader: Vestiarri (Enchantress) |
|
|---|---|---|
|
3x Archer, 2x Knight, 2x Cleric, 1x Flood Dragon, 1x Thunder Dragon, 1x Warlock |
||
|
Deployment |
10 Units |
|
|
Guests |
N/A |
|
|
Victory Conditions |
Defeat Vestiarri |
|
|
Bonus Objectives |
Win with a Dragoon in your battle party. |
|
|
Perform an attack that strikes multiple tiles. |
||
|
Difficulty |
★★☆☆☆☆ (2/5) |
|
- Bring a Dragoon or two to trivialize the Dragons. Beating them still takes time, but it's helpful.
- Your objective is to break enough of the enemy's ranks that Canopus and any other fliers can go for the throat and down Vestiarri.
- With as many walls as there are here, it won't so much be a matter of leading with tanks like usual; instead, you'll just be exchanging arrow and spell fire until Canopus can do his thing. This is the easier battle.
Stronghold Battle: Phidoch Hall

|
Enemies |
Leaders: Oz (Knight Commander) and Ozma (Knight Commander) |
|
|---|---|---|
|
4x Templar, 1x Hydra, 1x Knight, 1x Cleric, 1x Beast Tamer, 1x Archer, 1x Witch, 1x Terror Knight |
||
|
Deployment |
10 Units |
|
|
Guests |
N/A |
|
|
Victory Conditions |
Defeat Oz and Ozma |
|
|
Bonus Objectives |
Win with an Archer in the battle party. |
|
|
Perform an action to debuff an enemy. |
||
|
Obtain a buff card. |
||
|
Difficulty |
★★★★★ (5/5) |
|
If you thought the Oz battle was hard, this one's that much harder. Your units, even Knights and Dragons, will be dropping like flies at some point, so bring healing stones and Resurrection. Get a Beast Tamer with Lob to help deliver the goods in more expedient fashion.
- Quickly send tanks to the staircase. Their job is to hold off all the upstairs forces, but they won't pull it off with aplomb. Once Ozma is in front of them, she's going to wreak havoc. At that point, try to separate your tanks and melee attackers in this area, just by one to two tiles, to prevent Ozma, as well as the Witch, from multi-targeting you as much.
- Don't send everyone to the staircase, or Oz will box you in on the lower side whilst Ozma does the same from above. Take tough beasts to absorb his ridiculously high damage. Swordmasters are prime here, as Preempt and their overall evasiveness will help to keep Oz at bay until you can bring him down with a flurry of Finishing Moves.
- Neither Oz nor Ozma seem to gain any automatic buffs when their sibling perishes, but that doesn't change the fact that they're mighty enough as-is. By the time Oz is a goner, Ozma will probably be sandwiched between a smattering of your friends and foes. Focus fire on her, even if it means trampling your own allies, once you think you can kill her in time before they're dead for good.
Congratulations on getting through a tumultuous chapter!