The Last Hero of Nostalgaia has everything you would expect from a Soulslike, ranging from corpse runs to rich lore and atmosphere to challenging boss encounters. Despite there only being a handful of bosses in the game, mostly all of them will give you that satisfying challenge you come to this series for, with that rewarding feeling when you emerge victorious.
Gnom, for example, is the third boss you will come across in The Last Hero of Nostalgaia and is easily one of the more complex and challenging to square off against in the game. His eloquent movements and heavy-hitting attacks can make it hard to pinpoint when it's your turn to strike, and his second phase adds even more chaos and confusion into the mix.
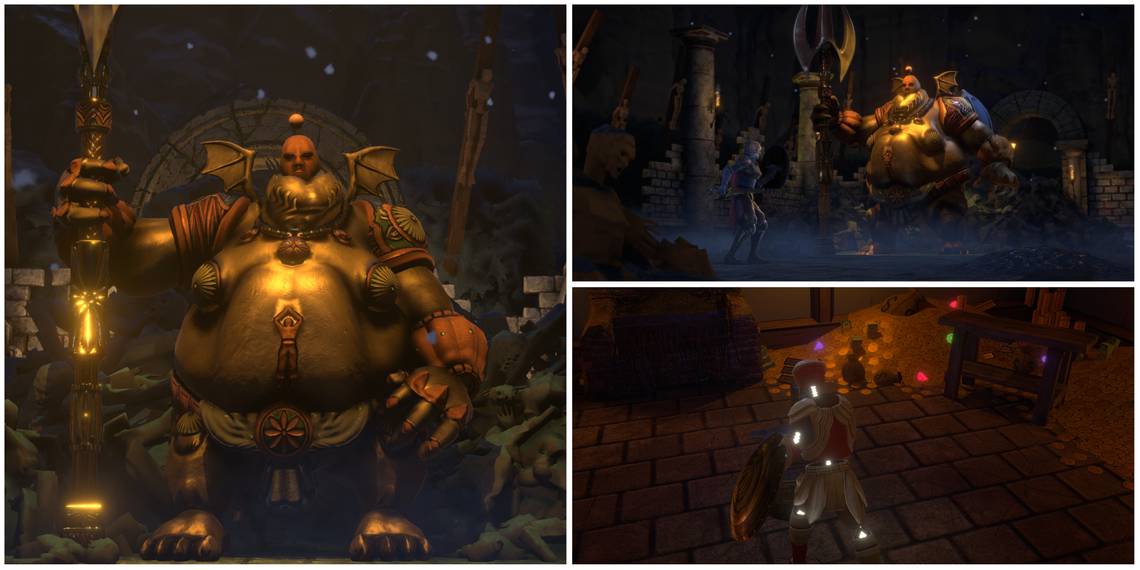
Gnom Overview

As already covered, Gnom is the third boss of The Last Hero of Nostalgaia and is one of the more challenging ones in the game. Gnom, like most of the bosses in Nostalgaia, has two phases you will have to deal with and learn to defeat him. For this encounter, we recommend upgrading your weapon as much as possible. We also suggest ensuring you have exchanged The Grinder's Withered Icon to receive an extra charge to your Heroic Icon (Estus Flask).
When defeated, Gnom will drop you a large amount of Memory (Souls) and Gnom's Withered Icon, which you can take to any Tether and return it for an additional charge on your Heroic Icon, bringing you up to five total. Going into this encounter, you should have four Heroic Icons, which should help you quite a bit, considering the battle's phase shifts and the overall difficulty.
How To Defeat Gnom

When it comes to trying to take on Gnom, there are a few things you must know that will help you out tremendously. During the first phase, all of Gnom's attacks are Physical-based, meaning any shield that absorbs 100 percent Physical Damage should be your go-to. The Shield of Nostalran will be a literal lifesaver during this encounter, so be sure to make good use of it.
However, when the second phase begins, Source-based attacks will enter the scene, but you can - and should - deal with it as quickly as possible. While Gnom's attack patterns are more or less the same in both phases, the introduction of a spirit form of him that can deal Source Damage to you can be disruptive and hard to resolve.
The sections below will split the encounter into two sections, the first and second phases. We will cover Gnom's moves, how to resolve them, and when you should attack. Overall, once you learn his patterns, there's not much to this encounter, but it can be overwhelming the first few attempts.
Phase One
The first phase of the Gnom boss fight will have several moves you will have to look out for, but most of them will allow you to follow up with your own attacks if you play your cards right. One of the moves Gnom will do frequently is to perform multiple large sweeping attacks with his lance before finishing off the string with an overhead slam.
During this encounter, we found that blocking the first string of attacks with the Shield of Nostalran and then rolling toward him as he performs his overhead was the best method of dealing with it. Not only do you not take damage, but Gnom's lance will occasionally get stuck in the ground, allowing you to retaliate with two to four attacks on your own, depending on your build. Dex Builds can land more hits than Strength Builds, with Source Builds being able to cast lots of Codes (Spells) at Gnom before he recovers.
Another frequent action Gnom uses during this phase is he will move to the opposite end of the arena and begin casting large boulders onto the arena, forcing you to dodge them before they crash land on you. This move can last for an extended period of time, so be prepared to dodge like there's no tomorrow. While you can get close to him and hit him during this encounter, we recommend just dodging the boulders, as you want to avoid taking any damage or risks until at least the second phase.
There will also be moments where Gnom dances around and tries poking you with his lance and might even follow it up with a series of quick jabs or twirls. Don't let his wild movements or forceful thrusts throw you off guard; just block everything he throws at you. While you won't be able to land many attacks there, there will be a small window where you can sneak one or two in after blocking, and we suggest trying to take it any chance you get.
Phase Two
After you whittle Gnom's health down to around 50 percent, he will enter his second phase, where we suspect most people are getting tripped up. In addition to Gnom's wild movements and swift attacks, he will summon a phantom version of himself at the entrance of the arena, who will cast all sorts of attacks at you. To quickly resolve this mechanic, beeline over to the phantom and give it a few smacks to destroy it.
Please note that you cannot lock onto the phantom, but you can destroy it, which will be your top priority when this phase begins. We recommend leading the real Gnom far away, then quickly making your way over to the phantom to destroy it without worrying about Gnom interfering. Once you eliminate the phantom, it will never return, leaving only you and Gnom.
The remainder of the fight will be the same mechanics as the first phase, but with the addition of one more that has Gnom stand in the middle of the arena and cast Source attacks at you. Like the boulder phase, you will want to focus on dodging the attacks rather than getting close enough to Gnom to hit him. Once he's done casting, if you are near him, you can typically land one or two hits on him before he moves on to his next attack.
Additionally, Gnom does pick things up quite significantly in the second phase, making his attacks quicker than before. As a result, your openings for attacks are much smaller, so don't get too carried away when trying to land hits. We recommend one or two hits at most, then immediately returning to the defensive. Also, keep your eyes on your Stamina at all times, as it is more crucial in this fight than most others due to the relentlessness of Gnom and how his attack strings are structured.
General Advice
Gnom can be pretty intimidating initially, as he is agile and swift yet extremely powerful and has a significant health pool. Due to this, it will take you a few attempts to adapt to his strange movement and to get a feel of his patterns. Once you get into the flow of the encounter, you will learn when you can attack and when you should back off and let the current mechanic resolve itself before resuming your offense.
Your build will also dictate how you should play, so keep that in mind. Much like The Grinder, in this encounter, we feel that Source Builds may be in the most advantageous situation, as Gnom has very few ranged attacks to disrupt or challenge you. Aside from his boulder move or Source attacks, you are more or less safe if you can keep your distance. Strength and Dexterity builds, however, they will need to manage their Stamina and should always be blocking and looking for the most opportune times to attack.