Among the collectibles in Tiny Tina's Wonderlands are Lost Marbles (the trapped memories of an amnesiac), Poetry Pages (scrawled poems written by the poet in Brighthoof), and, of course, the Lucky Dice!Lucky Dice give you a special reward when you find them! On top of the loot they drop on the spot, they'll also increase your 'Loot Luck' stat, which affects the quality of the gear that drops for you in general. To maximize your looting and shooting, we're detailing how to find every single Lucky Die in the Drowned Abyss!
1 - Coral Reef
.jpg?q=50&fit=crop&w=740&dpr=1.5)
Right after entering this area, stick to the right-hand side of the path to find this Lucky Die on some coral.
2 - Guarded By Vines And Crabs
.jpg?q=50&fit=crop&w=740&dpr=1.5)
After picking up the previous Die, flip and stick to the left-hand side. There are some red, glowing vines you can melee to access a new area. There, guarded by some very friendly we promise crabs, is another Lucky Die.
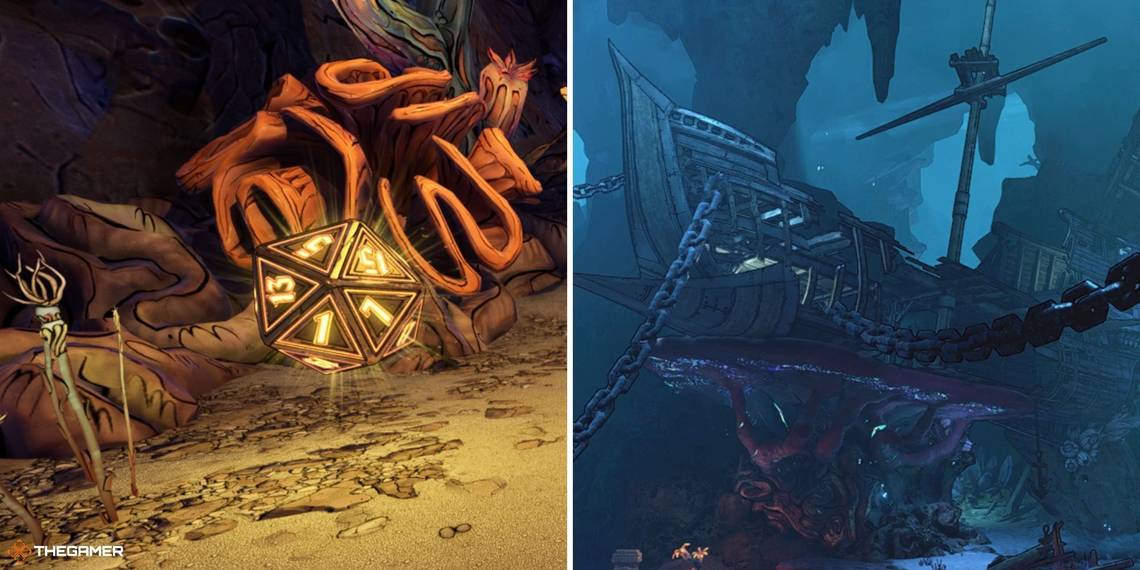
3 - Ksara, The Diversion From Lucky Dice
.jpg?q=50&fit=crop&w=740&dpr=1.5)
After meeting Tina's favourite character, Ksara, for the first time, check nearby for a little ledge with a ruined pillar and a Lucky Die!
4 - Jump Pad-Adjacent
.jpg?q=50&fit=crop&w=740&dpr=1.5)
This Lucky Die is found once the map opens up into wider areas. Take the purple jump pad that you can see in the image to get to this ledge.
5 - Pirate's Loot
.jpg?q=50&fit=crop&w=740&dpr=1.5)
There's another Lucky Die near the last one - after taking that purple jump pad, jump up over the railing on that pirate ship and follow the little balcony around to the other side of the ship.
6 - Romeo, Romeo
.jpg?q=50&fit=crop&w=740&dpr=1.5)
One Lucky Die isn't far from the Rune Switch on this map. Use the various ruins to climb up to this temple ledge for it!
7 - Anchored Down
.jpg?q=50&fit=crop&w=740&dpr=1.5)
Near the 4th and 5th Lucky Dice, there's another one hiding under some wooden boards. To access it, just look up! There's a giant anchor hanging from a chain right above you.

Shoot the chain to cause the anchor to fall and break the boards.
8 - Easy As Pie
.jpg?q=50&fit=crop&w=740&dpr=1.5)
This one is just on a ledge along one of the paths you'll travel during the main quest.
9 - Jumping Puzzle
.jpg?q=50&fit=crop&w=740&dpr=1.5)
This Lucky Die is at the top of a pirate ship that's lodged vertically. It takes some climbing to reach it, but thankfully there are boards plastered with yellow paint so you know where to go.

Above is a vertical view of the location, to give you a better sense.
10 - Stick To The Rivers And Lakes That You're Used To
.jpg?q=50&fit=crop&w=740&dpr=1.5)
There's one Lucky Die sitting in a little stream next to a waterfall.
11 - Quite The View
.jpg?q=50&fit=crop&w=740&dpr=1.5)
As you progress through the main quest, this Lucky Die is overlooking the edge of the map.
12 - Tucked In The Corner
.jpg?q=50&fit=crop&w=740&dpr=1.5)
This Lucky Die is in the back of the temple area, hidden behind a ruined pillar.
13 - Of Curse And Claw
.jpg?q=50&fit=crop&w=740&dpr=1.5)
This Lucky Die isn't far from the map's entrance, but you'll need to do some adventuring to get it. To open the door that leads to this ledge with the Lucky Die, you need to destroy all the "clampifiers" in the side quest Of Curse And Claw
14 - Hidden Under Suspicious Circumstances
.jpg?q=50&fit=crop&w=740&dpr=1.5)
Hidden in (yet another) pirate ship is this Lucky Die. The area is only accessed by progressing in the Mortal Coil quest with Ksara.
15 - Lava Luck
.jpg?q=50&fit=crop&w=740&dpr=1.5)
Not far from the last one, there's a Lucky Die in a pool of lava! Just jump onto its little island. Again, you'll need to progress along the Mortal Coil quest to access this area.
16 - "Boss" Arena
.jpg?q=50&fit=crop&w=740&dpr=1.5)
One final Lucky Die is found along this path where you meet up with Ksara during the Mortal Coil quest. It's behind a fallen pillar.
17 - Disguised Cavern
.jpg?q=50&fit=crop&w=740&dpr=1.5)
There's a little cavern behind some hanging vines that's really easy to miss if you're just heading through the area during a quest. Jump to the little ledge, melee the vines, and kill the crabs to reach the Lucky Die.
18 - Wreckage Pile
.jpg?q=50&fit=crop&w=740&dpr=1.5)
There's a Lucky Die on top of a pile of wreckage in one of the open regions. You'll know you're in the right place if you fight the chest at the bottom.
19 - The Road Less Travelled
.jpg?q=50&fit=crop&w=740&dpr=1.5)
In one route that branches off of a larger path, you'll find another Lucky Die past some vines you need to melee.
20 - Ancient Obelisk Reward
.jpg?q=50&fit=crop&w=740&dpr=1.5)
The final Lucky Die is at the back of the Ancient Obelisk arena, around a little corner just out of sight.