Quick Links
Uncharted: The Lost Legacy introduces the photo collectibles to the series. This collectible means Chloe can take out her phone at specific locations and snap a photo. There are 28 of these photo opportunities in the game. Therefore, photos are the second most common collectible in A Lost Legacy.
These photo opportunity locations can be hard to spot. That said, most of these photo opportunity locations will have a few dragonflies swarming around them. While they are not the most obvious marker in the game, they are helpful in sometimes spotting these hard-to-find locations. Knowing this, you are ready to get started taking photos.
Chapter Zero
Photo Opportunity One

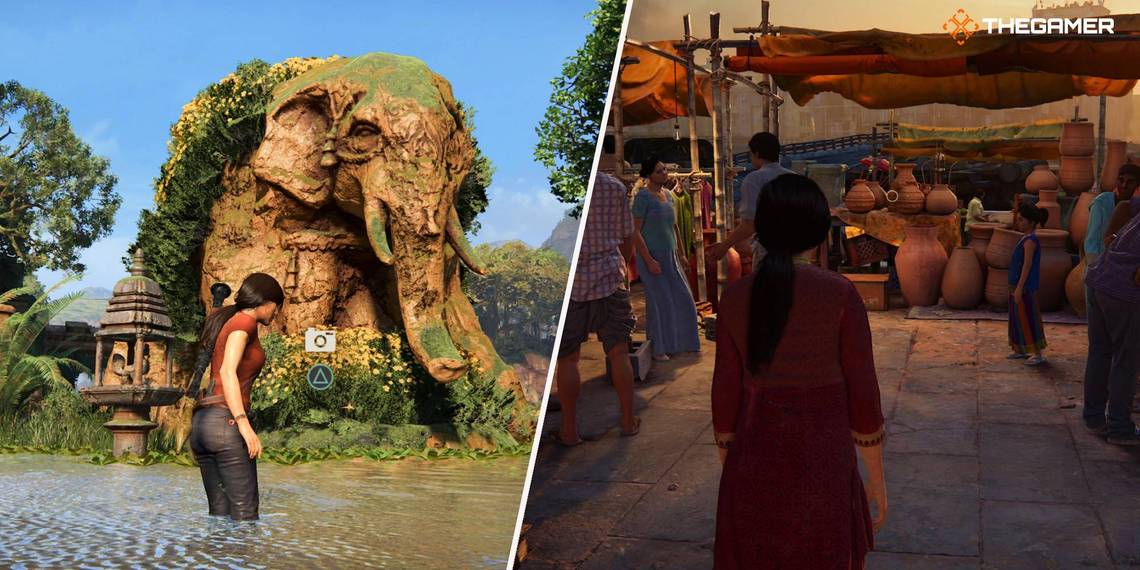
At the start of the chapter, Chloe will be following a little girl through a market. As soon as you see this vase shop, interact with the camera icon to take your first photo.
Chapter Two - Infiltration
Photo Opportunity Two

At the start of the chapter, this photo opportunity will be right beside you. You do not need to move because the prompt should appear in the bottom right corner of your screen. If not, or if you move, look for the photo opportunity next to the pink lotus neon sign.
Chapter Three - Homecoming
Photo Opportunity Three

At the start of the chapter, immediately turn your camera to the right. Then walk to the edge of the cliff pictured here. This photo opportunity is barely a few steps away from the start. Once you are here, collect the next photo.
Photo Opportunity Four

You will get to a part in the level where you are driving an off-road vehicle up a rapid stream. Stick to the left of the stream. Stop the car once you get close to the top, near the drop-off.

There is a photo opportunity up here looking down at the flamingos. Take a photo of these beautiful birds.
Photo Opportunity Five

Much later in the level, you will come across a massive temple. There are lots of soldiers here that you need to take out first. To find the photo op, you walk around the waters in front of the temple until you stumble across another photo opportunity. This photo can be hard to find, so try to match the position of Chloe as best you can with the image above. If you need more help, you can spot some dragonflies flying around this photo location. Once you are in the correct spot, take a photo.
Chapter Four - The Western Ghats
Photo Opportunity Six

At the start of the chapter, jump out of the vehicle. Head towards the cliff left of Chloe and the car. You will spot the first photo opportunity of this chapter here. Take the first photo in this chapter.
Photo Opportunity Seven
-1.jpg?q=50&fit=crop&w=740&dpr=1.5)
Chapter four features an open-world area. Fortunately, you have an in-game map to help you navigate around this area. Head to the location of the red arrow pictured above.

The area marked above is a small set of ruins guarded by a couple of platoons of soldiers. Clear out all the soldiers until the section is safe. Then use a grenade to blow open the destructible wall pictured above.

Go inside the ruins and collect the token. Afterward, jump through the small opening to the outdoor statue. Next to it will be another photo opportunity. Take a photo of the sculpture with Chloe's phone.
Photo Opportunity Eight
-1.jpg?q=50&fit=crop&w=740&dpr=1.5)
Head to the location of the red arrow on the map above.

You will spot this photo opportunity in the middle of this open area. Try to match where Chloe is standing in the image above. Also, keep an eye out for the dragonflies flying near this photo op spot.
Photo Opportunity Nine
-1.jpg?q=50&fit=crop&w=740&dpr=1.5)
Head to the location of the red arrow pictured above. To get to this location, you will need to enter the Hoysala Temple.

As you walk into the temple, you will see a bunch of monkeys on your right. Go up to the cliff facing them to collect this photo opportunity.
Photo Opportunity Ten
-1.jpg?q=50&fit=crop&w=740&dpr=1.5)
Keep going through the temple to find the Hoysala Token room. You will need to collect every Hoysala Token to obtain this photo opportunity. We have a guide you can use to find every Hoysala Token. Finding every token will also unlock the Queen’s Ruby bracelet, which can help to locate hidden treasures with controller vibrations.

Once you collect the bracelet, the door to your right will open. Go down the path behind the door and walk past the ruins covered in Monkeys. Stick to the right side of this area, close to the cliff. In the corner will be the next photo opportunity for you to collect.
Photo Opportunity 11
-1.jpg?q=50&fit=crop&w=740&dpr=1.5)
Go to the location of the red arrow on the map above.

The photo opportunity can be hard to find, but you want to frame yourself with the waterfall to your left and look up towards a temple. Also, keep an eye out for the dragonflies markers. Take the photo to collect this photo op.
Photo Opportunity 12
-1.jpg?q=50&fit=crop&w=740&dpr=1.5)
Go into the ax temple, where the star is on the map pictured above. The location of the red arrow is where the photo op is inside the temple.

After you complete the first puzzle inside the temple, you will emerge to an outdoor path with a scenic view. This path is where the next photo op is. Take the photo to get this collectible.
Photo Opportunity 13
-1.jpg?q=50&fit=crop&w=740&dpr=1.5)
Head to the location of the red arrow on the map above. This exact location is on top of the cliff, not underneath, in case you get confused.

At the cliff, look towards the Bow And Arrow Temple. The next photo opportunity is here.
Photo Opportunity 14
.jpg?q=50&fit=crop&w=740&dpr=1.5)
Head to the location of the red arrow above and look for the stone elephant statue.

Next to the stone elephant will be the next photo opportunity. Take the photo to collect it.
Chapter Five - The Great Battle
Photo Opportunity 15

Near the beginning of chapter five, you will need to use your rope to swing across a large gap. Aim for the platform on the upper left and then follow that path.

You will quickly stumble across the next photo opportunity pictured above. Take the photo.
Photo Opportunity 16

Later in the level, you will climb up the elephant statues. Once you reach the top, there is a short cutscene of Chloe and Nadine looking over the scenery. After you resume gameplay, you will have to shimmy towards a grapple point. Before you grapple, look for the photo opportunity up here.
Photo Opportunity 17

Eventually, you will end up inside the Ganesh (elephant) statue. You will need to repel down a rope at one part, and in the room where you end up will be the next photo op.

Go up the stairs to the upper platform and look for the photo opportunity location.
Photo Opportunity 18

Right before the end of the level, there will be a long cutscene and fight sequence with Asav. After this sequence, Chloe and Nadine will have to walk up a long set of stairs to a passage outside. This passage will lead to a crank that will open the gates to the next part of the game. Do not turn this crank, instead go back down the hill and follow the ridge.

The photo opportunity will be over here.
Chapter Six - The Gatekeeper
Photo Opportunity 19

After you ride the elephant, you will be standing near a small group of them. Look in front of them to find the next photo opportunity.
Photo Opportunity 20

Go up the stairs past the elephants. You will stumble across a couple of lockboxes, one open and one closed. Go up the platform beside the stairs. Then climb up to the top of the rocks. Then, jump to the other rocky upper platform.

On this platform will be the next photo opportunity. Make sure to collect this photo.
Chapter Seven - The Lost Legacy
Photo Opportunity 21

At the start of the chapter, walk two steps forward. The photo opportunity is right there for you to collect.
Photo Opportunity 22

Later, you will swim through a tunnel and emerge in a room with a staircase on the right. When you emerge on the other side, go towards the stairs.
The photo opportunity is right near the base of the stairs, near the water. Take the photo to collect it.
Photo Opportunity 23

After the room with the alter, you will emerge into this room pictured above. Right as you enter the space, another photo opportunity will be waiting for you to collect.
Photo Opportunity 24

Later, you will have to dive underwater and get past some roots to emerge in another large room. Then you will need to climb up several rock pillars to get to a doorway. Near this doorway is another photo opportunity. Take the picture to collect it and receive a fun surprise.
Photo Opportunity 25

Shortly after this, you will need to squeeze through a small cave and swing towards another room with a pool. Right in the middle of the room will be the next photo opportunity for you to collect.
Photo Opportunity 26

Once again, you will need to dive underwater to get to the next room. This transition will also involve Chloe squeezing through a claustrophobic cave. She will emerge into a room with another massive statue. Walk directly in front of the statue to find the next photo opportunity. Remember to take to the photo to collect it.
Photo Opportunity 27

Eventually, you will have to solve a puzzle using light, prisms, and mirrors. During this puzzle, Nadine will have to hold up a mirror. When she does this, look for the photo opportunity in front of her. Take the photo.
Chapter Eight - Partners
Photo Opportunity 28

After you finish your first enemy encounter, you will need to traverse across a few rock slides. Eventually, you will climb up to a section with a view of the train bridge. Look around here for the last photo opportunity in Uncharted: A Lost Legacy. Do not forget to snap that picture.