Quick Links
Valorant's Killjoy is a versatile character that is capable of making a game-changing difference. Many players take advantage of Killjoy's abilities on Defense, but are they fully utilising Killjoy on Attack?
Post-plant Nanoswarm Grenades that are set up around the Spike can often be easily destroyed. This is why it may be a better choice to throw your nades from a safe position since it will be more difficult for enemies to shoot. To do that, you need to be aware of the best spots and positions where you should throw your Swarm Grenades from. See our guide below for multiple lineup options for Site A on Pearl from A Main, A Resturant, Spawn, and Mid.
How To Practice Lineups In Valorant

To freely practice your lineups without boundaries, it's best to create a custom game with cheats. Go to 'Play' > 'Custom Game'. Select your map of choice - in this case, Pearl.
Then click on 'Options' and turn on cheats.
Once you're in-game, open settings again, and set a bind key to freely move around the map to see your lineups land. Then turn on:
- 'Infinite Abilities'
- 'Infinite Ammo'
- 'Infinite Magazines'
- 'Infinite Creds'
- 'Ignore Shopping Restrictions'
Once warm-up time runs out, pause the match timer as well.
Finally, enable 'Invulnerability', so that you don't take damage from your utilities.
Lineups For Default Spot

Default Spot Lineup From A Main
If you plant on default and walk back into A Main, you can secure the round by using this lineup. You will stand behind a wooden box while deploying it. As long as you're not getting flanked or rushed, you should be relatively safe. It's also not too far from A Site, so you won't have to spend too much time moving to your lineup spot. To execute this lineup, walk behind the wooden box and stand against the orange stripe on the wall. Look up and place your crosshair below and a little to the right of the floating submarine (it may be in a slightly different position than shown above, as it floats around). You can use the right edge of the white hud line as a reference if you align it with the grey stripe on the glass ceiling. Also, align your triangle Swarm Grenade icon with the other stripe. Then, throw.

This Nanoswarm Grenade covers the whole default plant area.
Precise Lineup For Default Spot From A Restaurant

You could want to use this lineup if you want to be extra safe, as it will be more difficult for an enemy to rush you. They'd have to push far out. Especially in a 1 v 1 situation, that is not likely. Even if they do push you, they might not make it back to the Spike on time. Stand in the above corner in A Restaurant.

Look up at the top part of the damaged structure. Align your crosshair with the part of the structure pictured above and throw.

This lineup also covers the default area on A Site well.
Lineup For A Default Plant Spot From Spawn

Are you looking to be even safer? Or are you watching flank? This lineup that is executed from spawn (technically A Restaurant) is worth learning. Go to the area with stairs and find the octopus sculpture. Stand against it. If you equip your Swarm Grenade, you will see two white squares above the mouse icons. Align the left square with the edge of the brick part of the wall. You can also use the above crosshair placement for reference. The bottom part of your ability icons should be aligned with the bottom part of the wall.

Once again, the Swarm Grenade covers the default plant spot on A, even though you're nowhere near it.
Lineup For A Default From Mid

Pearl is a map that's centered around Mid executes. If you're playing from Mid, your team is just fine to plant in A default spot as well. Stand in the corner near Defender Side Water. Look up and align the white line on the right side of your hud with the lamp as you see above. Then, throw.

Your Swarm Grenade has covered the front of the hut on A Site.
Lineups For A Dugout

For simplicity's sake, when A Dugout is mentioned in this article, it refers to the plant area on A Site. This area is opposite the ditch that is called A Dugout on the Pearl map.
A Dugout Lineup From Behind The Wooden Box In A Main
It's tricky to throw a lineup at A Dugout from A Main, as there is a roof covering the area. But it certainly is possible. This lineup is executed from A Main. Crouch against the wooden box and align yourself with the grey stripe. Aim on the part of the box shown above. And of course, throw.

This lineup covers a large area of the Dugout plant spot.
You have to be precise with this spot, so practice as much as you need to.
A Dugout Lineup From Mid Defender Side Water

You can use this lineup if you're playing from Mid, and your teammate plants in the corner opposite A Dugout. Stand in the corner in the passageway near Defender Side Water. Align the white line on the right side of your hud with the corner of the roof in front of you.

The Swarm Grenades cover the A Dugout area and prevent anyone from defusing.
Alternative A Dugout Lineup From Mid Defender Side Water
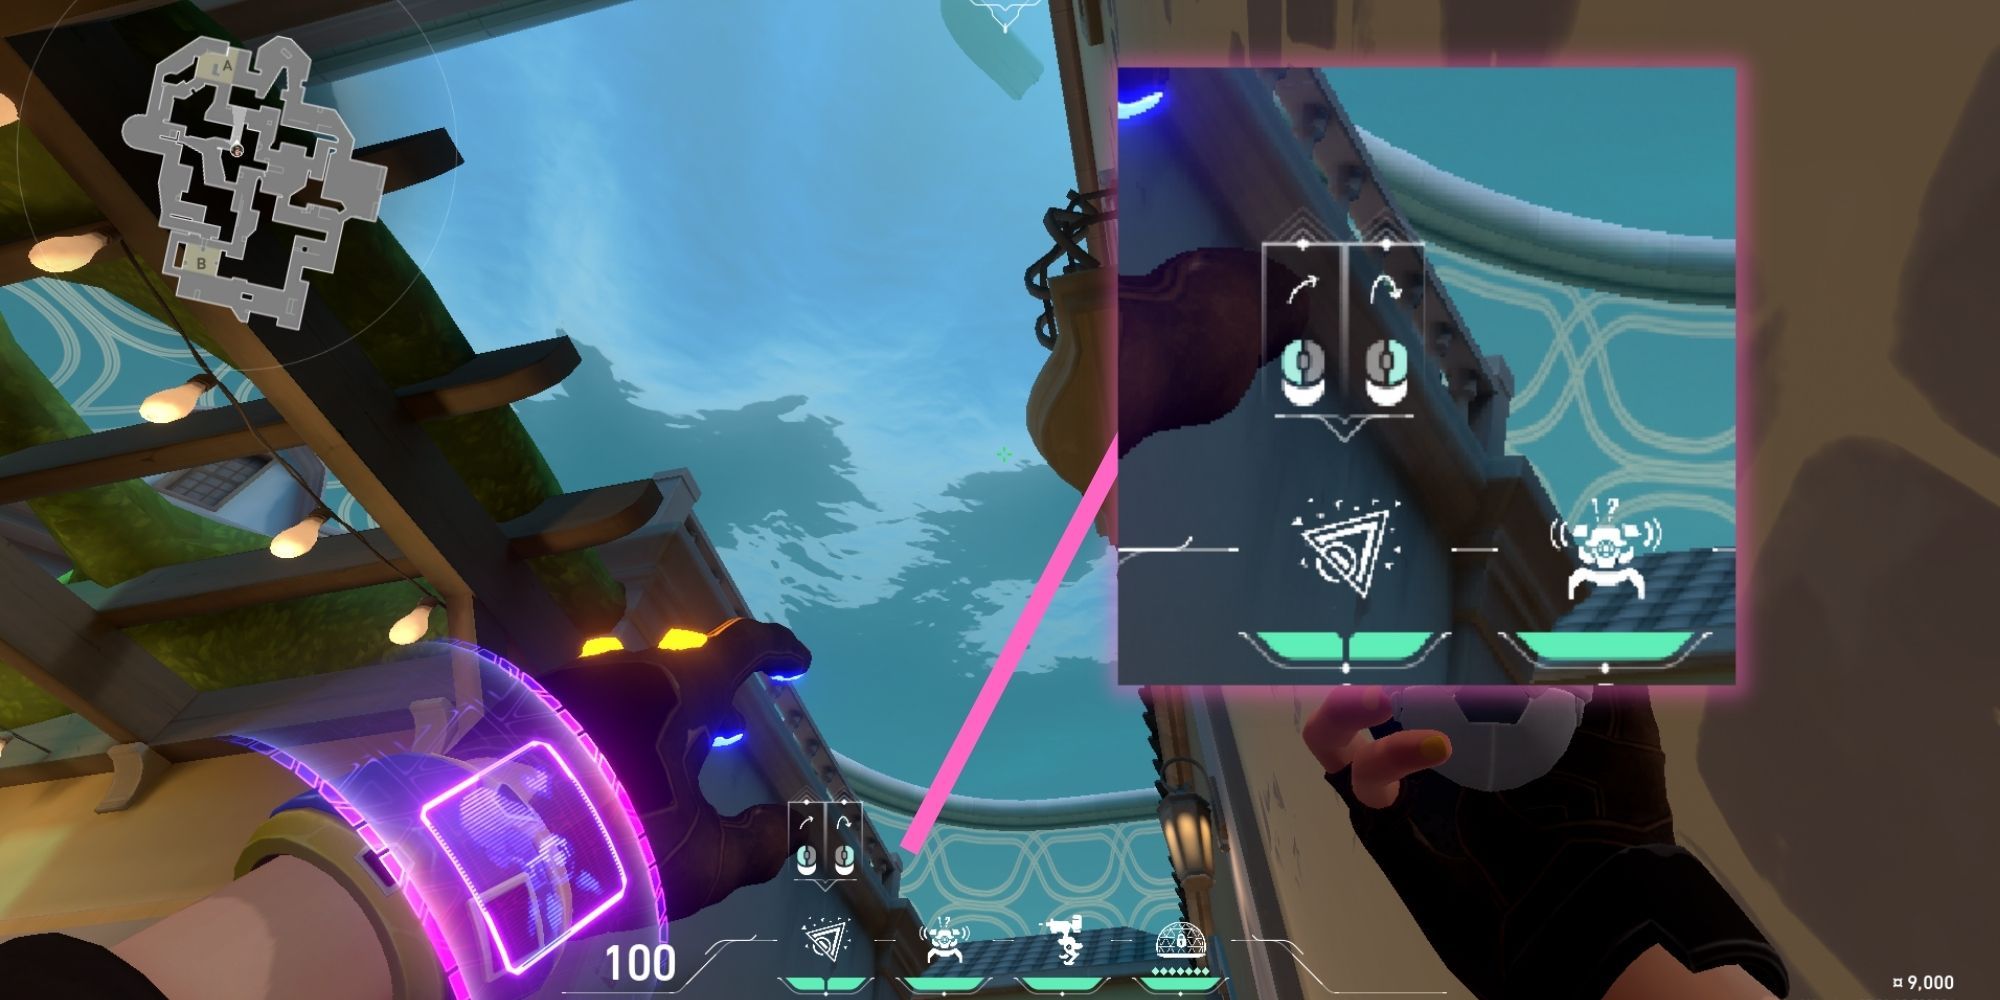
You can also use an alternative A Dugout lineup which is executed from Mid. It covers more of A Dugout. You can remember this one by aligning the little line in-between your Swarm Grenade and Alarm Bot icons with the part of the railing shown above Another way you can remember it is that you will see two PC mouse icons above your ability icon if you equip your Swarm Grenade. They will each have a white square above them. Align the white square on the right with the fourth railing pole from the right. Then, throw.

The lineup covers most of the A Dugout planting space, preventing the enemy from defusing anywhere in that spot.
 How To Best Use Your Lineups
Good lineups won't immediately make you into a Radiant - although they sure can help. Dealing damage without having to face your enemy poses a definite advantage, especially during clutches. Let's say you're in a 1 v 1 situation. You're hidden, throwing your Swarm Grenade lineups while the enemy is trying to defuse. Unless your enemy rushes you or manages to destroy your utility as you throw it, they have no choice, but to run away or take damage as they defuse.
Taking advantage of lineups when playing heroes like Killjoy, Viper, Brimstone or even Kayo can therefore be the difference between a win and a loss.
However, it's equally important to not only focus on lineups but to consistently work on other aspects of your gameplay. To do that, ensure that you keep other important gameplay principles in mind, including:
- Good teamwork
- Clear communication
- Aim control
- Defensive setups
- Attack and Defense strategies