Quick Links
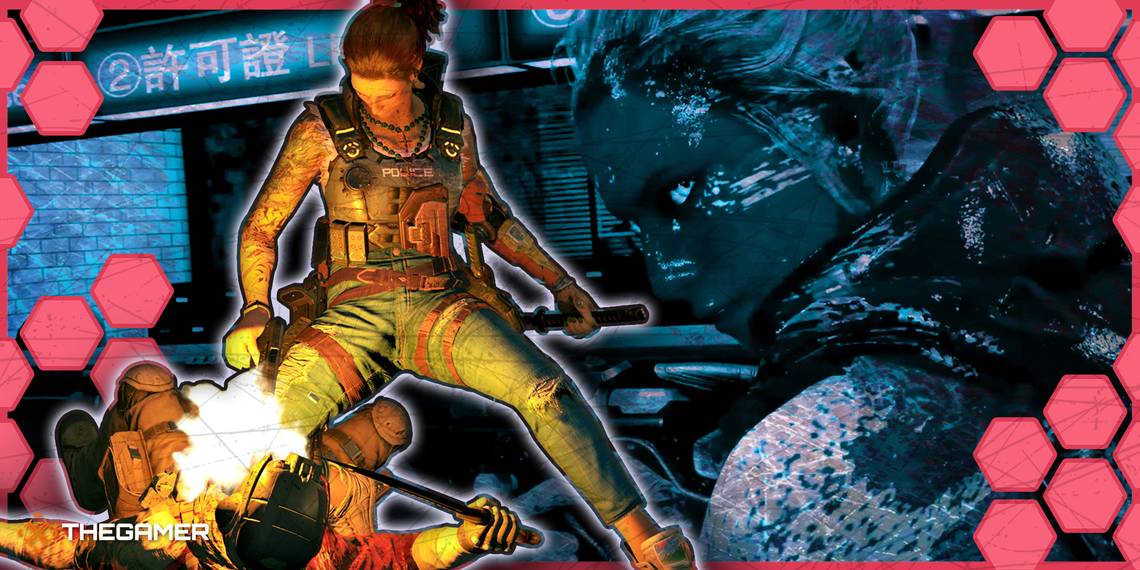
Wanted: Dead is a hack-and-slash blended with a third-person shooter that delivers on the classic PlayStation 2 era of gameplay, where the focus is primarily on fun, whacky, and over-the-top animations and style. And we wouldn't expect anything less, seeing as this comes from the former developers of the Ninja Gaiden and Dead or Alive series.
However, despite its rambunctious and adrenaline-pumping gameplay, it can be quite challenging to dispatch enemies and get the hang of the many combat options at your disposal. There's surprisingly lots to see and do as the Zombie Unit, and you should take advantage of most of it whenever you get the chance.
How To Save

This may seem like an odd entry, especially to kick off the guide. However, there is no standard 'Save' button in Wanted: Dead, which can be a tad annoying in some situations. During a Mission, your Save Point is the little Weaponsmith's Drone that serves as the level's checkpoint, refill, and customization station. In addition, it will save your progress, allowing you to close the application and resume there if need be.
Unfortunately, anything you do past that point will not be saved unless you clear the Mission or come across another Weaponsmith's Drone. This means that any collectible you pick up, Skill Points you accumulate, or even Skills you unlock will be wiped if you were to die or close the application. So, if you're looking to quickly Save and Quit your game during a Mission, you can't. Just keep going until you reach the next checkpoint before doing so.
Interestingly enough, this same method applies to the Police Station, where you get to explore and play Mini Games with the rest of the Zombie Squad. Due to the lack of a Save button, you will have to play the Clawgame, sing Karaoke, or do one of the other many activities to Save your progress. This is crucial as there are tons of Documents you can gather in the Police Station, and all of that will be wiped if you don't force the game to save and decide to call it quits for the time being.
To check when the last Save took place in Wanted: Dead, open the Menu and navigate to the "Data Load" option. Select it and look for the "Save Date" row. This will tell you when your last Save was, so you can try and force one or reach the next checkpoint.
Skills Are Crucial

As the obvious title states above, Skills are a crucial aspect of Wanted: Dead, and while you probably already knew that, there are some that you should prioritize when starting out. For starters, we recommend getting the first Skill in each Skill Group, as you will gain access to abilities that will drastically help you out in combat. We recommend getting them in the following order:
- Utility: Grenade
- Offense: Bullet Time
- Defense: Extended Dodge
During the first Mission, you will encounter enemy forces with Riot Shields, which can be a hassle to deal with. Having the Grenades Skill unlocked will allow you to make quick work of them.
Bullet Time is an excellent Skill that acts as a Super of sorts, having you slow time and pop several shots onto multiple targets in the area with your Pistol. This enables you to follow up with Finishing Moves or uncontested melee attacks.
Extended Dodge allows you to cover lots of ground to either evade or close the gap on an enemy, making it crucial for most boss encounters. However, you will have more than enough Skill Points to snag this before your first big boss fight, so you can save this for the last of the three.
Other Skills To Consider Getting Early
- Offense: Dash Attack, Charge Attack, Sliding Attack
- Defense: Armor Reinforced, Guard Strength Increase, Increased Melee Defense
- Utility: Incendiary Grenade, Quick Reload, Cortez: Sleeper Hold
Explore Thoroughly

Each Mission will have several zones with dozens of enemies to fight your way through. Often in these zones will be Documents to collect and, in some cases, extremely powerful weapons like a chainsaw that will one-shot kill nearly everything in your path, including those pesky Ninja mini-bosses. Exploring each zone thoroughly will also give you the opportunity to replenish your ammo, find additional healing items, and much more.
Tryout New Weapon Attachments

In addition to your katana, Stone also has an Assault Rifle that can be kitted out with a variety of Attachments, ranging from barrels to sights to stocks and pretty much anything in between. She also possesses her "Taker" Handgun, which can be customized similarly to her AR.
Attachments are acquired whenever you reach a new checkpoint during a Mission, which is the Weaponsmith's Drone we mentioned a bit earlier in the guide. However, every Attachment has its pros and cons, meaning you will need to try and strike a balance that keeps the gun effective and efficient while also matching your playstyle or current situation. You can find all Weapon Stats in the table below!
Weapon Stats
|
Weapon Stat |
Description |
|---|---|
|
Damage |
This is the gun's flat damage rate without additional factors, such as if the enemy has Armor or the weapon's Stopping Power. |
|
Stopping Power |
Refers to the caliber of the ammunition and velocity at which it is fired. The higher the Stopping Power, the faster your target is dispatched. |
|
Armor Piercing |
The gun's effectiveness against forces with Body Armor. Typically the melee-based enemies. The higher this Stat is, the faster you will punch through and eliminate these types of enemies. |
|
Range |
Your gun's Range Stat showcases how optimal your weapon is at certain distances. If a gun has a low Range Stat, the bullet won't reach targets at greater distances. |
|
Reload Speed |
This refers to how long it takes to reload your weapon, which can also be affected by the Quick Reload Stat under the Utilities Skill Tree. |
|
Magazine Capacity |
Tells you how much ammunition the weapon can hold. Typically, larger magazines will have a higher Reload Speed, while smaller or taped magazines will have shorter Reload Speeds. |
|
Recoil Handling |
Refers to how much the weapon kicks when firing it. The lower the Recoil Handling, the harder the weapon kicks, making it harder to maintain when holding the trigger down. |
|
Accuracy |
Displays the weapon's base accuracy when you first pull the trigger before factoring in the Recoil Handling. If your gun has high Accuracy but low Recoil Handling, it will still be wildly inconsistent. Try finding a balance between the two. |
Spend Your Downtime Wisely

When between Missions, you will be able to roam around the Police Station and take on a variety of Mini Games and obtain Collectibles such as new Music, Documents, Figurines, and more. While playing the Ramen Mini Game or singing your heart out in Karaoke will be a blast, you should use this time to hit up the Firing Range.
The Firing Range has a leaderboard of everyone in the Zombie Unit, allowing you to compete against them and overthrow the Gunsmith. Toppling her scores in both the Time Attack and Score Attack modes will grant you access to the Gunsmith's Rifle, an AR. You can find the Firing Range by taking the elevator to the third floor and heading past the Combat Arena.
Do not tackle the Firing Range outside of the campaign, as it will not count or carry over to your playthrough. You can only obtain the Gunsmith's Rifle by accessing the Firing Range from within the Police Station and reaching first place on the Leaderboards. Once that has been done, exit the Firing Range to get a text message from the Gunsmith informing you she gave you her rifle.
Combat Arena

Speaking of activities you should do in the Police Station instead of from the Main Menu, the Combat Arena found on the second floor of the building will reward you with Skill Points upon clearing each challenge. If you access it from the Main Menu, you won't receive any Skill Points but will still obtain the Achievements/Trophies for clearing them.
Blocking And Parrying

Despite Wanted: Dead being an action-packed hack-and-slash shooter, you will still have to respect your opponents and their capabilities. If you refuse or forget to block in some cases, you will be dead before you know it, especially when the melee-based opponents start showing up in groups.
Skills in the Defensive Tree, such as Guard Strength Increase, Increased Melee Defense, Power Parry, and Parry Window Increase will allow you to better deal with incoming melee threats much more consistently, making you feel like a total badass when all is said and done. While ranged threats are very much a thing in Wanted: Dead, dealing with armored melee soldiers will be brutally hard if you're not Blocking or attempting to Parry.
Furthermore, many boss and mini-boss encounters are melee-based enemies, so having a solid grasp on your defensive options will make those fights much more manageable and less frustrating. If you ever need to hone your defensive options, the Combat Arena is an excellent place to do just that.