Quick Links
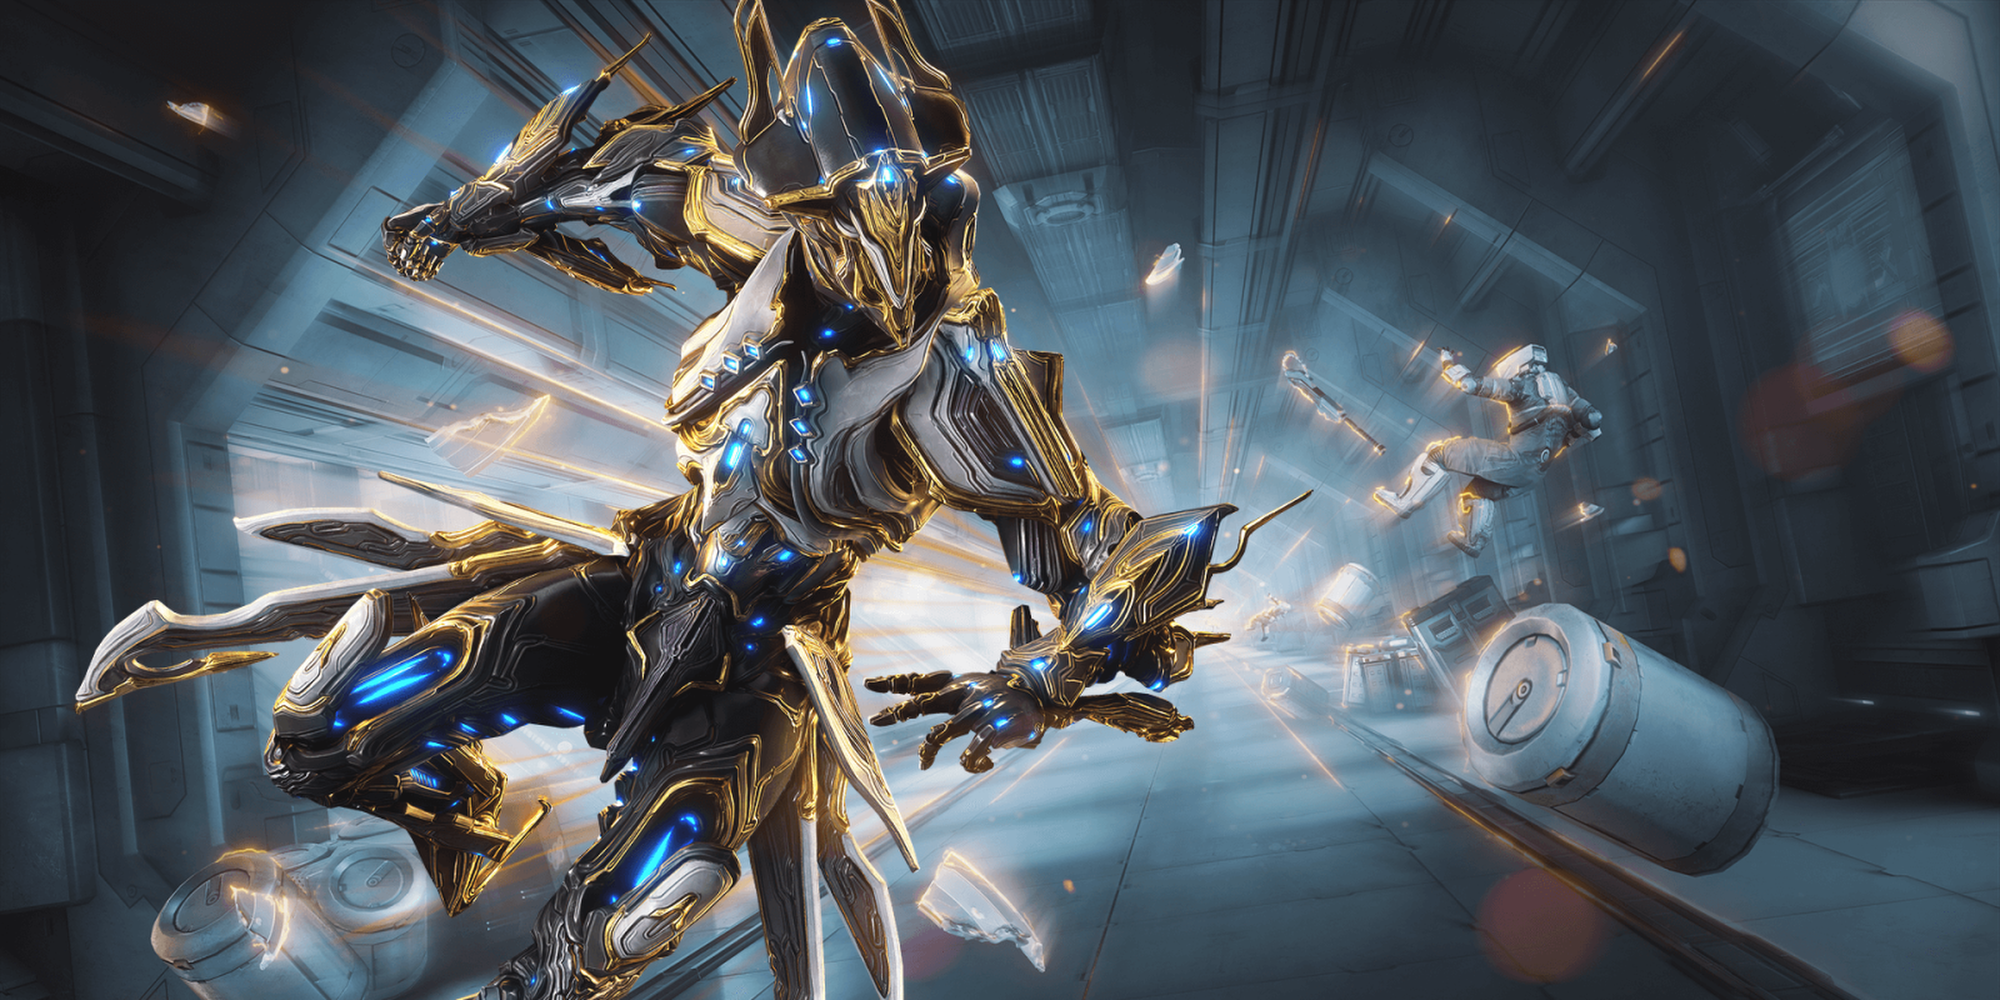
Warframe's Gauss is a supersonic blender of destruction, attacking enemies with an onslaught of bullets and melee swings. Few Warframes can offer the same adrenaline-fueled gameplay as Gauss, let alone with the degree of speed that Gauss offers.

Warframe: Grendel Complete Guide – Drops, Abilities, And Builds
The Grendel rework has made this Warframe a powerhouse for all content. Learn how to create the best builds for this eater of worlds.Available from Sedna's Disruption node, Gauss serves as the ultimate solo Warframe for weapon and melee fans alike. You can run at blinding speeds, strip armor, instantly freeze targets, protect yourself from incoming damage, and triple the fire rate of your guns. This guide will go over how to craft Gauss, what each ability does, and the best builds you can use with this Warframe.
Updated January 19, 2024, by Charles Burgar: Gauss Prime is finally here, complete with a gilded makeover and some slightly altered base stats. Quite a bit has changed in Warframe since we originally wrote this article, so much so that we've given it a complete overhaul. Every ability and augment description has been rewritten to better explain how Gauss' kit works, and we've updated all of our builds with up-to-date recommendations. A new Thermal Sunder build has also been added that can handle the toughest content Warframe has to offer.
How To Craft Gauss
The main crafting blueprint for Gauss can be purchased from the in-game market for 30,000 Credits. Gauss' neuroptics, chassis, and systems blueprints can be obtained from Rotation C of Kappa, Sedna. Kappa is a Disruption mission against Level 30 Grineer.
Disruption Reward Rotation
Unlike most endurance missions, Disruption's drop tables scale based on mission length and player skill. After the third round, defending three conduits will always award a Rotation C item, never looping back to Rotations A or B.
Gauss' parts are all part of the Rotation C pool, but the scaling rewards of Disruption make this farm significantly less arduous than some other Warframes. All of Gauss' component blueprints have a 7.84% drop chance.
Gauss Blueprint
| Drop Source | In-Game Market (30,000 Credits) |
|---|---|
| Crafting Costs |
|
| Crafting Time | 72 Hours |
Gauss Neuroptics
| Drop Source | Kappa, Sedna (Rotation C, 7.84% drop chance) |
|---|---|
| Crafting Costs |
|
| Crafting Time | 12 Hours |
Gauss Chassis
| Drop Source | Kappa, Sedna (Rotation C, 7.84% drop chance) |
|---|---|
| Crafting Costs |
|
| Crafting Time | 12 Hours |
Gauss Systems
| Drop Source | Kappa, Sedna (Rotation C, 7.84% drop chance) |
|---|---|
| Crafting Costs |
|
| Crafting Time | 12 Hours |
How To Craft Gauss Prime
Gauss Prime is obtained by opening Void Relics in Fissure missions within the Star Chart. You can obtain Void Relics from most Star Chart missions, Syndicate Relic Packs, and player trading. Once in hand, bring the Relic to a listed Fissure mission and collect ten Reactant to crack open the Relic. Your reward will be revealed when you reach extraction.
Farming Relics
The fastest way of acquiring new Void Relics is by purchasing Relic Packs from Syndicate factions, including Teshin's Steel Path offerings and Arbitration spoils.
Once your reputation is spent, you can farm for specific Relics in the following Star Chart nodes:
|
Lith Relics |
Hepit, Void – Capture Always drops Lith Relics or Aya |
|---|---|
|
Meso Relics |
Ukko, Void – Capture 50% chance of earning Meso Relics |
|
Neo Relics |
Ukko, Void – Capture 50% chance of earning Neo Relics |
|
Axi Relics |
Apollo, Lua – Disruption Always drops Axi Relics on Rotation B |
Gauss Prime Blueprint
| Drop Source |
|
|---|---|
| Crafting Costs |
|
| Crafting Time | 72 Hours |
Gauss Prime Neuroptics
| Drop Source |
|
|---|---|
| Crafting Costs |
|
| Crafting Time | 12 Hours |
Gauss Prime Chassis
| Drop Source |
|
|---|---|
| Crafting Costs |
|
| Crafting Time | 12 Hours |
Gauss Prime Systems
| Drop Source |
|
|---|---|
| Crafting Costs |
|
| Crafting Time | 12 Hours |

Warframe: Top 10 Companions, Ranked
From Sentinels to Kavats, here are ten of Warframe's best companions.Gauss Stats And Abilities
Stats
|
Gauss |
Gauss Prime |
|---|---|
|
|
Passive
Gauss' Battery: Moving generates an electrical current that fills Gauss' battery. Shields recharge up to 120% faster while the recharge delay is up to 80% shorter, based on the battery level.
Gauss features a battery gauge that acts as a second resource pool, empowering certain abilities and Gauss' shield. Sprinting, casting Mach Rush, and damaging targets with Thermal Sunder (Cold) will charge the battery. The more charge you have, the faster your shields will charge and the more powerful your abilities will be.
Maintain Mach Rush's hyper-sprint mode to charge your battery quickly.
By default, Gauss' battery cannot exceed 80% capacity, showcased by the red line on the battery gauge. However, if Redline is active, you can reach 100% capacity. A fully charged battery more than doubles your shield recharge rate, cuts your recharge delay down to a measly 0.25 seconds, and allows your abilities to reach 100% effectiveness.
Mach Rush
Mach Rush: Burst into a hyper-sprint, bowling over enemies while charging the battery. Crashing into solid objects generates a powerful shockwave. Hold to rush continuously.
|
Mach Rush Stats |
|||
|---|---|---|---|
|
Drain |
Cast: 15 Energy |
||
|
Drain: 12.5 Energy per Second |
|||
|
Speed |
25 m/s |
||
|
Range (Dash Distance) |
12 Meters |
||
|
Shockwave Radius |
10 Meters |
||
|
Shockwave Damage |
800 Impact |
||
|
Applicable Mods |
|||
|
Duration |
Range |
Efficiency |
Strength |
|
Affects Energy drain while < 175% Efficiency |
Affects ability radius |
Affects cast and drain Energy costs |
Affects shockwave damage |
Gauss begins to hyper-sprint at absurd speeds, ragdolling any enemy he makes contact with. Tapping the ability will make Gauss dash forward roughly 12 meters, unaffected by mods. Holding the ability will make Gauss continuously hyper-sprint until you either hit an immovable object or deactivate Mach Rush.
While in hyper-sprint, you will be unable to shoot, melee, or perform parkour maneuvers. Your turning radius is also substantially reduced, encouraging you to sprint in a straight line. You can always aim or deactivate Mach Rush if you need to course-correct. Alternatively, run into a wall. This will create a shockwave that will damage and knockdown all nearby enemies, leaving Gauss unharmed.
You can make Mach Rush even faster by modding for sprint speed. This ability also stacks with other mobility-centric powers like Volt's Speed and the Helminth's Infested Mobility subsume. Strength only buffs the pitiful damage this skill does, so you can safely ignore it. Duration and Efficiency affect how much Energy this skill costs, and Range affects how big Gauss' hitbox is while sprinting.
Kinetic Plating
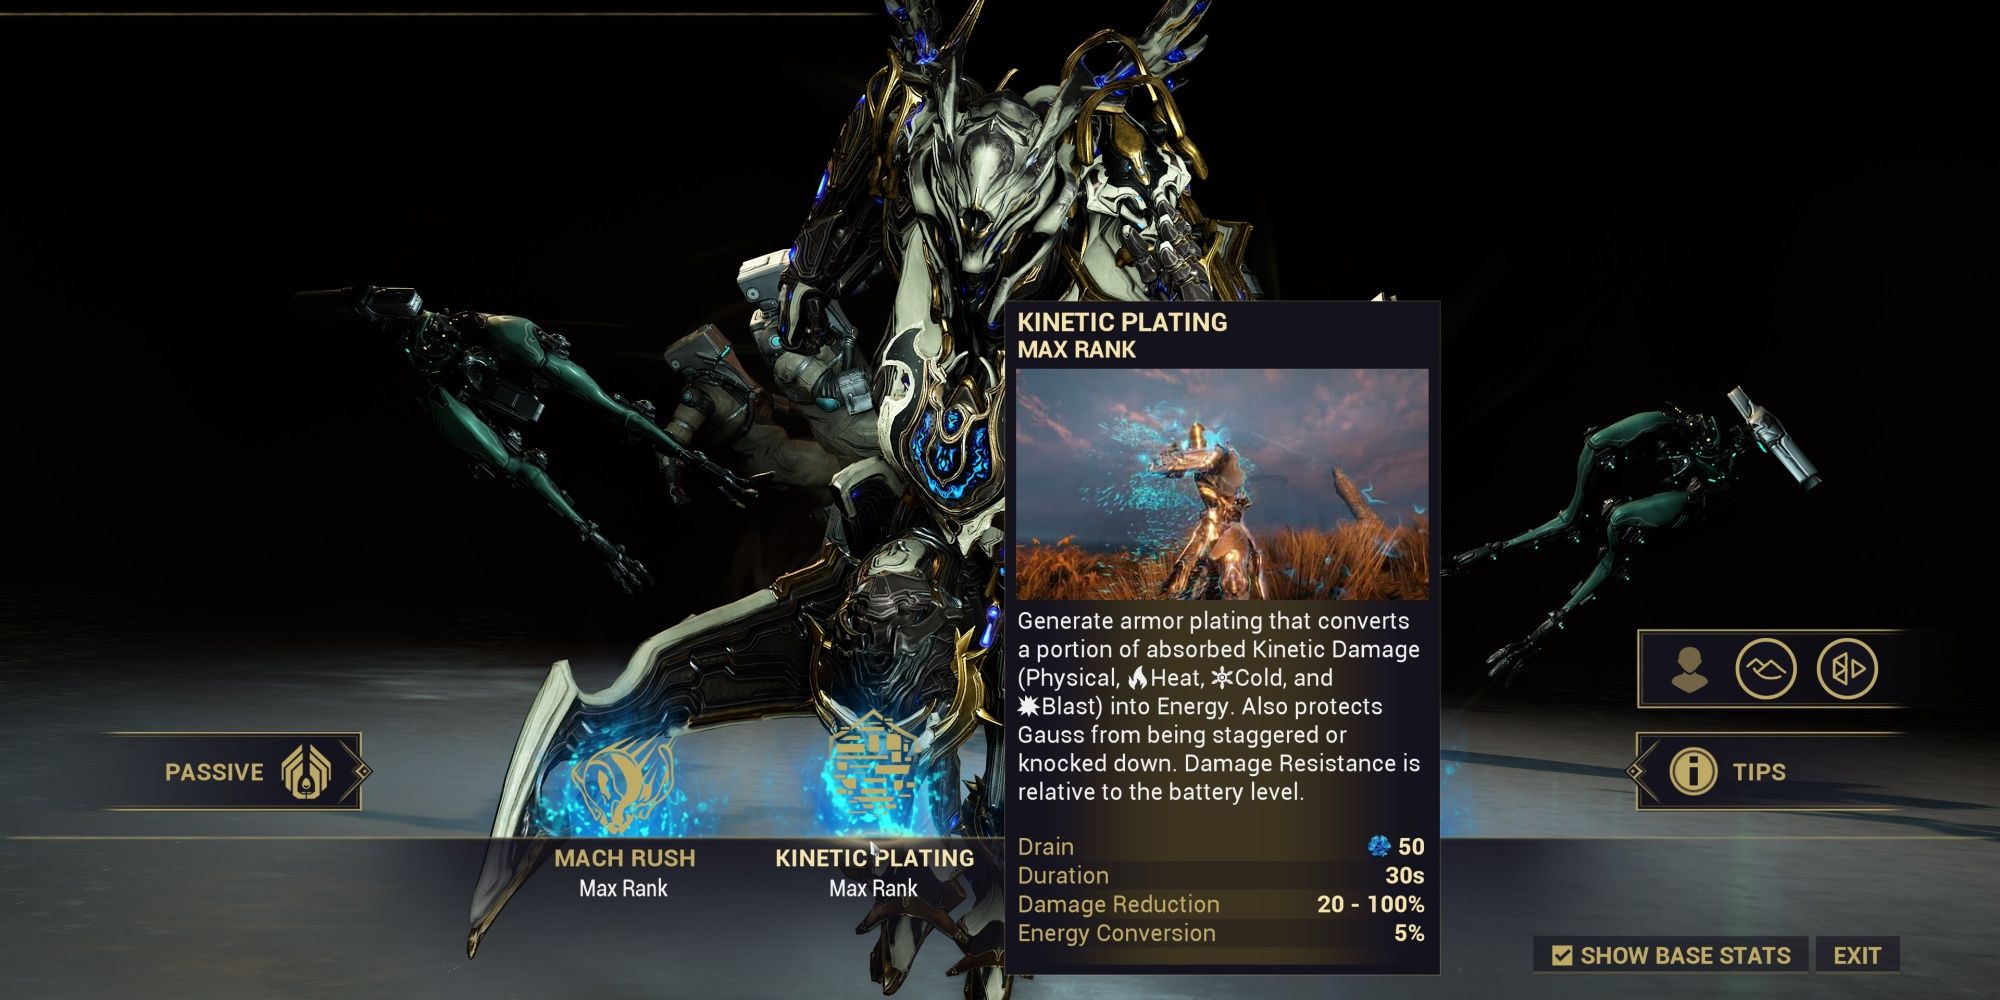
Kinetic Plating: Generate armor plating that converts a portion of absorbed kinetic damage—Physical, Heat, Cold, and Blast—into Energy. Also protects Gauss from being staggered or knocked down. Damage resistance is relative to Gauss' battery level.
|
Kinetic Plating Stats |
|||
|---|---|---|---|
|
Drain |
50 Energy |
||
|
Duration |
30 Seconds |
||
|
Damage Reduction |
20-100% |
||
|
Energy Conversion |
5% |
||
|
Applicable Mods |
|||
|
Duration |
Range |
Efficiency |
Strength |
|
Affects DR duration |
N/A |
Affects cast Energy cost |
Affects DR provided |
Gauss uses his battery to greatly mitigate incoming damage for the next 30 seconds. While active, each source of damage will drain a small portion of your battery, roughly 1-6%. Your battery will also passively decay when active. These penalties sound severe, but the damage resistance (DR) is well worth the drawbacks.
When used properly, this ability can make you immune to Impact, Puncture, Slash, Heat, Cold, and Blast damage. That's nearly every common damage type in Warframe. The only damage type not included there is Toxin, so be careful playing Gauss in Infested missions.
Kinetic Plating will reduce all incoming damage by 20% by default when your battery is empty. As the battery charges, the DR value scales linearly, up to the listed cap of 100% DR at 100% charge. Since your battery is locked to 80% charge by default, you must have Redline active for Kinetic Plating to provide its full damage resistance.
While Kinetic Plating is active, Gauss is immune to all sources of stagger and knockdown. Surprisingly, this includes the stagger animation from the Quick Thinking mod.
Additionally, all damage received is partially converted into Energy at a rate of 5% per point of damage received. This works exactly like Rage and Hunter Adrenaline but also applies to shields and Overguard. This conversion rate is unaffected by Strength.
Kinetic Plating scales best with Duration and Strength. Duration affects how long this ability lasts, and Strength affects how much DR this ability gives at lower battery levels. Since this ability grants Energy, you can safely ignore Efficiency on most Gauss builds.
Thermal Sunder
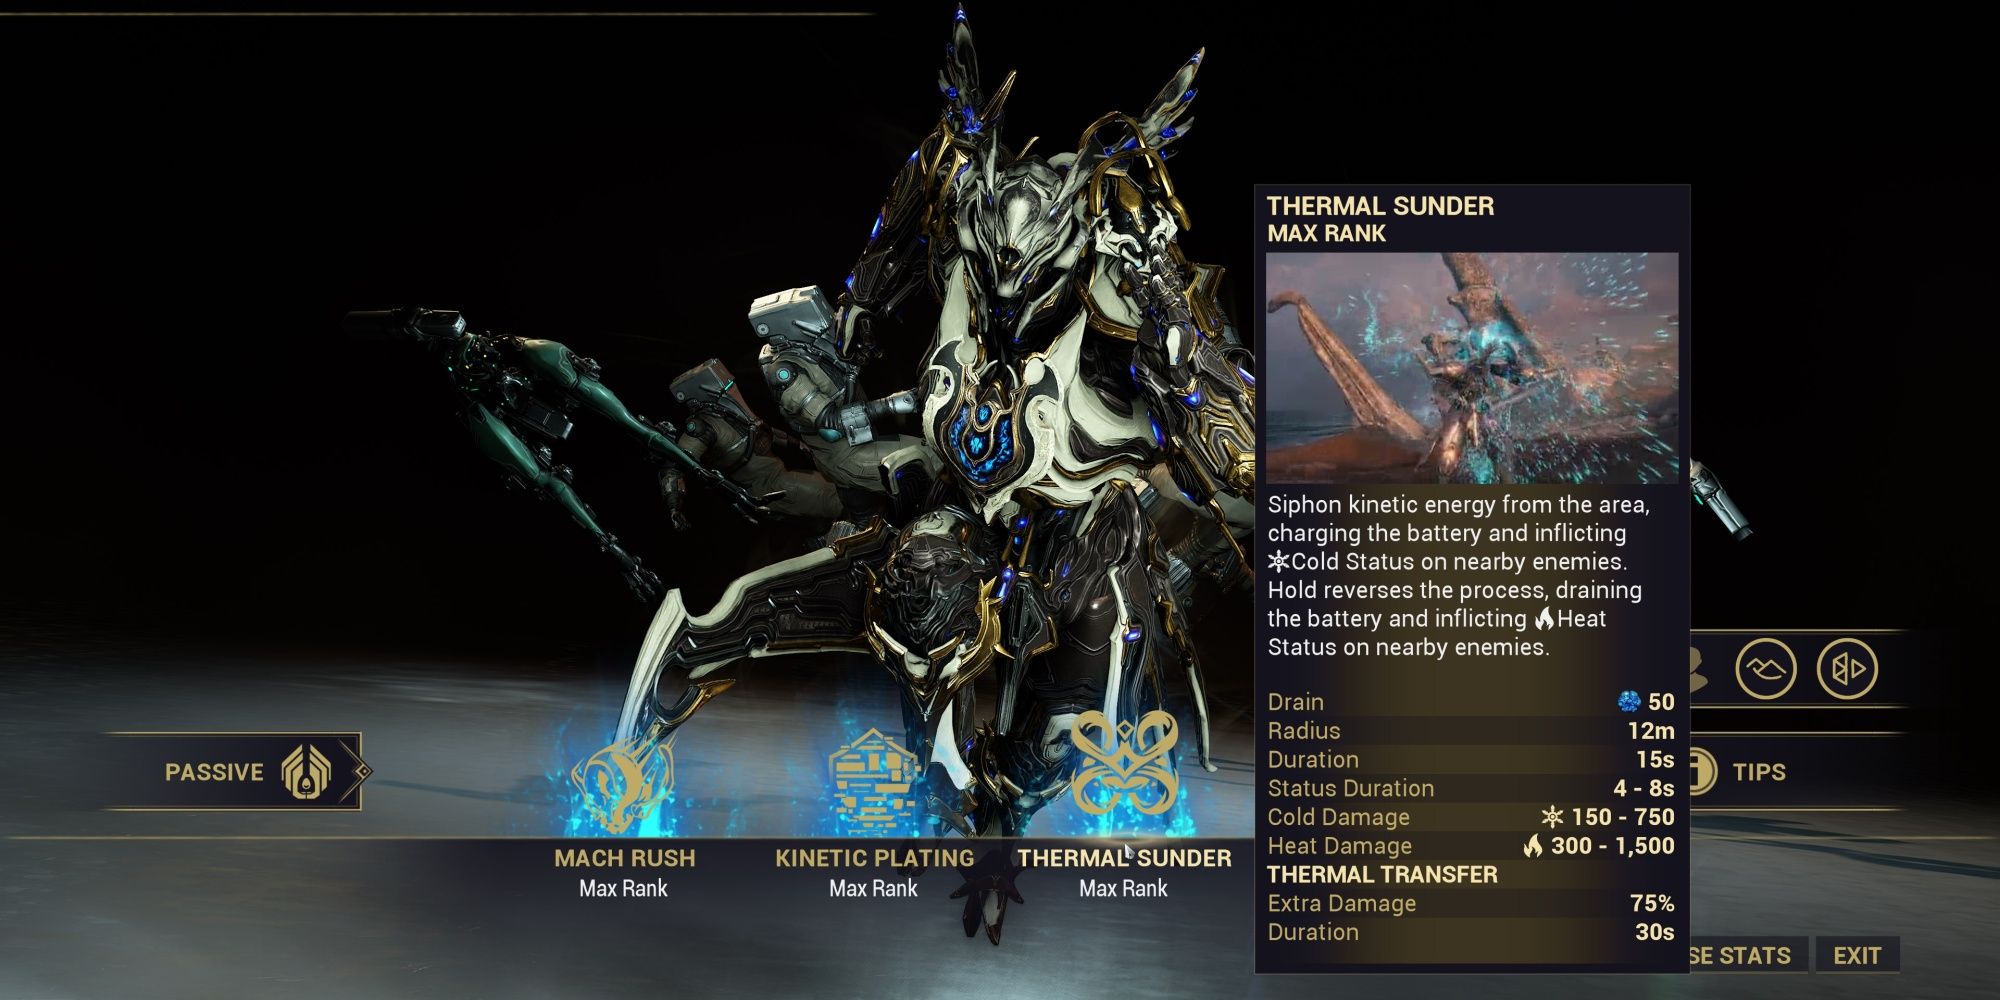
Thermal Sunder: Siphon kinetic energy from the area, charging the battery and inflicting Cold status on nearby enemies. Hold reverses the process, draining the battery and inflicting Heat status on nearby enemies.
This ability can be subsumed with the Helminth system.
Thermal Sunder's damage is equal to Gauss at 50% battery level when used on other Warframes.
|
Thermal Sunder Stats |
|||
|---|---|---|---|
|
Drain |
50 Energy |
||
|
Radius |
12 Meters |
||
|
Duration |
Thermal Sunder: 15 Seconds |
||
|
Status Ailments: 4-8 Seconds |
|||
|
Damage |
Cold: 150-750 Cold |
||
|
Heat: 300-1,500 Heat |
|||
|
Applicable Mods |
|||
|
Duration |
Range |
Efficiency |
Strength |
|
Affects ability and status duration |
Affects ability radius |
Affects cast Energy cost |
Affects ability damage |
Thermal Sunder is divided into two variants: Cold and Heat.
- Cold (Tap): Creates a freezing ring, inflicting Cold status on enemies. Charges Gauss' battery.
- Heat (Hold): Creates a ring of flame, inflicting Heat status on enemies. Drains Gauss' battery, but deals double damage.
Gauss will clap his hands and create a ring of energy that will immediately damage all nearby targets, bypassing walls and all line-of-sight checks. Cold will grant 10% battery and chill enemy targets, outright freezing them if you cast the ability again. Heat will drain 10% battery and inflict a Heat status effect, dealing twice as much damage as Cold.
If you cast both Cold and Heat variants back-to-back, you will perform a Blast version of Thermal Sunder. This deals bonus damage based on the remaining Heat and Cold procs on the target, dealing an absurd amount of burst damage. Additionally, Blast Thermal Sunder partially strips armor while Redline is active. At 100% battery, this will full-strip armor.
Unlike most damage abilities, Thermal Sunder's damage should not be scaled with Strength, but rather cast speed. Every time you cast Heat Thermal Sunder, any Heat procs on the target will be added to Thermal Sunder's damage, including the forced Heat proc it inflicts. Since Thermal Sunder is dealing Heat damage, this creates a feedback loop that experiences exponential damage scaling.
The damage of your Thermal Sunder doesn't matter. The number of Heat procs you inflict will compound the amount of damage Thermal Sunder does. This is why most Thermal Sunder builds bias Efficiency, Range, and cast speed. The more Heat procs you can inflict, the exponentially more damage Thermal Sunder will dish out. Strength is not needed.
Scaling Heat Status
Archon Vitality will cause Thermal Sunder to inflict an additional Heat status ailment, further scaling its damage. Redline will also double the damage of Thermal Sunder's Heat procs.
Redline
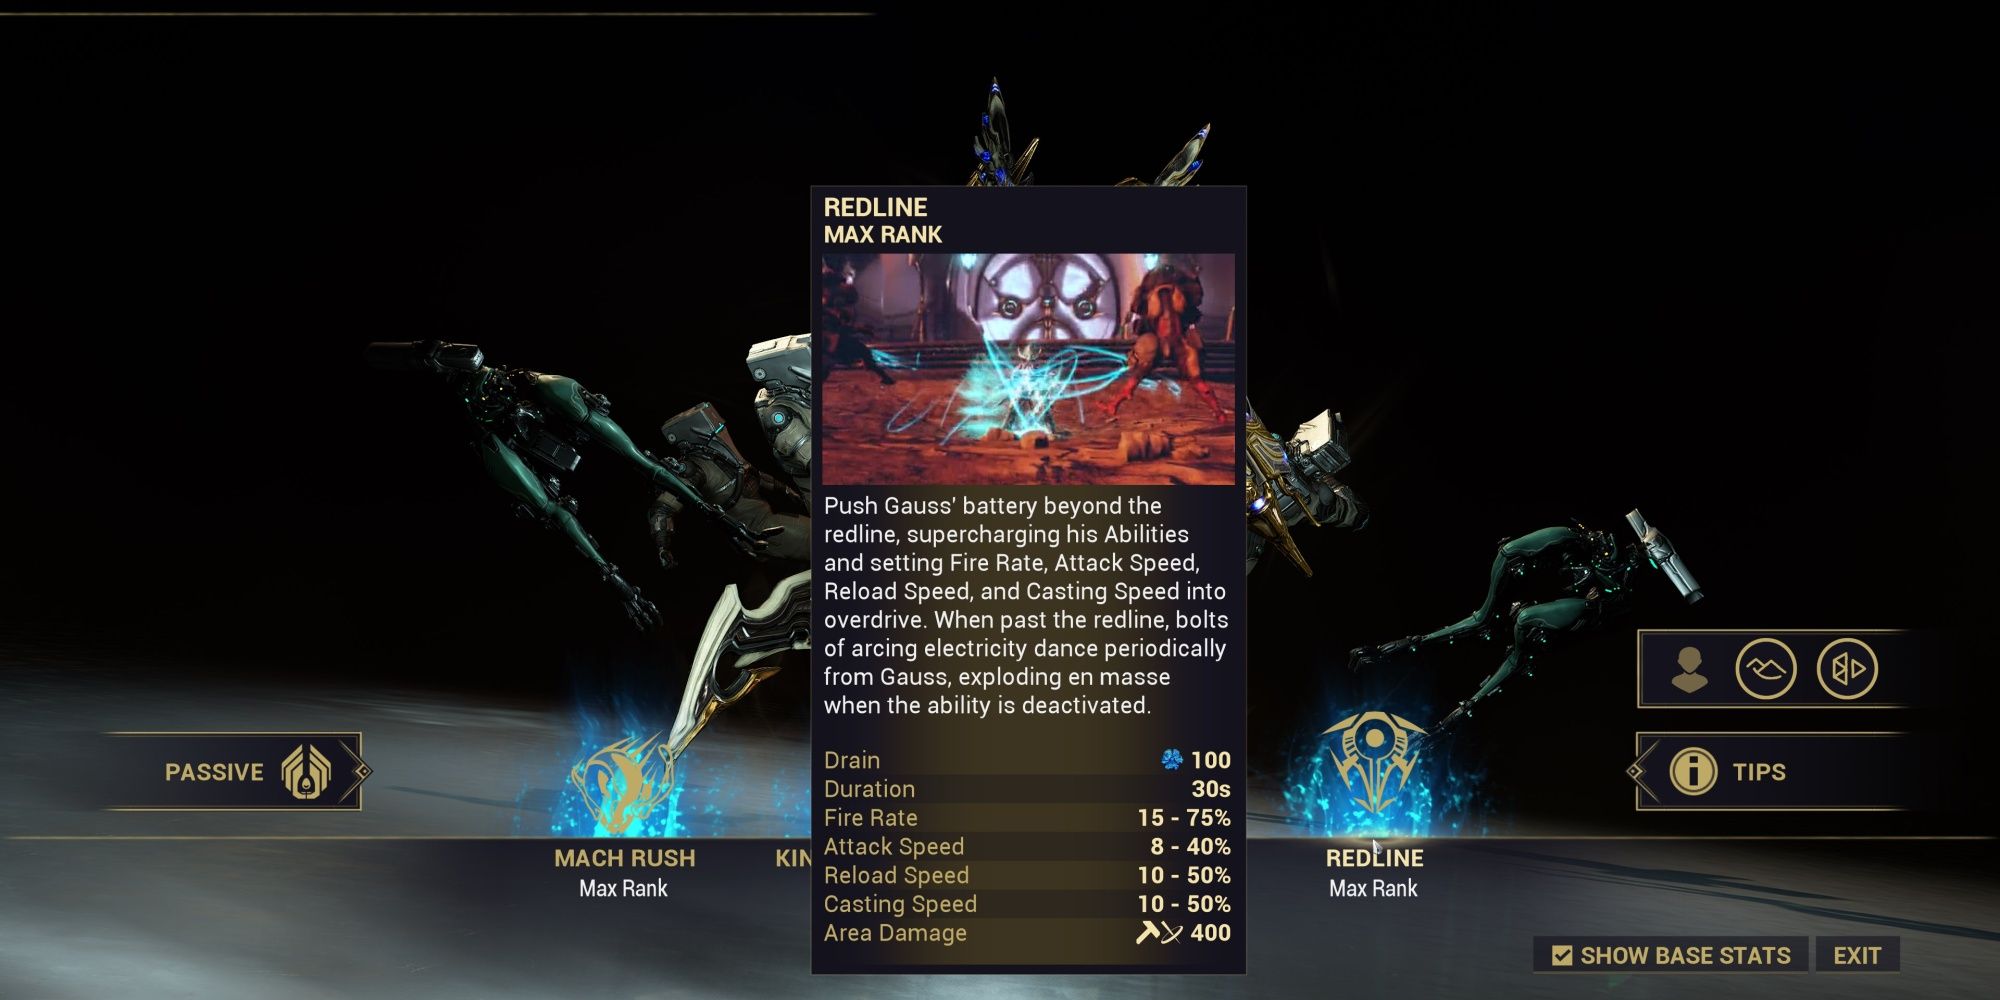
Redline: Push Gauss' battery beyond the redline, supercharging his abilities and setting fire rate, attack speed, reload speed, and casting speed into overdrive. When past the redline, bolts of arcing electricity dance periodically from Gauss, exploding en masse when the ability is deactivated.
|
Redline Stats |
|||
|---|---|---|---|
|
Drain |
100 Energy |
||
|
Duration |
30 Seconds |
||
|
Fire Rate |
15-75% |
||
|
Attack Speed |
8-40% |
||
|
Reload Speed |
10-50% |
||
|
Casting Speed |
10-50% |
||
|
Area Damage |
400 Impact and Puncture |
||
|
Applicable Mods |
|||
|
Duration |
Range |
Efficiency |
Strength |
|
Affects ability duration |
N/A |
Affects cast Energy cost |
Affects buff magnitudes and bolt damage |
Redline is Gauss' bread and butter ability. When active, Gauss' battery gauge can now reach 100% charge, and the battery gauge now provides buffs to your fire rate, reload speed, cast speed, and melee attack speed. As with Kinetic Plating, the buffs scale linearly with your battery level. This ability drains 2% battery per second.
Unlike most buff abilities, Gauss' Redline scales off Ability Duration, not Strength. With that said, increasing your Duration will also influence how long it takes to fully charge your battery. If you decide to stack all Duration sources, it can take 15+ seconds to fully charge your battery from running or casting Mach Rush. Be mindful of this when creating builds.
Additionally, Redline provides some powerful ability synergies that are unlisted in the ability's description:
- Battery: Can now reach 100% charge, making Gauss' shields recharge much faster.
- Mach Rush: Drains half as much Energy when active, stacking multiplicatively with Efficiency.
- Kinetic Plating: Melee weapons deal +100% (base) damage with a 100% chance to stagger enemies.
- Thermal Sunder: Heat procs deal double damage. Cold procs instantly freeze targets. Blast procs strip armor, up to 100% at max battery.

Warframe: A Complete Guide To The Grimoire
Use the Grimoire's unique Tome mods to create the ultimate utility weapon.Gauss Augments
Gauss has access to two augment mods, one for Mach Rush and another that alters Thermal Sunder. Every augment mod for Gauss may be purchased from the Arbiters of Hexis and Perrin Sequence Syndicates for 25,000 Standing each. You must be at least Rank 4 with each Syndicate to purchase these mods. These mods are also tradeable.
Mach Crash
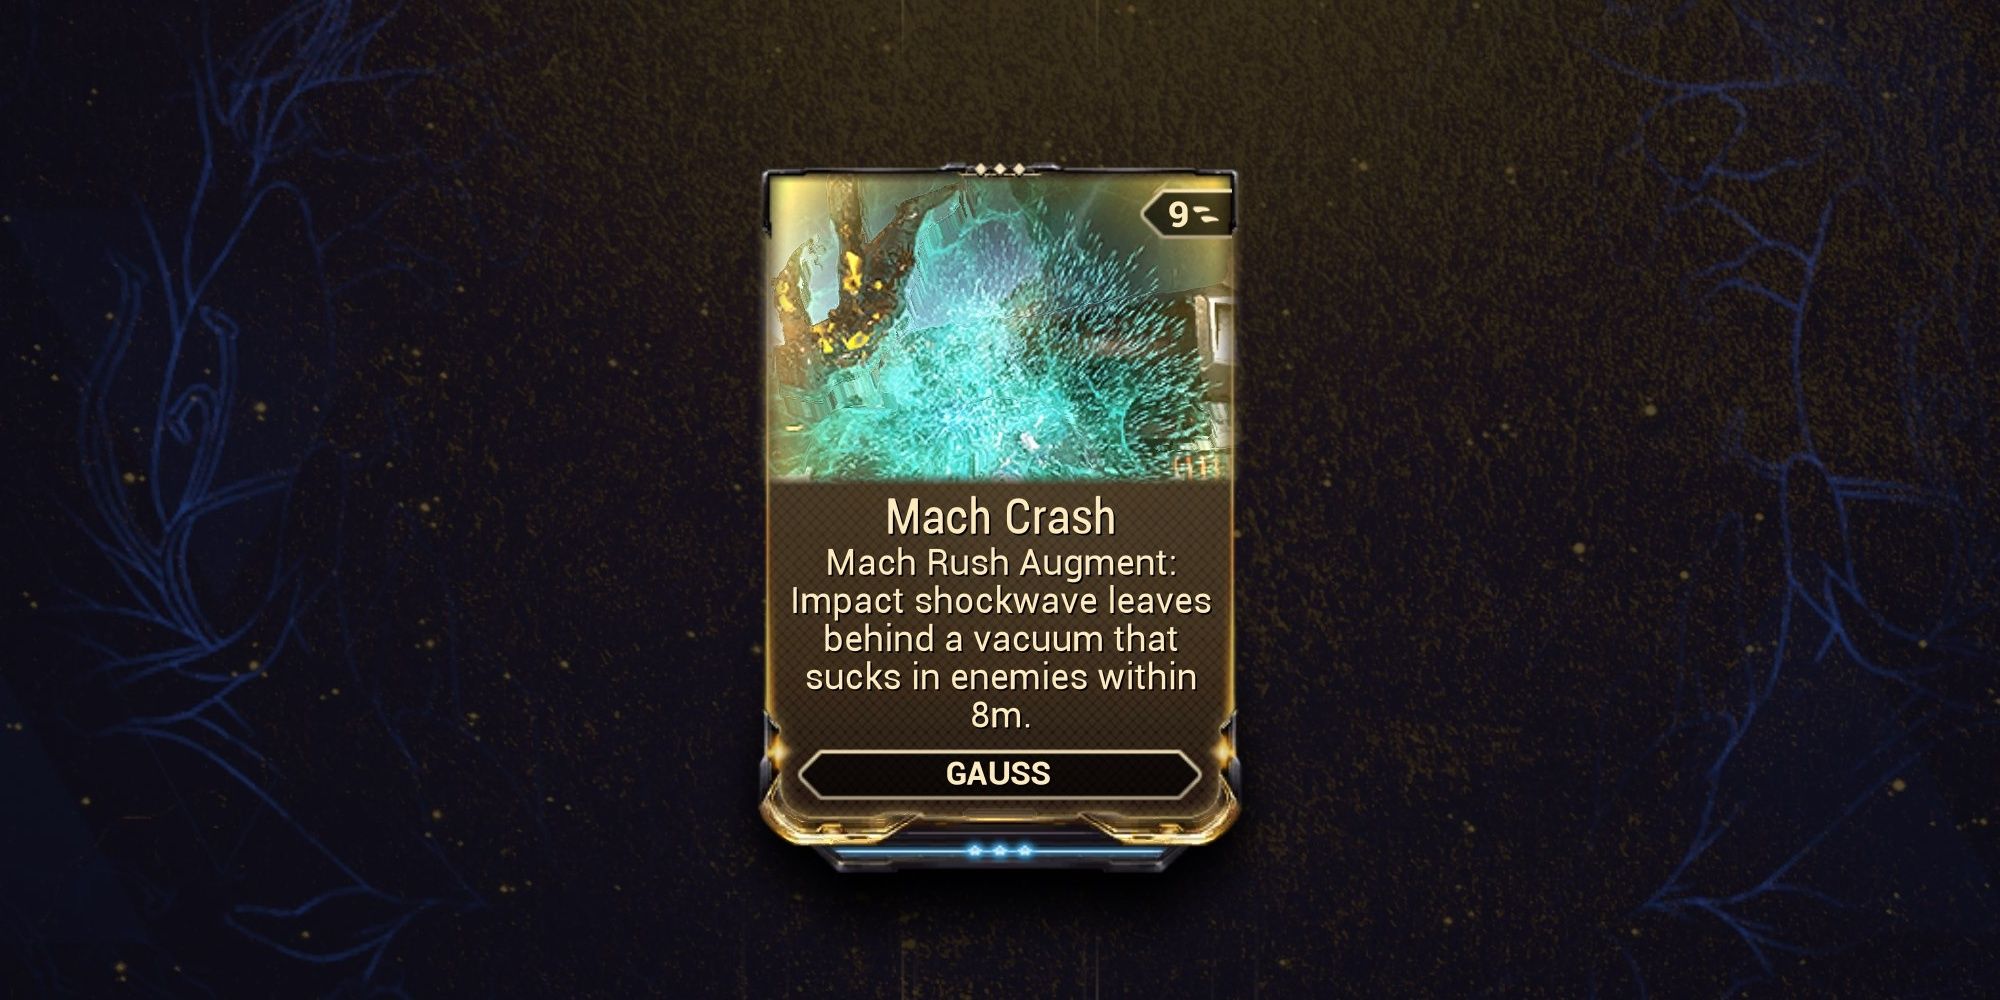
Mach Crash: Mach Rush Augment – Impact shockwave leaves behind a vacuum that sucks in enemies within 8m.
Mach Crash gives Mach Rush the ability to pull targets into a tight cluster upon crashing into a wall. The implosion effect is identical to Mag's Pull, pulling enemies into a tight mass for roughly two seconds before dissipating. While in this state, enemies are ragdolled and cannot attack.
This augment scales with Ability Range, increasing its effective pull radius. There aren't any line-of-sight checks or similar restrictions to this augment, making this an excellent option for Gauss players who enjoy using melee weapons or guns with punch-through.
Thermal Transfer
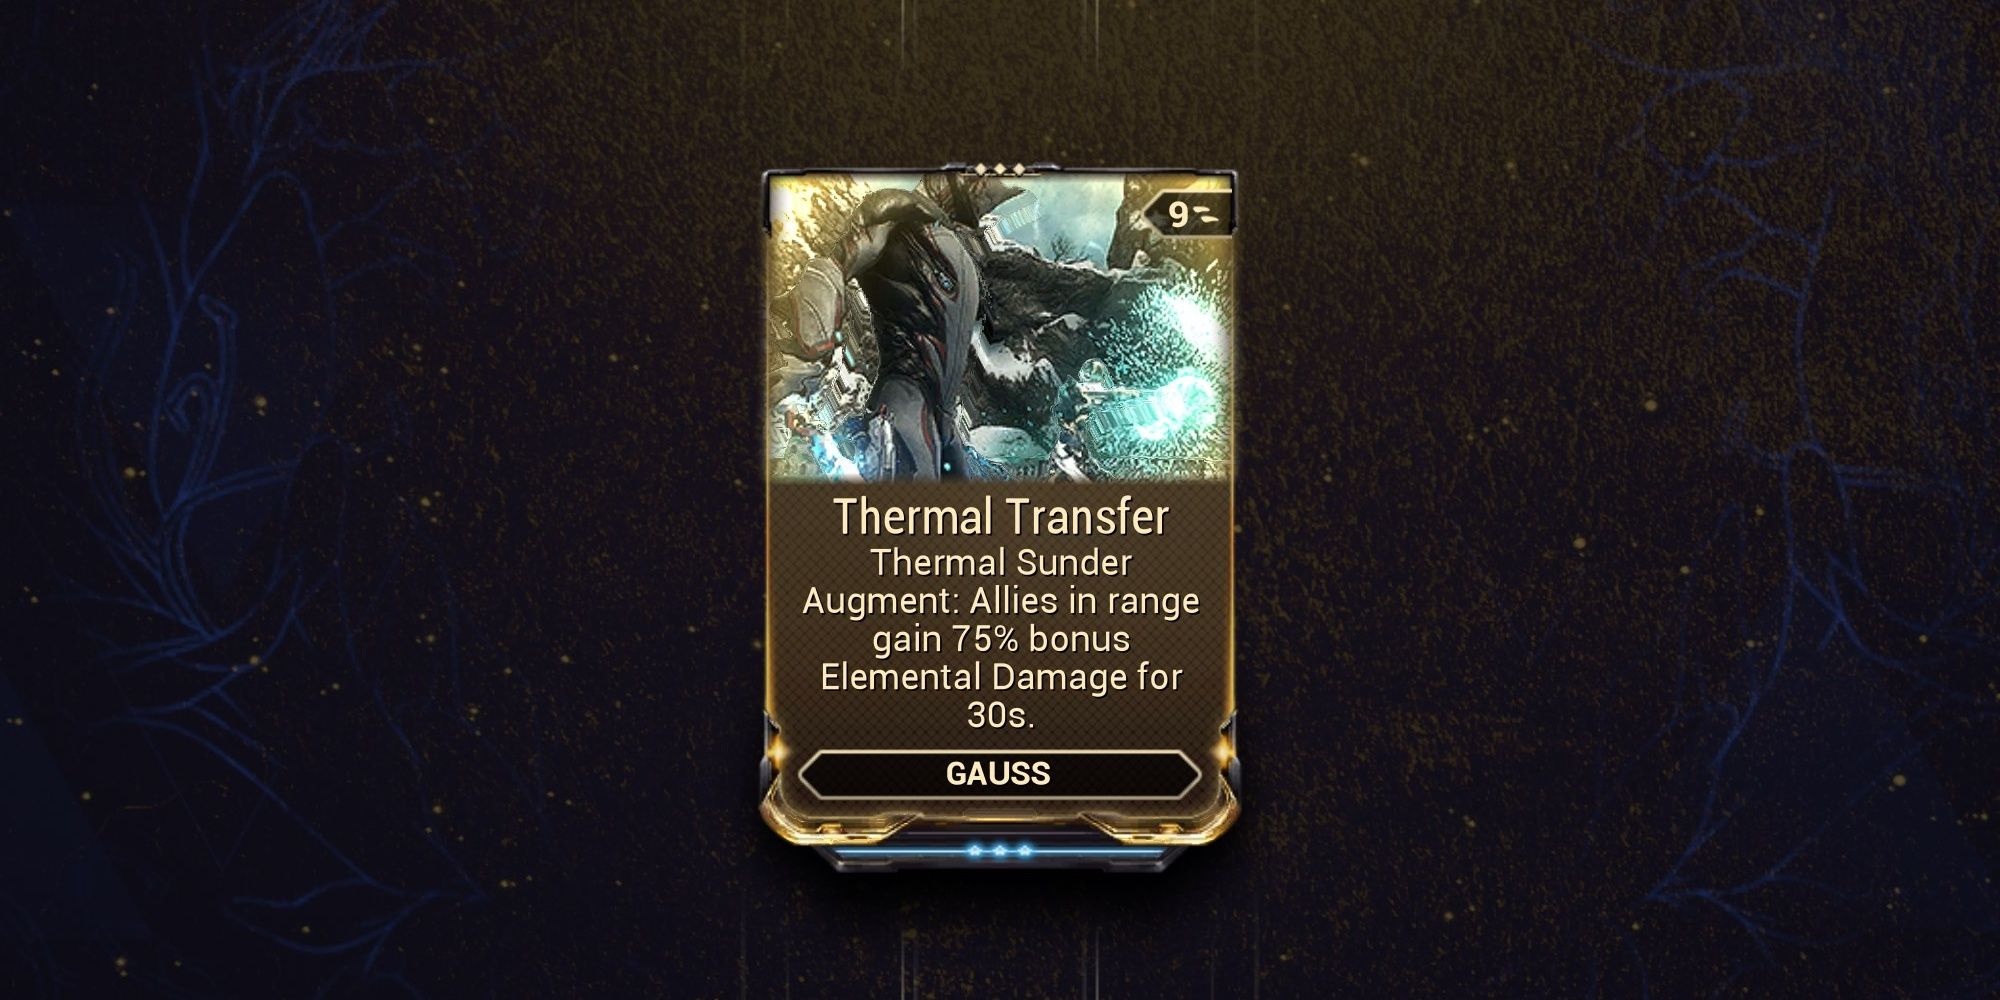
Thermal Transfer: Thermal Sunder Augment – Allies in range gain 75% bonus elemental damage for 30s.
Thermal Transfer's mod description isn't entirely accurate. What this mod actually does is provide your weapons with bonus Heat or Cold damage based on the type of Thermal Sunder you're standing in. It behaves identically to the elemental damage augment mods seen for Volt's Shock and Ember's Fireball.
Both damage buffs linger for 30 seconds.
The elements are applied after mods for the purposes of combining elements. For example, if your weapon dealt pure Toxin damage and you stood in a Heat Thermal Sunder, your gun would now do Gas damage.
You can modify this augment mod through Ability Strength and Duration. Strength affects the bonus Heat and Cold damage granted, while Duration affects how long the buff lingers.
Gauss Builds
We will be looking at three builds for Gauss in this guide, showcasing his effectiveness at all investment levels. Two builds will focus on buffing his Redline and weapon DPS capabilities, while our last build will focus on making Gauss' Thermal Sunder as best as it can be.
Since Gauss has high base shields with a powerful DR ability, he is a great candidate for shield tanking and shield-gate builds. Tank builds can use Adaptation by itself to make Gauss' EHP skyrocket. If you're attempting level cap Steel Path, you can use Rolling Guard or Catalyzing Shield instead for a more active shield-gate build.
As for Focus schools, we recommend Zenurik or Madurai depending on your build. For a Redline build, we suggest Zenurik to passively restore your Energy. Thermal Sunder builds should use Madurai to scale their cast speed and Ability Strength.
Archon Shards
Gauss can make great use of Archon Shards. None of the builds listed below use Archon Shards, but if you want to min-max Gauss, the following shard properties are worth experimenting with:
|
Amber |
|
|---|---|
|
Crimson |
|
|
Azure |
|
|
Emerald |
|
|
Topaz |
|
|
Violet |
|
Starter Build (0 Forma, No Subsume)
|
Forma |
0 |
|---|---|
|
Subsume Options |
N/A |
|
Archon Shards |
None |
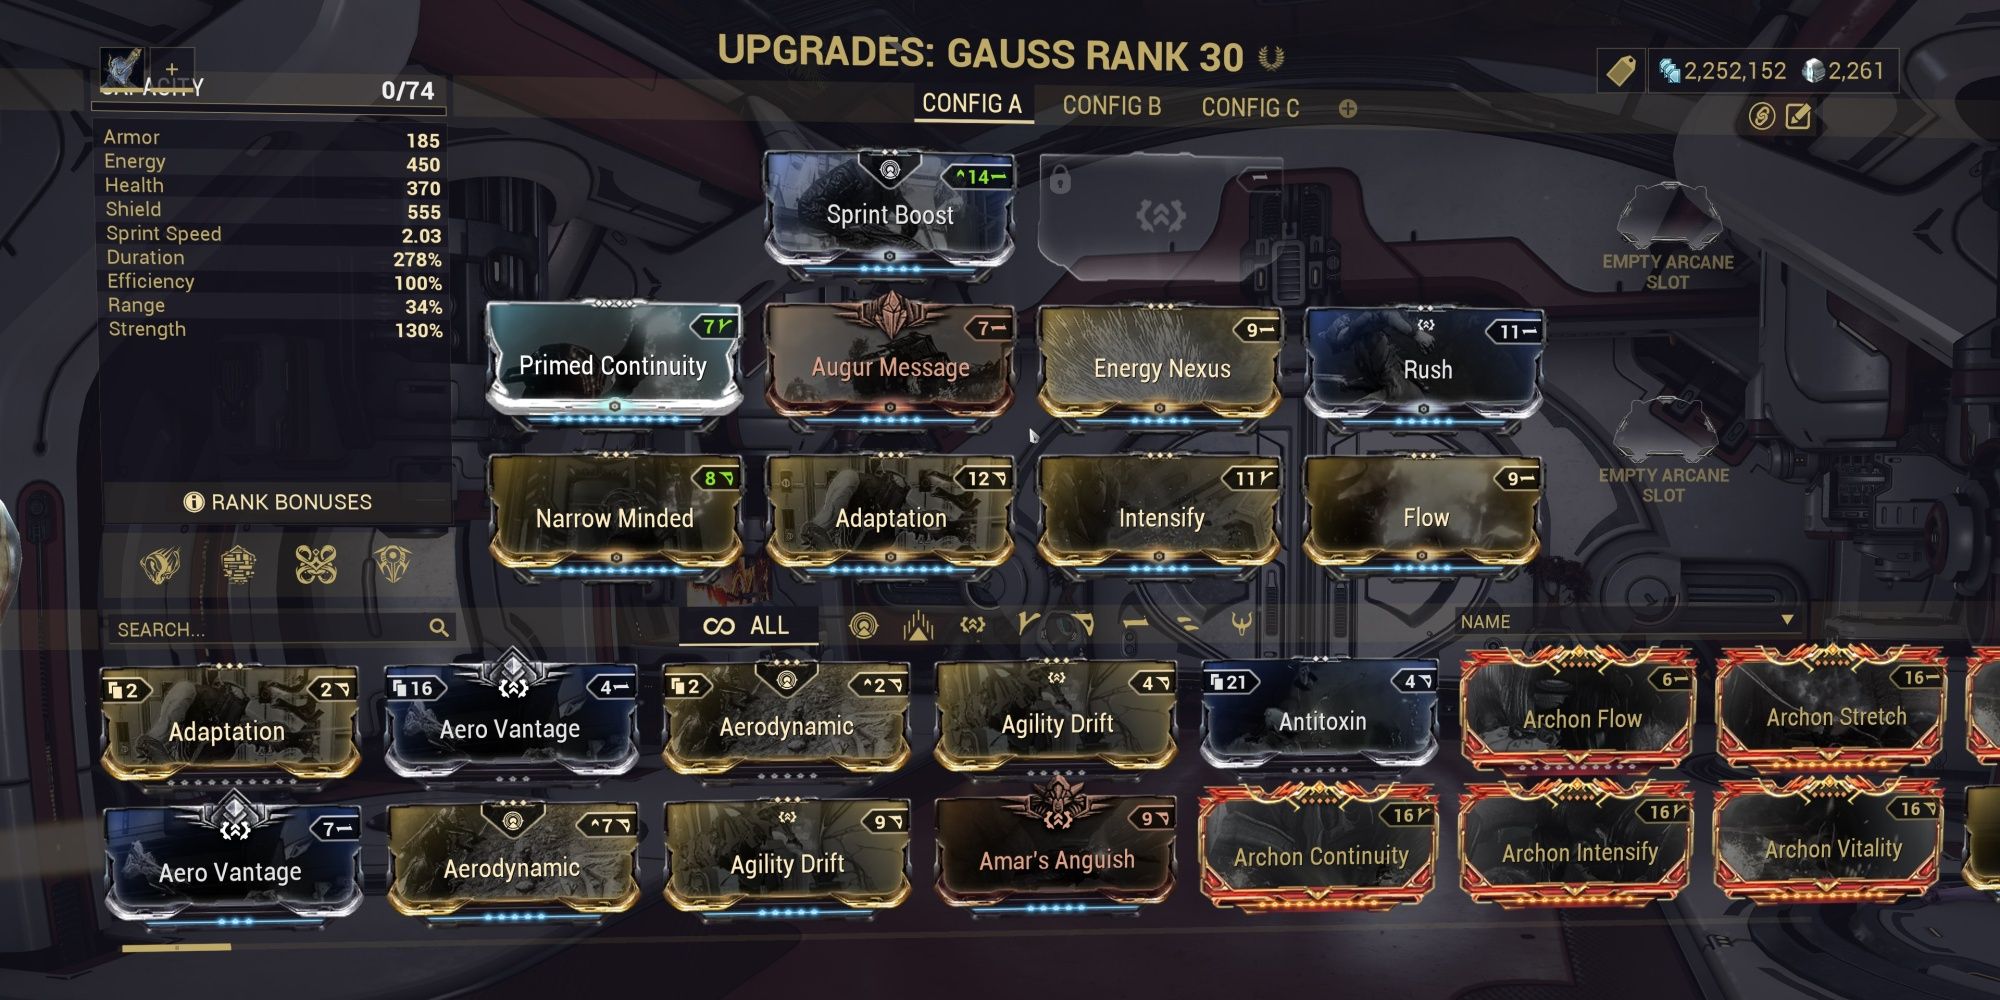
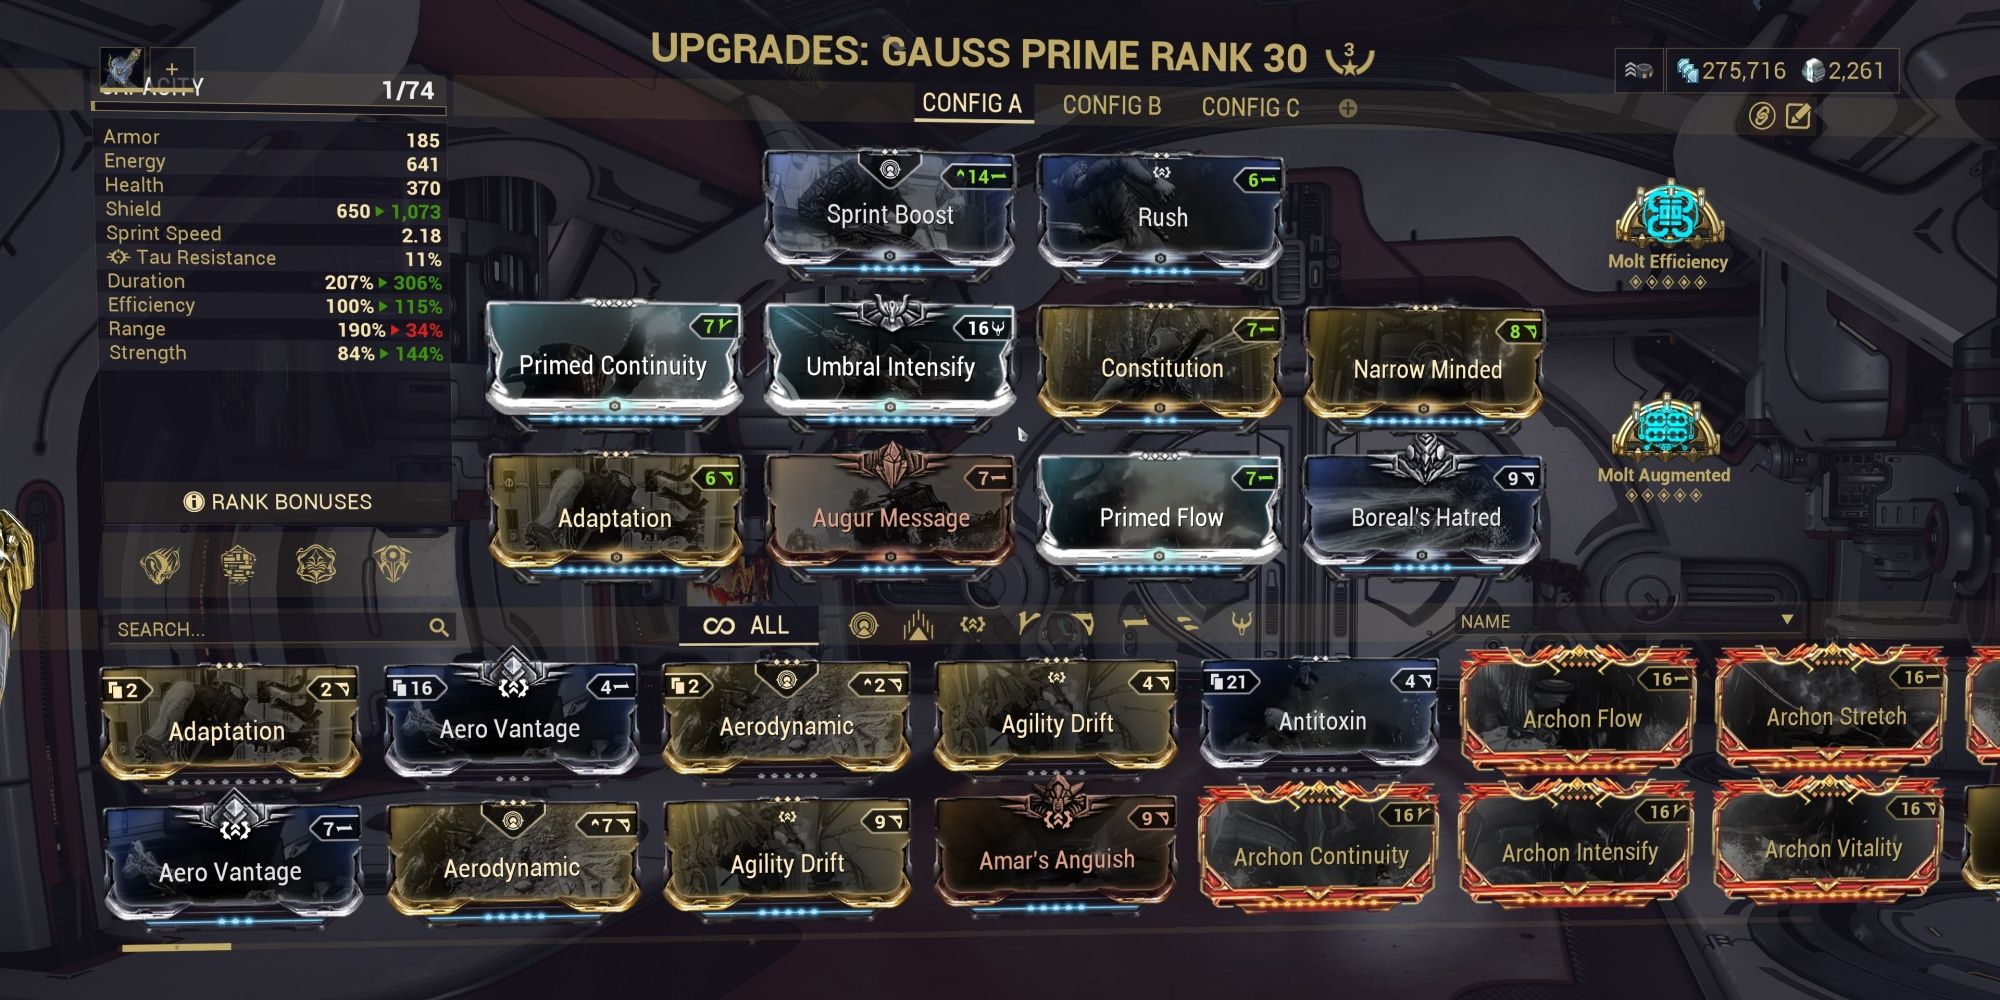
This build focuses on buffing Gauss' Redline power without the help of Arcanes or Archon Shards. The most expensive mods in this build are Primed Continuity and Narrow Minded. The former can be replaced with Continuity if you don't have one. Narrow Minded doesn't need to be max rank either, but higher ranks are preferred. Adaptation is also fully optional.
You'll want to increase your Ability Duration as much as possible to buff Redline. We use Primed Continuity, Narrow Minded, and Augur Message to greatly buff Gauss' duration to 278%. Strength isn't a hard requirement here, but we do recommend Intensify to buff the DR provided by Kinetic Plating.
To buff Gauss' Energy economy, we suggest using Energy Nexus and Flow. Both mods are fairly cheap and passively restore Gauss' Energy reserves without any input from you. When Redline expires, you'll have more than enough Energy to cast it again, especially if you're using Zenurik.
For the last two slots, we use Adaptation to scale our damage resistance and Rush to buff Gauss' sprint speed. You can replace Adaptation with Redirection or Vitality if you don't own it. Rush can also be switched for anything you please, although we find it quite useful since it buffs the speed of Mach Rush.
Weapons Platform Gauss (2 Forma, Nourish Subsume)
|
Forma |
2 (D and –) |
|---|---|
|
Subsume Options |
Nourish (Grendel), Roar (Rhino), Energized Munitions (Helminth) |
|
Archon Shards |
None |
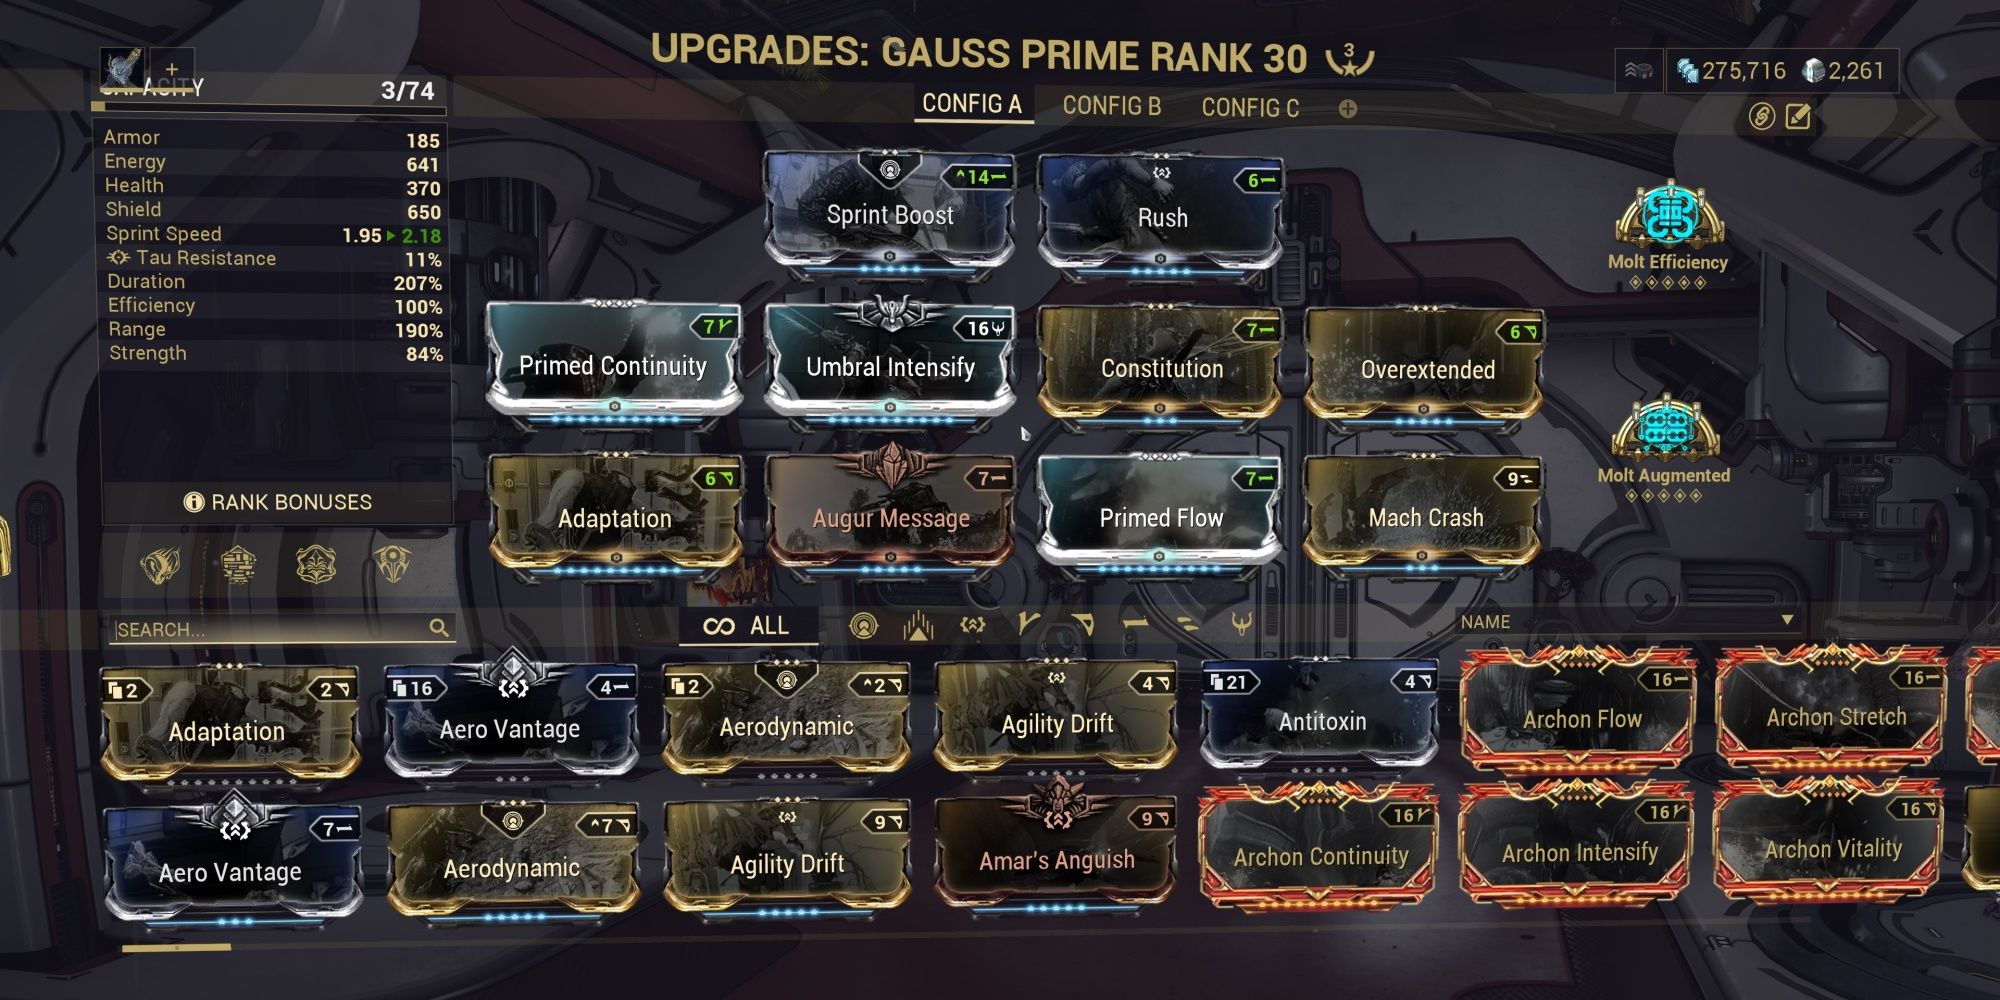
This build turns Gauss into a devastating weapons platform. We start by replacing Thermal Sunder with any DPS ability. We prefer Grendel's Nourish since it gives Viral damage, but feel free to use Rhino's Roar if your guns lack faction damage mods. Energized Munitions is also a fun pick, providing 75% ammo efficiency for a short time, but beware that it doesn't work on Incarnon Form weapons.
We focus on scaling Ability Duration as much as possible without using Narrow Minded, as this build also aims to scale Gauss' Ability Range stat. Primed Continuity, Constitution, Augur Message, and Molt Efficiency bring Gauss' duration up to 243% while Molt Efficiency is active. Archon Shards can be used to further boost this value.
Max Duration Variant
If you dislike Mach Crash and just want to make Redline the best it can be, drop Overextended for Narrow Minded. Mach Crash may be replaced with more Strength, Efficiency, Duration, or a QoL mod.
As powerful as Redline is, keeping your battery charged can be annoying at times. This is why we suggest using Mach Crash. This is an augment mod for Gauss' first ability that gives it Mag's Pull effect when you crash into a wall, vacuuming nearby targets into a tight ball. The added utility makes Mach Rush a far stronger ability for smaller tilesets.
Since Mach Crash scales off Range, we use Overextended to increase its vacuum distance to 15 meters. This feels large enough in our testing, but feel free to drop Augur Message for Stretch if you want a larger vacuum radius.
Since Overextended drops our Strength, we use Molt Augmented and Umbral Intensify to get some Strength back. While Gauss doesn't need Strength for any of his abilities, it does make Kinetic Plating more effective at lower battery levels, so it shouldn't be fully ignored.
To finish the build, we use Adaptation to scale our DR and Primed Flow to increase Gauss' Energy reserves. Since Mach Rush scales off sprint speed, we might as well use Sprint Boost and Rush.
Thermal Sunder Build (2 Forma, No Subsume)
|
Forma |
2 (D and –) |
|---|---|
|
Subsume Options |
N/A |
|
Archon Shards |
None |
Our third build for Gauss turns him into the ultimate nuke Warframe, capable of reaching the damage cap in just a few casts. This is possible thanks to the way Thermal Sunder scales its damage off Heat procs. Heat status effects are added to the initial damage of Thermal Sunder, scaling that cast's Heat proc. This creates a feedback loop that leads to exponential damage scaling.
With that knowledge, it becomes clear that we want to scale as much Efficiency and Range as possible. Cast speed is also valuable, but we can get this stat from Redline, Archon Shards, and the Madurai Focus School. Despite what many builds suggest, Strength is not needed to scale Thermal Sunder's damage; you just need rapid casts.
Invert Tap/Hold Abilities
You can change the behavior of Thermal Sunder to cast its Heat variant on tap instead of on hold. To do so, head to the options menu and look for the "Invert Tap/Hold Abilities" setting. Toggle this setting for Gauss, and you can now tap the ability key to cast Heat Thermal Sunder.
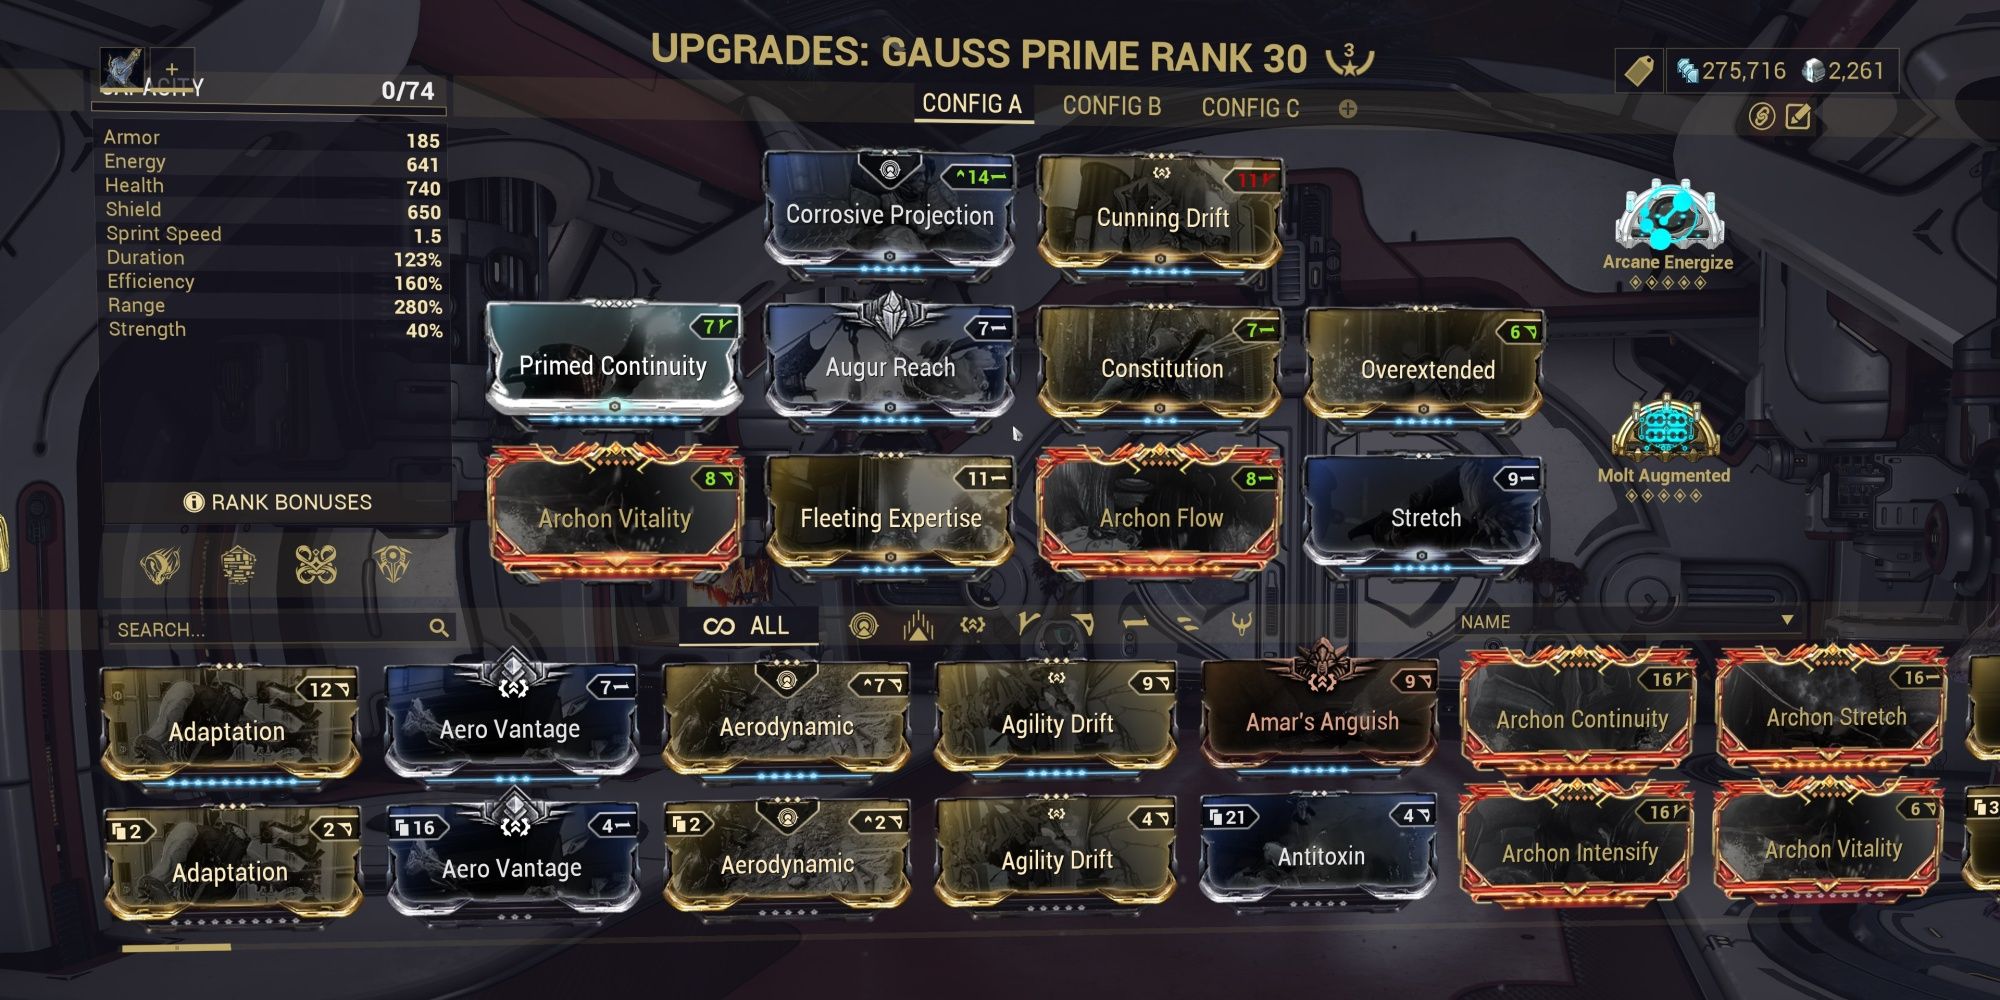
Let's start with the strangest mod on here: Archon Vitality. This mod will apply an additional Heat proc whenever an ability applies Heat status, copying its damage. This works with Thermal Sunder, substantially buffing this build's damage output. You only need an unranked copy for this build. If you want to max it, you'll need another Forma.
Redline is another ability that scales Thermal Sunder, doubling its Heat damage while active. Since Redline also gives cast speed, scaling Ability Duration indirectly gives us cast speed. That's why we use Narrow Minded and Primed Continuity. If you need more Ability Range, drop Narrow Minded for another Ability Duration mod.
For our Energy economy, we use Archon Flow and Arcane Energize. Using the Cold variant of Thermal Sunder can now spawn Energy Orbs, and picking one up will restore 150 bonus Energy. Since we'll be spamming so many Thermal Sunders, Fleeting Expertise is also used. This will cut down Thermal Sunder's cost to 20 Energy.
If you don't have Arcane Energize, drop Archon Flow for Primed Flow. The Arcane slot can be replaced with any Arcane of your choosing.
If Energy becomes an issue, use the Zenurik Focus School.
Finally, we scale our Ability Range with every mod available: Overextended, Stretch, Augur Reach, and Cunning Drift. This more than doubles Thermal Sunder's effective radius. Overextended does reduce our Strength, which isn't a major deal for Thermal Sunder, but it does affect Kinetic Plating's DR scaling. To bring it back up, we use Molt Augmented.
Paired with your high Energy reserves, you should be able to spam powerful Thermal Sunders to your heart's content. In the event you take this build into Steel Path, run Corrosive Projection and perform a Blast Thermal Sunder at 84% battery to fully strip enemy armor.


