Quick Links
The ghostly Wisp is an excellent addition to any Warframe arsenal. She serves as a powerful support to any squad, capable of giving your team a massive boost to their health, fire rate, and much more. Plus, she's got an enormous death laser as an ultimate. What's not to love?
Getting Wisp is no easy task, but playing as this ethereal firecracker is immensely rewarding. This guide will go over how to obtain Wisp's components—along with a quick breakdown of the Ropalolyst fight—along with her abilities and some potent builds. If you want to become a jack of all trades or the ultimate support Warframe, Wisp is the frame for you.
Updated July 28, 2023, by Charles Burgar: Wisp Prime has released with the Echoes of Duviri update, featuring added mod polarities and slightly higher base stats. We've updated this guide to include Wisp Prime's drop locations, altered base stats, and added a new endgame build that takes advantage of Archon mods and endgame Arcanes.
Warframe Story Spoilers Ahead
Obtaining Wisp
Wisp blueprints—even her main blueprint—drop from the Ropalolyst on Jupiter, a boss that unlocks upon completing The Chimera Prologue quest. Each component has roughly a 25% drop chance. The good news is that the Ropalolyst is probably the most straightforward Sentient boss fight in the game. The bad news is that you need to be reasonably far along to unlock the Ropalolyst node on Jupiter.
Ropalolyst Walkthrough
To unlock the Ropaloyst node, you must first complete the Chimera Prologue quest— unlocked after completing The Sacrifice. But before you go running off to fight this flying Sentient, it's best to be prepared.
You'll want to bring a high-damage Radiation weapon to the fight with decent range. Snipers like Rubico Prime are a good idea, but anything with high single-shot damage should do the trick. A decent Amp is also recommended; anything better than a Mote Amp will do. Pick a Warframe with a damage-boosting ability and high toughness. Rhino and Chroma are ideal, but any tough Warframe will do.
The Ropalolyst fight can be summarized in two phases. In the first phase, your goal is to remove the Ropalolyst's shields and make it vulnerable. Use your Operator's Amp to widdle down the Ropalolyst's shields. Should it charge a beam attack, cloak with your Operator to tank the beam. When you remove its shield, it'll become vulnerable to a grapple from your Warframe. Get as close to the boss as you can and hit the interact input to mount the Ropalolyst.
Now that you're controlling the Ropalolyst, move it to one of three pylons near the edges of the arena. Hop off of the Ropalolyst. When it starts to charge a beam attack, take cover behind the pylon. This will charge the pylon, allowing you to stun the boss. Get atop the boss again, then ram it into the charged pylon. This will start a second phase of the fight.
Phase two is the real damage phase. First, shoot one of the "Syonvias" on the Ropalolyst's hind legs. This will stun it again and cause it to drop to the ground once more. A nearby panel will be activated and allow you to fire the Terren Charger at the Ropalolyst to deal damage to its health.
You have a short window to use the Terren Charger on the boss. Stay near the panel while damaging the boss to ensure you use the beam in time.
After that, the Ropalolyst will get up and start flying around. Repeat these phases two more times to destroy this Sentient for good. Navigate through the remaining debris to extract.
There's roughly a 25% chance of getting any given Wisp blueprint, which means you'll have to run the Ropalolyst at least four times to get all four. You'll also need some rare materials to build Wisp, including Hexenon, Argon Crystals, and Nitain Extract. Crafting components for each part are listed below.
How To Craft Wisp
Wisp Blueprint
|
Obtained |
Ropalolyst Boss (22.56% chance) |
|---|---|
|
Crafting Costs |
|
|
Crafting Time |
72 Hours |
Wisp Neuroptics
|
Obtained |
Ropalolyst Boss (25.81% chance) |
|---|---|
|
Crafting Costs |
|
|
Crafting Time |
12 Hours |
Wisp Chassis
|
Obtained |
Ropalolyst Boss (25.81% chance) |
|---|---|
|
Crafting Costs |
|
|
Crafting Time |
12 Hours |
Wisp Systems
|
Obtained |
Ropalolyst Boss (25.81% chance) |
|---|---|
|
Crafting Costs |
|
|
Crafting Time |
12 Hours |
How To Craft Wisp Prime
Wisp Prime's components drop from Void Relics found throughout the Star Chart. You can earn Relics by completing missions, purchasing Relic Packs from Syndicates or Teshin, or by trading with other players. The exact Relics needed to obtain each of Wisp Prime's components are listed below.
Wisp Prime Blueprint
|
Obtained |
Axi W3 (Rare) |
|---|---|
|
Crafting Costs |
|
|
Crafting Time |
72 Hours |
Wisp Prime Neuroptics
|
Obtained |
Meso K6 (Uncommon) |
|---|---|
|
Crafting Costs |
|
|
Crafting Time |
12 Hours |
Wisp Prime Chassis
|
Obtained |
Lith W3 (Rare) |
|---|---|
|
Crafting Costs |
|
|
Crafting Time |
12 Hours |
Wisp Prime Systems
|
Obtained |
Neo D7 (Common) |
|---|---|
|
Crafting Costs |
|
|
Crafting Time |
12 Hours |
Wisp Abilities
Stats
|
Wisp |
Wisp Prime |
|---|---|
|
|
Passive
Passive: Wisp becomes invisible to enemies while in the air.
Wisp's passive is rather straightforward. While you're airborne, you are considered invisible. Using your guns will break your invisibility, even silenced weapons. Note that your passive persists for a second when you land, giving you an opportunity to jump.
Reservoirs
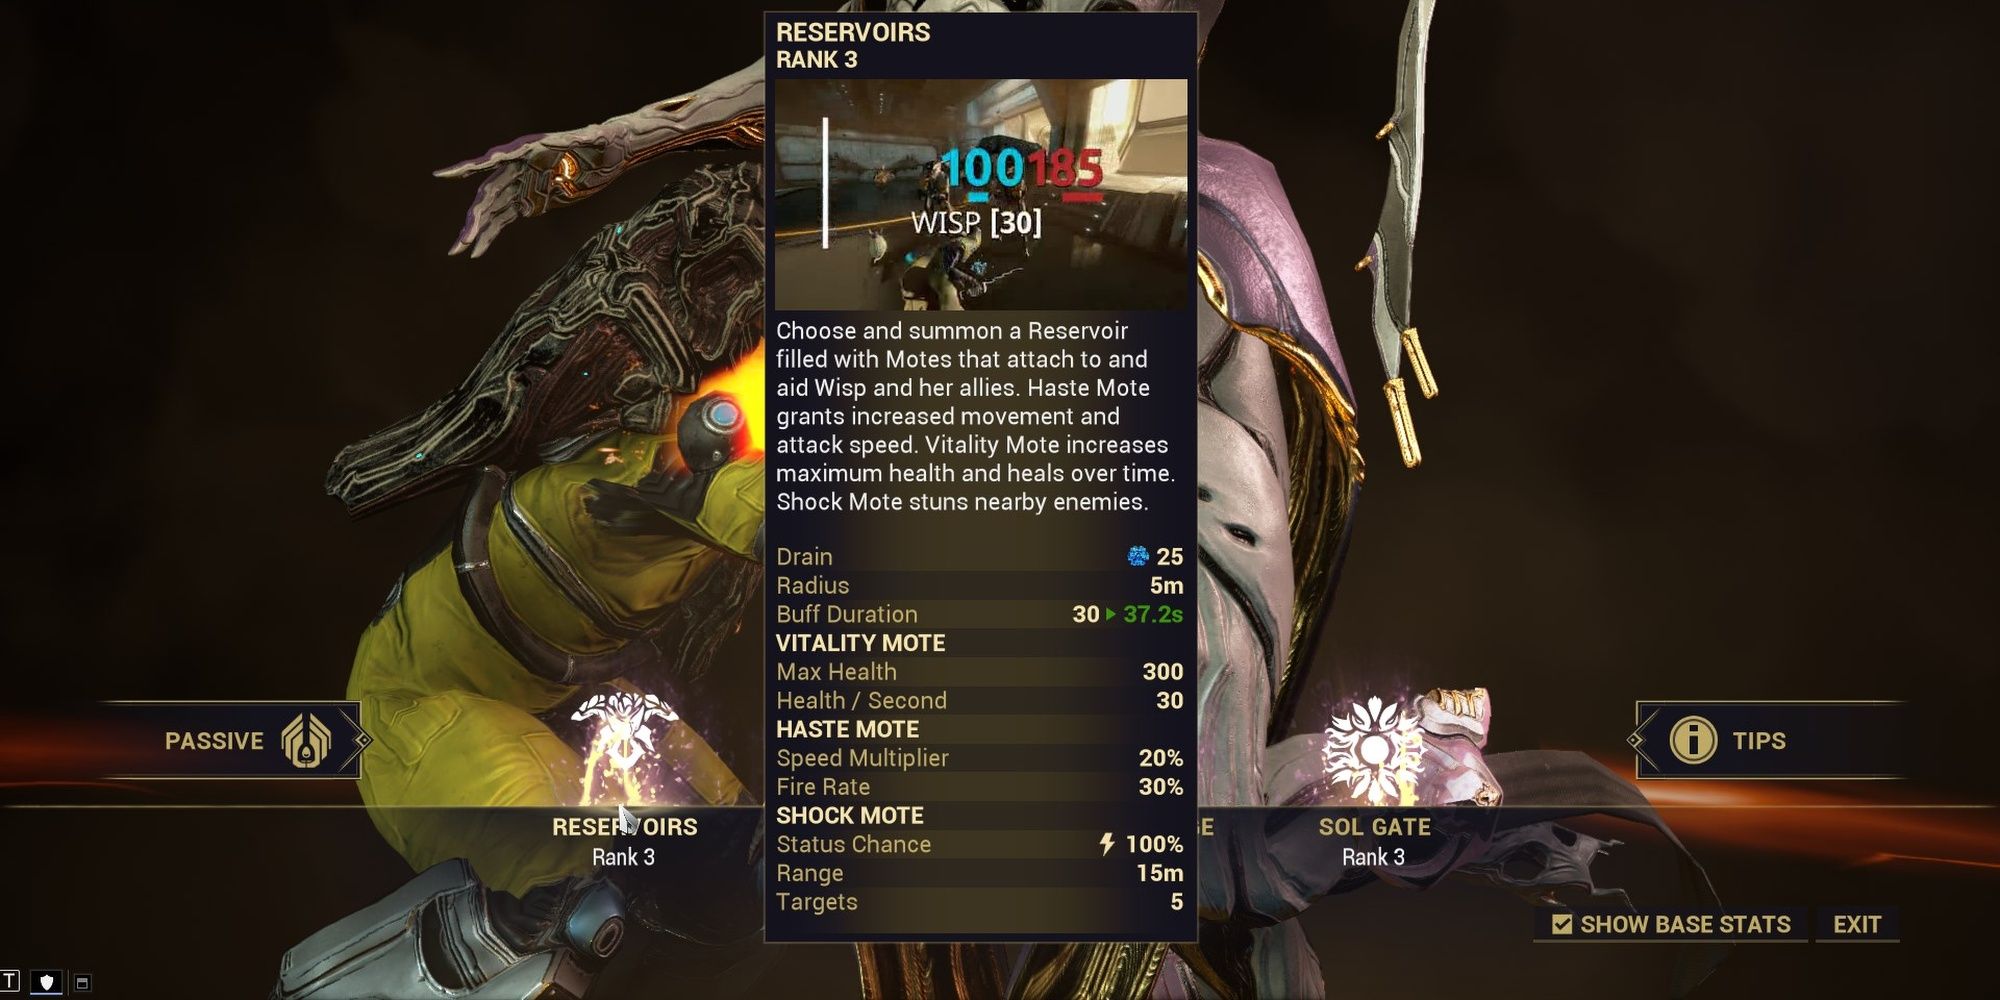
Reservoirs: Choose and summon a Reservoir filled with Motes that attach to and aid Wisp and her allies. Haste Mote grants increased movement and attack speed. Vitality Mote increases maximum health and heals over time. Shock Mote stuns nearby enemies.
|
Reservoir Stats |
|||
|---|---|---|---|
|
Drain |
25 Energy |
||
|
Radius |
5m |
||
|
Duration |
Reservoir: Infinite |
||
|
Mote: 30 seconds |
|||
|
Vitality Mote Buffs |
Health: +300 |
||
|
HP Regen: 30 per second |
|||
|
Haste Mote Buffs |
Speed: +20% |
||
|
Fire Rate: +30% |
|||
|
Shock Mote Buffs |
Status Chance: 100% |
||
|
Range: 15m |
|||
|
Targets: 5 |
|||
|
Applicable Mods |
|||
|
Duration |
Range |
Efficiency |
Strength |
|
Affects Mote duration |
Affect Reservoir radius and Shock Mote range |
Affects cast Energy cost |
Affects the magnitude of each Mote buff |
Reservoirs might be the strongest support ability in Warframe—arguably one of the strongest first abilities out of any Warframe kit. You can cycle between one of three Reservoirs to deploy at Wisp's feet, granting anyone in the area a Mote of the respective Reservoir type. She can deploy a Vitality, Haste, or Shock Mote. You can have up to six Reservoirs active at a time, but your Motes can affect an infinite number of allies—including companions and NPCs.
Standing in a Reservoir will cause its respective Mote to last indefinitely; moving outside of a Reservoir will cause your Mote to gain a timer. Should that timer reach zero, you lose the Mote's buffs until you walk into a Reservoir again. You can only have one of each Mote type affect you at a given moment. Walking past a stronger Reservoir will override your current Mote with the strongest variant; they don't stack. Build this ability for Strength to get the most out of each Mote.
You can use Breach Surge to teleport to a Reservoir, doubling the base radius of Breach Surge.
Wil-O-Wisp
Wil-O-Wisp: Cast forward a spectral image of Wisp to confuse and distract enemies. Reactivate to travel to its position. Hold to have the image travel faster and teleport to its position on release.
|
Wil-O-Wisp Stats |
|||
|---|---|---|---|
|
Drain |
50 Energy |
||
|
Duration |
4 seconds |
||
|
Time Invulnerable |
3 seconds |
||
|
Applicable Mods |
|||
|
Duration |
Range |
Efficiency |
Strength |
|
Affects the spectral image's duration |
N/A |
Affects cast Energy cost |
N/A |
Wil-O-Wisp is Wisp's dedicated survivability tool. Activating this ability will create a spectral image of Wisp that travels in the direction you were facing when Wil-O-Wisp was cast. Holding down the ability key when casting Wil-O-Wisp will create an image that moves twice as fast. It will continue to move in a straight line for the listed duration. You can cancel the ability at any time by activating Wil-O-Wisp again, teleporting to your spectral image's location.
To further help you survive, this ability grants three seconds of invulnerability when cast. You can't extend this invulnerability window through Ability Duration, but you can chain it with Rolling Guard and similar effects. We recommend building for Ability Duration to get the most out of it.
Casting Breach Surge while Wil-O-Wisp is active will cast a second Breach Surge near your spectral image. Wil-O-Wisp's Breach Surge radius is also doubled if you teleport to a Reservoir.
Breach Surge
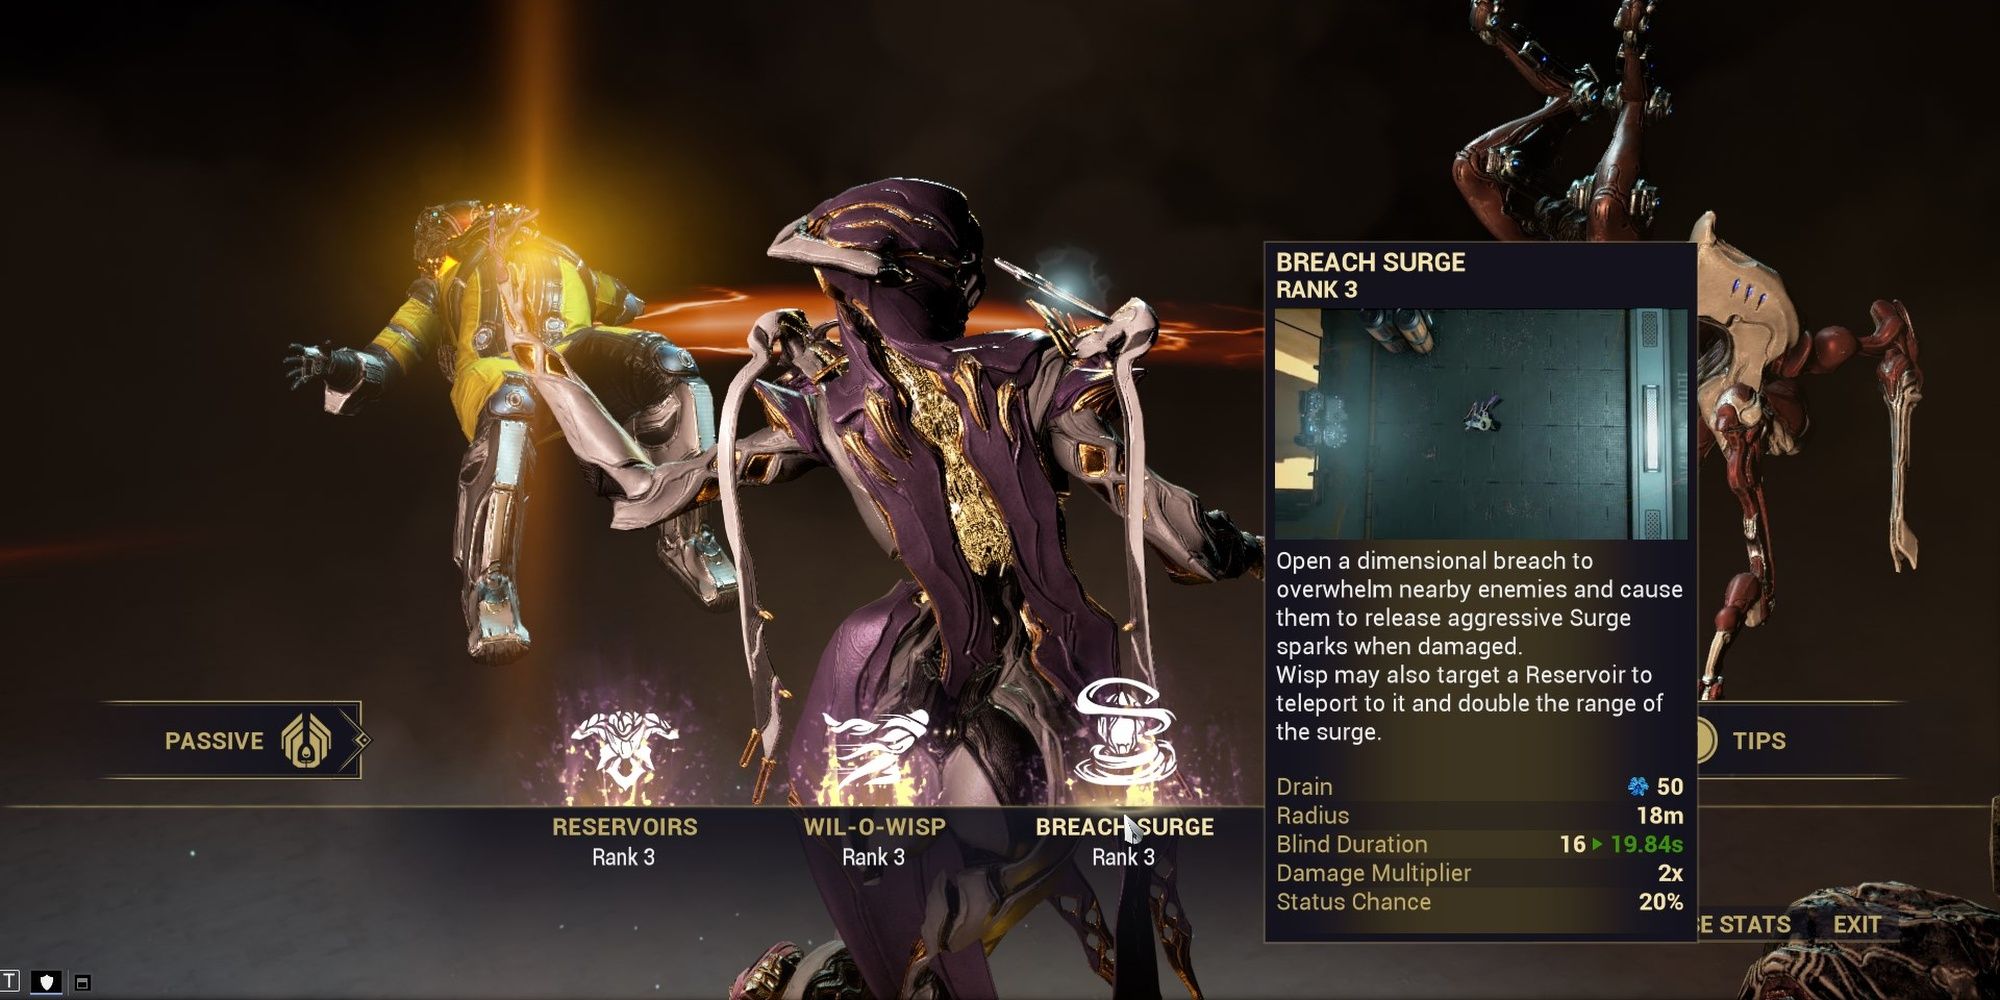
Breach Surge: Open a dimensional breach to overwhelm nearby enemies and cause them to release aggressive Surge sparks when damaged. Wisp may also target a Reservoir to teleport it and double the range of the surge.
This ability can be subsumed with the Helminth system.
|
Breach Surge Stats |
|||
|---|---|---|---|
|
Drain |
75 Energy |
||
|
Radius |
18m |
||
|
Duration |
16 seconds |
||
|
Damage Multiplier |
2x |
||
|
Status Chance |
20% |
||
|
Applicable Mods |
|||
|
Duration |
Range |
Efficiency |
Strength |
|
Affects debuff and blind duration |
Affects Breach Surge radius |
Affects cast Energy cost |
Affects damage multiplier and status chance |
Wisp will spawn a ring of sparks around her for a moment, causing all targets in the ring to become blind. Damaging a target affected by Breach Surge has a chance of spawning a spark that will fly to a nearby target, dealing twice as much damage as the source of the hit. These sparks aim for the head, allowing them to land headshots on humanoid targets.
While the ability breakdown might imply that Breach Surge debuffs targets, it actually causes enemies to spawn sparks and nothing more. The sparks get a damage multiplier that's affected by Ability Strength. Strength also increases Breach Surge's status chance, making each damage source more likely to trigger a spark. Sparks can spawn from any damage source, including DoTs like Heat or Slash. Weapons that fire quickly or inflict lots of DoTs are recommended. Building this ability for Strength is also recommended.
Sol Gate
Sol Gate: Open a portal to the sun to irradiate enemies with a devastating beam of pure solar plasma. Hold fire to double Damage at the cost of increased energy consumption. For the duration of an attack enemies damaged by Sol Gate are increasingly more vulnerable to it.
|
Sol Gate Stats |
|||
|---|---|---|---|
|
Drain |
Cast: 25 Energy |
||
|
Active Drain: 12 per second |
|||
|
Range |
40m |
||
|
Damage / Second |
1,500 Heat and Radiation |
||
|
Applicable Mods |
|||
|
Duration |
Range |
Efficiency |
Strength |
|
Affects Energy drain while < 175% Efficiency |
Affects Sol Gate's range |
Affects cast and drain Energy costs |
Affects Sol Gate's damage |
Sol Gate is arguably Wisp's weakest ability, but it's still a solid choice for low-level content. Wisp creates a massive beam of energy in front of herself, dealing 1,500 Heat and Radiation damage every half second. You can hold down the fire button to double your damage in exchange for double Energy consumption. Enemies damaged by the beam become progressively more vulnerable to it, taking 50% more damage per second. This debuff caps at 500% more damage taken from Sol Gate.
Motes have an inherent synergy with Sol Gate, enhancing this ability with a few different properties:
- Vitality Mote: Increases base damage by 25%.
- Haste Mote: Sol Gate can inflict Corrosive status, stripping armor.
- Shock Mote: Increases base damage by 25%.
Wisp can only strafe and dodge while Sol Gate is being channeled; parkour, sprinting, and firing your weapons are all disabled. You are immune to knockdowns while this skill is in use. We recommend you replace this ability with something else through the Helminth system, although players who want to use Sol Gate should spec for Ability Efficiency and Strength.
Wisp Augments
Wisp has two augment mods, one of Reservoir and Breach Surge. All of Wisp's augment mods may be purchased from the Cephalon Suda and New Loka Syndicates for 25,000 Standing each. You'll need to reach max rank with either Syndicate to purchase these mods. All mods may also be traded between players if you don't have either Syndicate leveled.
Fused Reservoir
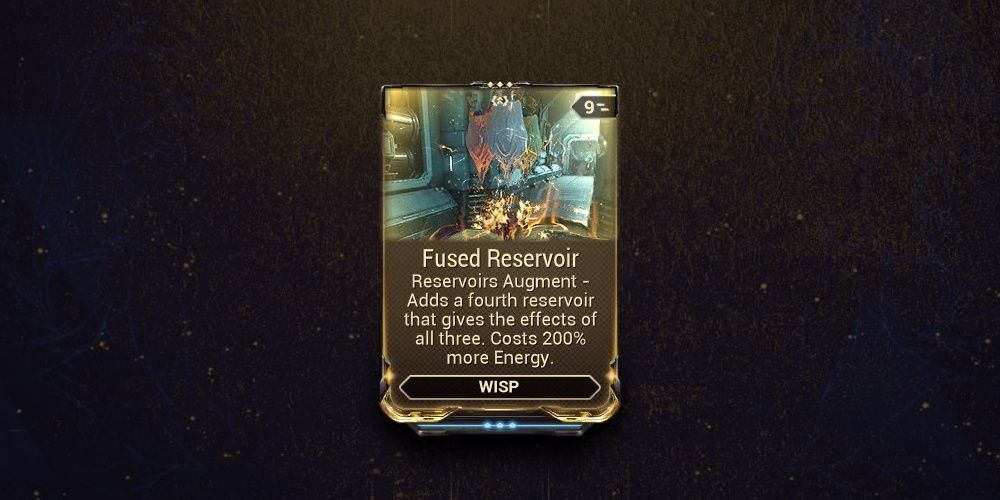
Fused Reservoir (Exilus): Reservoirs Augment: Adds a fourth Reservoir that gives the effects of all three. Costs 200% more energy.
Fused Reservoir does what you'd expect. You gain a fourth Mote type that allows you to spawn all three at once. A fused Reservoir counts as having three Reservoirs when considering your Reservoir cap. Keep in mind that this is an Exilus Mod, meaning it doesn't have to take up a main Mod slot.
There are two main advantages to using this augment:
- You can receive the benefits of all three Motes while leveling Wisp.
- You can much more easily snapshot your Ability Strength.
That latter reason shouldn't be disregarded. This allows Wisp builds to run Energy Conversion, the Empower Helminth ability, or use the Power Drain Parazon Mod.
Critical Surge
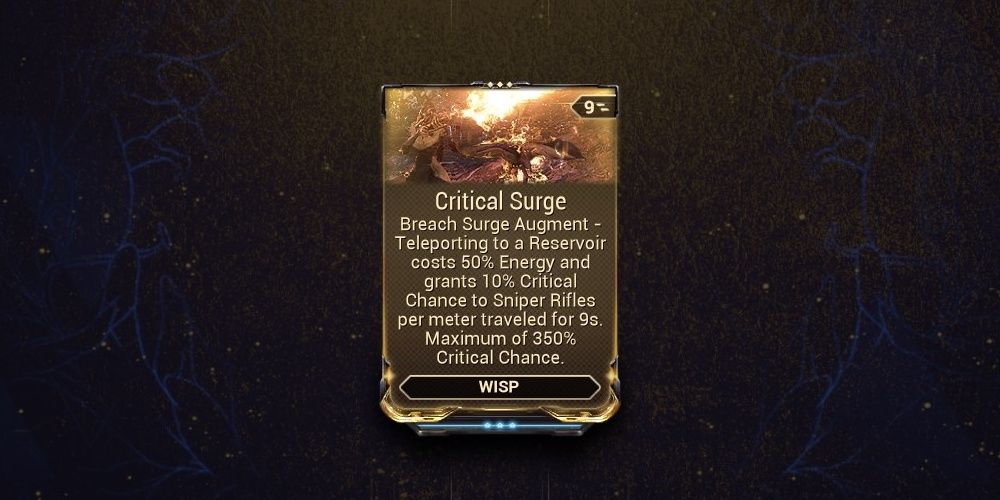
Critical Surge: Breach Surge Augment: Teleporting to a Reservoir costs 50% Energy and grants 10% Critical Chance to Sniper Rifles per meter traveled for 9s. Maximum of 350% Critical Chance.
The critical chance given by Critical Surge is multiplicative with your base critical chance, behaving exactly like Point Strike. If other critical-enhancing Mods are on your weapon, Critical Surge will be added to those bonuses. For example, the 350% critical chance from this Mod would stack with Point Strike to give your sniper +500% critical chance.
Ability Strength affects the critical chance obtained per meter traveled but not the critical chance cap. Ability Duration affects how long the Critical Surge buff lasts. Recasting Breach Surge will refresh Critical Surge with a new buff. The Energy cost reduction is not affected by Ability Efficiency.
The Best Wisp Builds
Wisp is quite versatile and can be modded in several different ways, but we're going to focus on three builds: a starter build with no Forma, a general support build that's good in all content, and a min-maxed Strength build that focuses solely on making Wisp's Reservoirs the best they can be. All three builds focus on Ability Strength and Ability Duration, with Strength being the more important stat.
Before we cover these builds, there are two ways you can build Wisp defensively:
- Adaptation Health Tank: Use Adaptation, Umbral Intensify, and Wisp's Vitality Mote to absorb a great deal of punishment passively. This is a great general setup that requires very little management.
- Shield Gating: Use a Decaying Dragon Key and Brief Respite to refresh your shield gate by casting Wil-O-Wisp. You'll have three sources of immunity—Rolling Guard, Wil-O-Wisp, and your shield gate.
For Focus Schools, any work here. We recommend using either Madurai or Zenurik. Madurai gives you access to more Ability Strength and faster cast speed, while Zenurik has Wellspring to assist Wisp's Energy economy. Both are equally good.
Archon Shards
Wisp wants all Ability Strength (Crimson) Shards. Strength greatly buffs your Motes and Breach Surge, allowing you to support your team with stronger buffs and debuffs. While not required for any of our builds, you'll want five Tauforged Crimson Shards to reach Wisp's hypothetical maximum Ability Strength value to create the strongest Reservoir Motes in the game. It's not mandatory, but fans of min-maxing can get a lot out of Wisp.
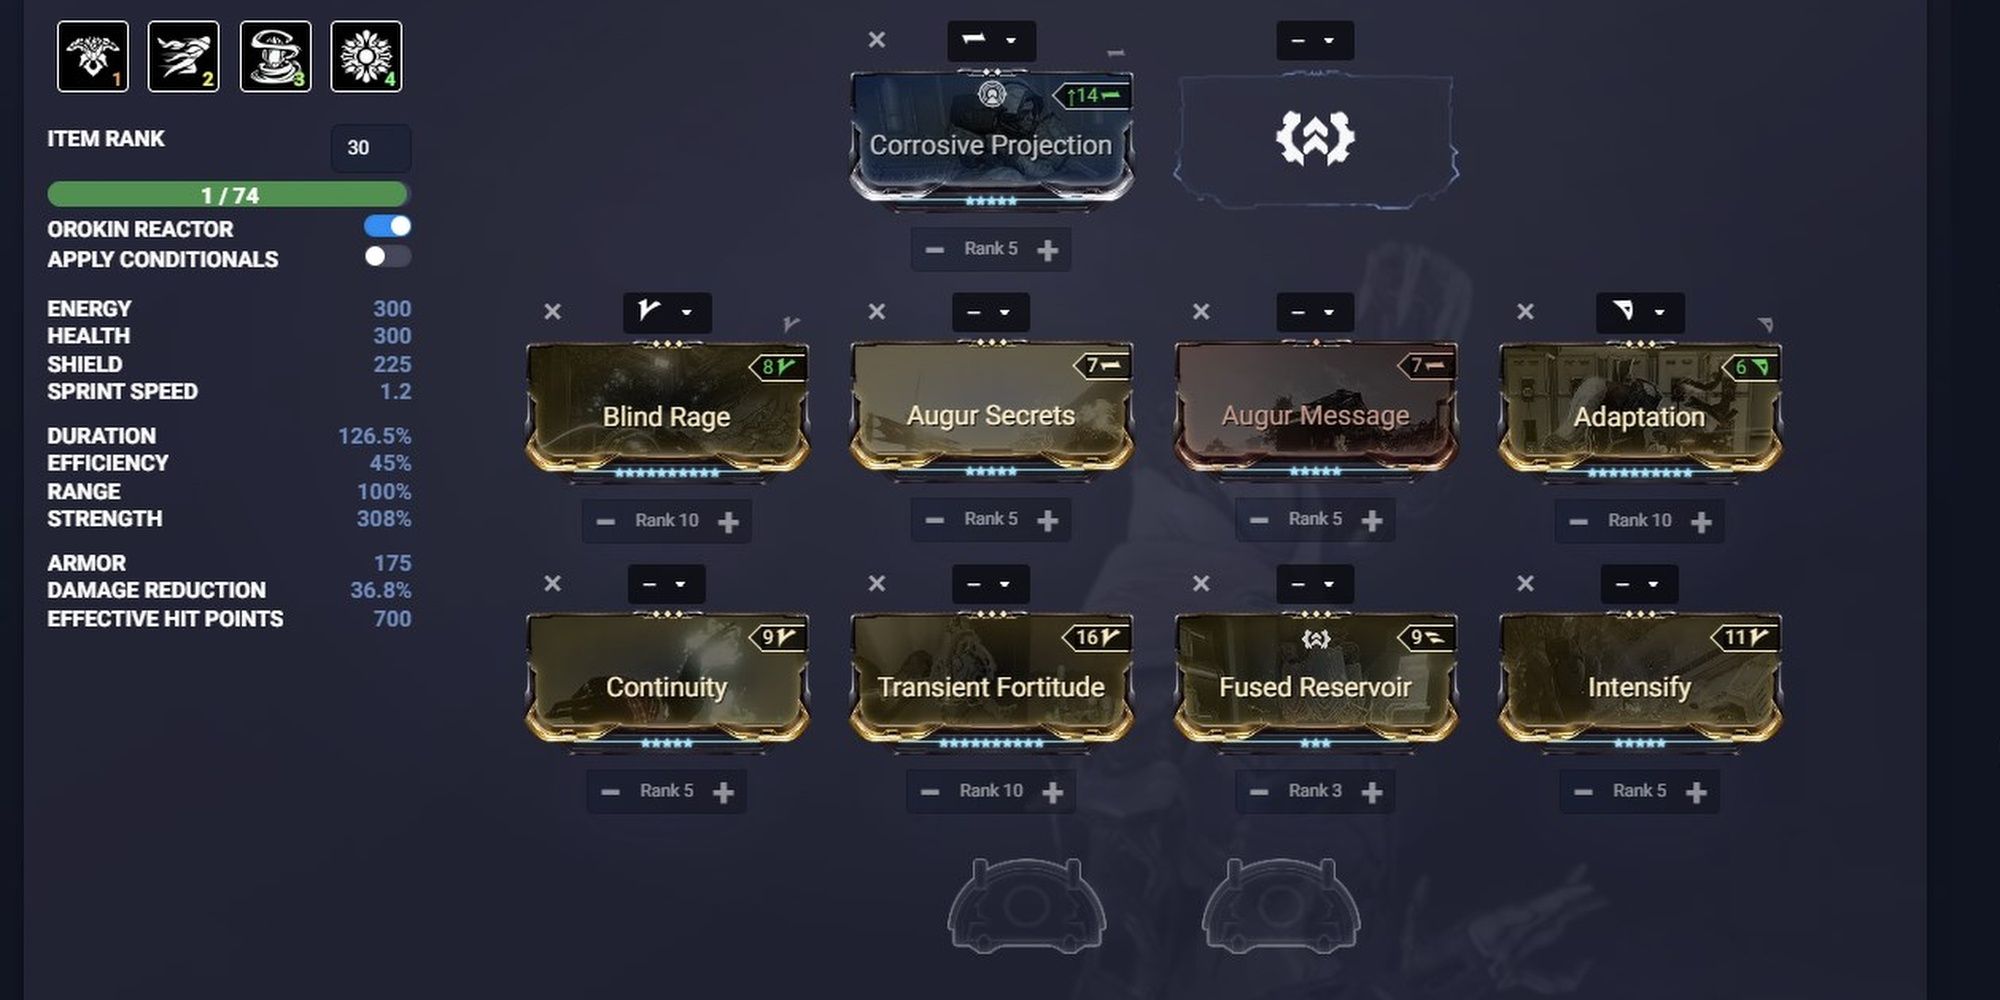
Starter Build (0 Forma, No Subsume)
- Forma: None
- Subsume: None OR Elemental Ward (Chroma)
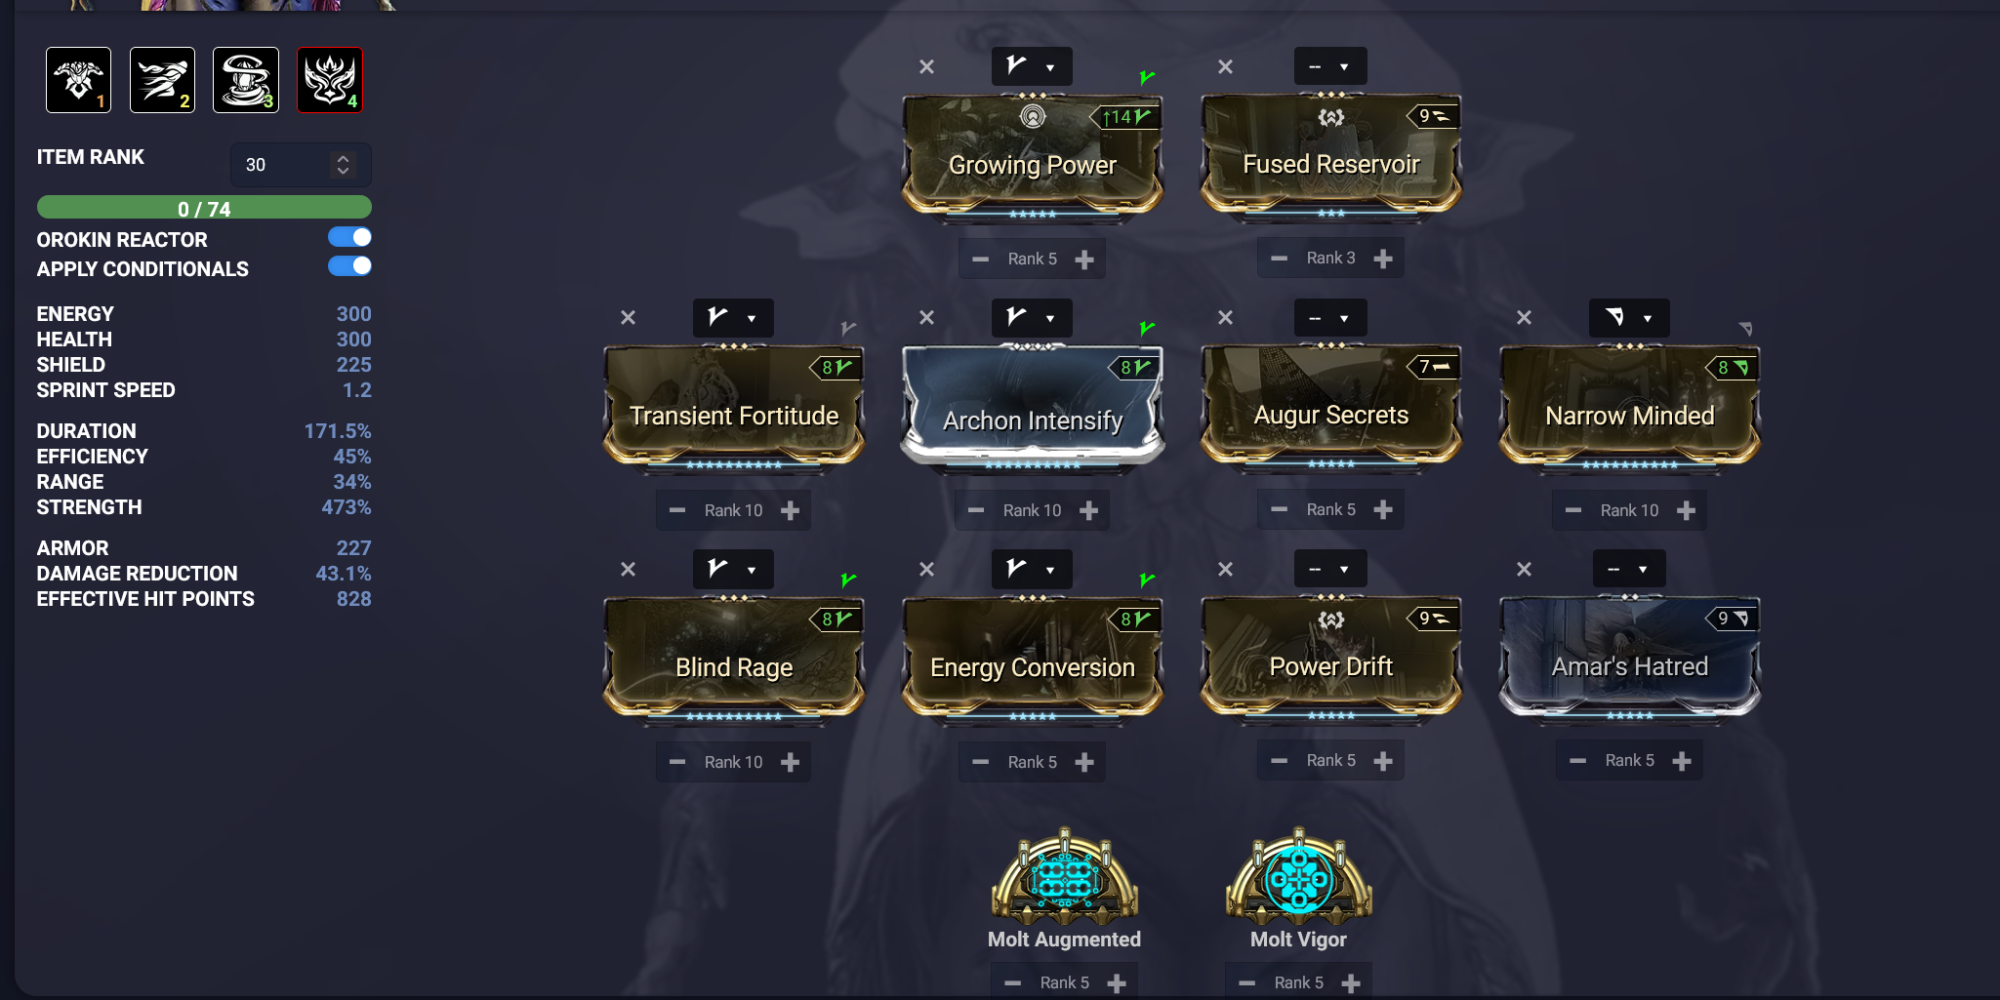
Wisp thrives when you put Forma into her, but she's still more than usable without any. This build focuses on raising her Ability Strength, allocating Blind Rage, Transient Fortitude, Intensify, and Augur Reach to achieve a respectable 308% Ability Strength. Throw on Augur Message and Continuity to increase the duration of all of your skills. Then we throw on Fused Reservoir to make her more comfortable to play in non-endurance missions. If you want even more Strength, use Power Drift or Amar's Hatred instead.
If you have Helminth unlocked and want to make Wisp a better support Warframe, subsume Chroma's Elemental Ward into her fourth ability slot (replacing Sol Gate). Use either Heat or Cold for your element—determined by your Wisp's primary energy color—and replace Fused Reservoir with Everlasting Ward. This makes Wisp a fantastic support Warframe with minimal investment.
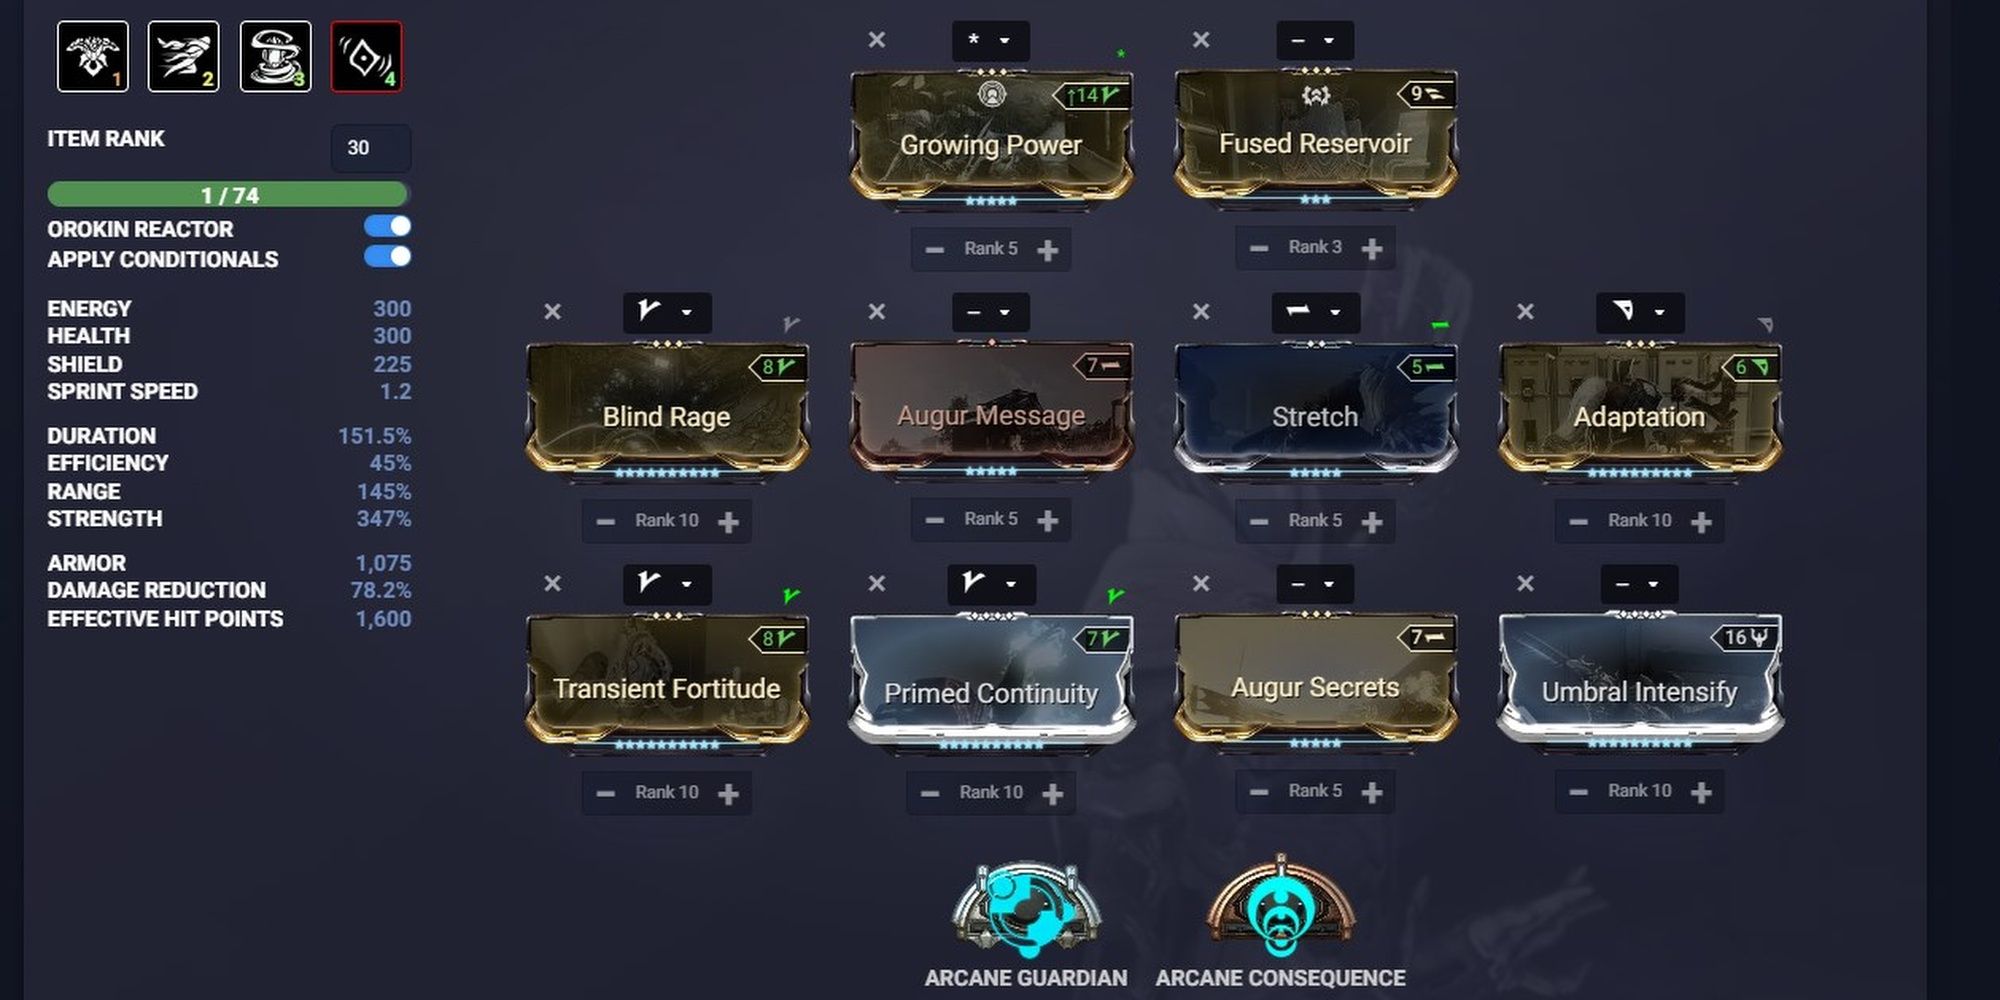
General Support Build (4 Forma, Roar Subsume)
- Forma: 4 (Aura, 2 Vs, – )
- Subsume: Roar (Rhino) OR Elemental Ward (Chroma) OR Nourish (Grendel)
This is a solid upgrade to our general starter build listed above, this time taking advantage of Rhino's Roar (in place of Sol Gate) to give your team a sizable damage boost. An Ability Strength of 348% should be more than enough for most content. Raising your Strength any higher requires some compromises that you might not like—ones we make in our final build. We round out the build by getting some Ability Duration and Ability Range, allowing Breach Surge to debuff more enemies while making Roar easier to use. Consider replacing Stretch with Archon Stretch for extra Energy, and consider dropping Augur Secrets for Crimson Archon Shards and Primed Sure Footed.
If you want to give more utility to your group, replace Roar with either Grendel's Nourish or Chroma's Elemental Ward. From there, replace Fused Reservoir with an R4 Power Drift. Finally, replace Augur Message or Strech with Everlasting Ward. You can run whichever element you desire, although we recommend Cold or Heat. Toxin is also good, although this build doesn't scale its effects very well.
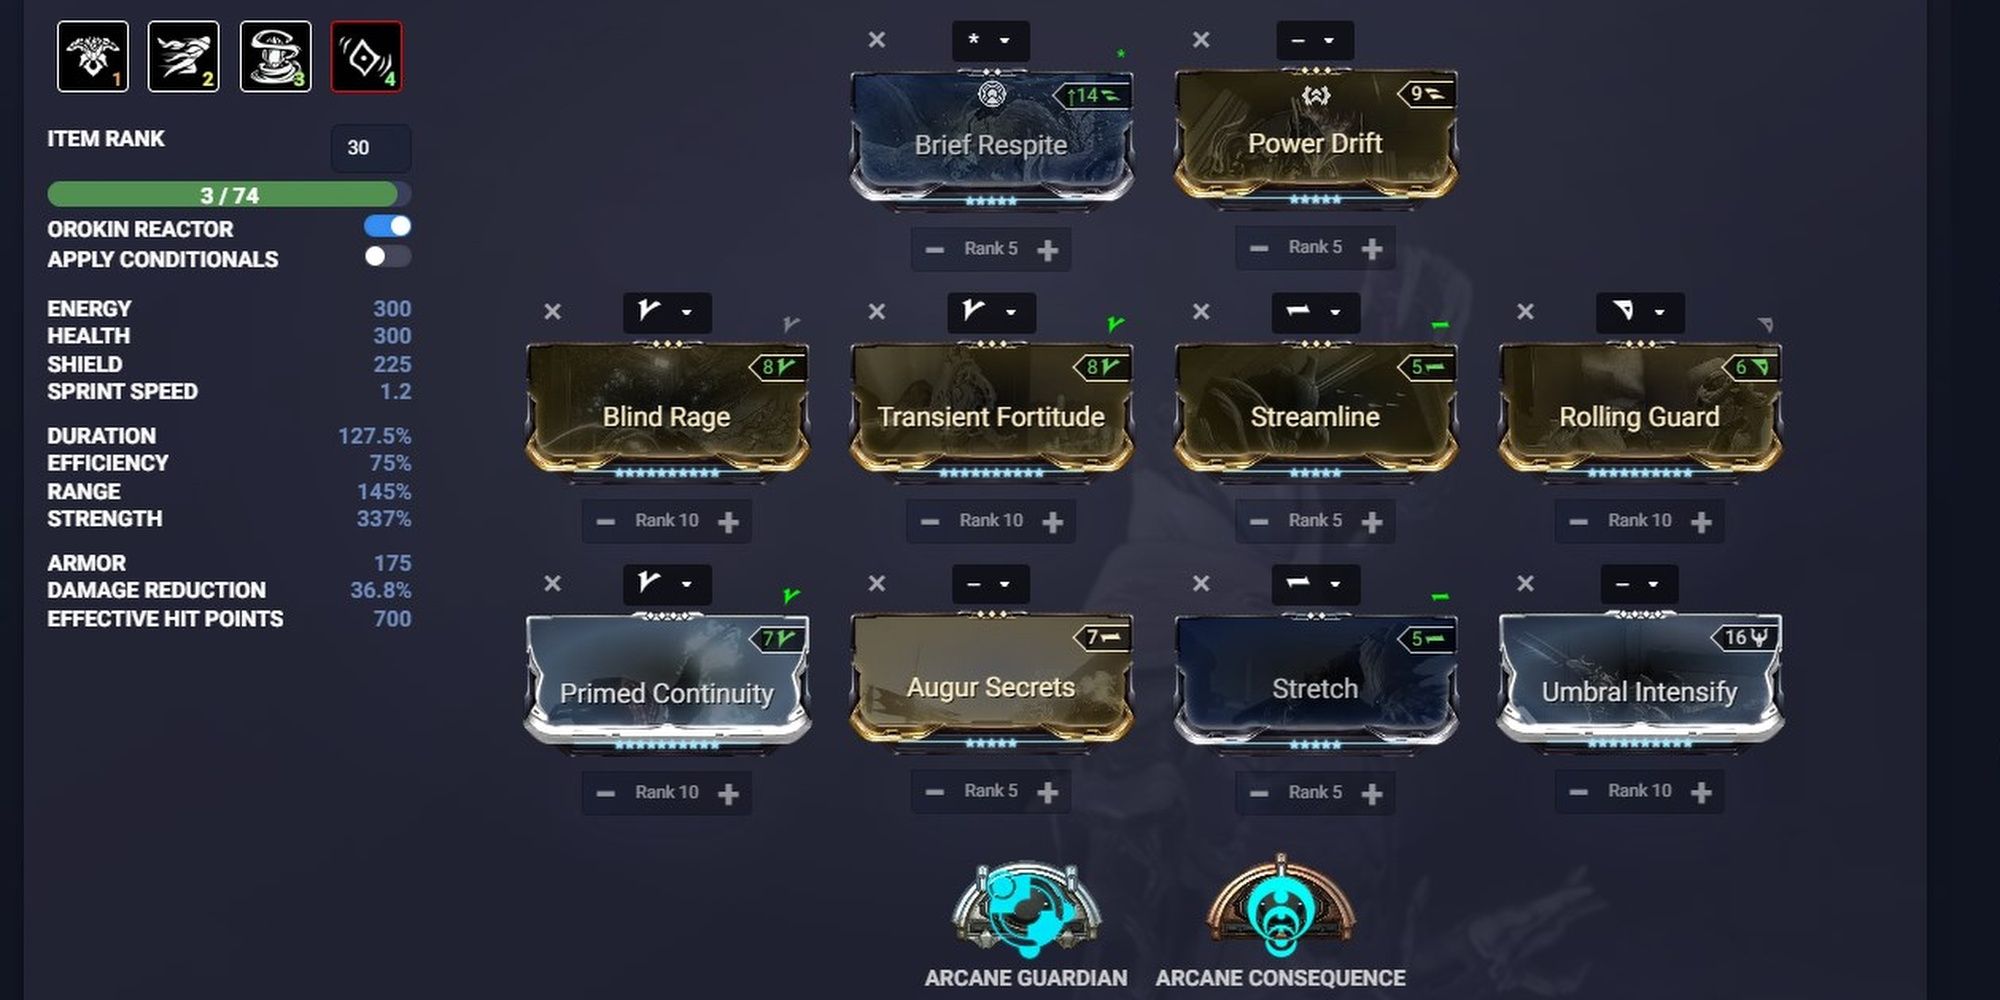
Shield Gate Alternative
If you want to use shield gating to stay alive, replace Growing Power with Brief Respite, Adaptation with Rolling Guard, and drop Augur Message for Streamline. With a Decaying Dragon Key equipped, you'll generate just enough shields from Wil-O-Wisp to fully refresh your shield, re-enabling your shield gate. Your Wil-O-Wisp and Rolling Guard also give invulnerability, giving you three sources of invincibility.
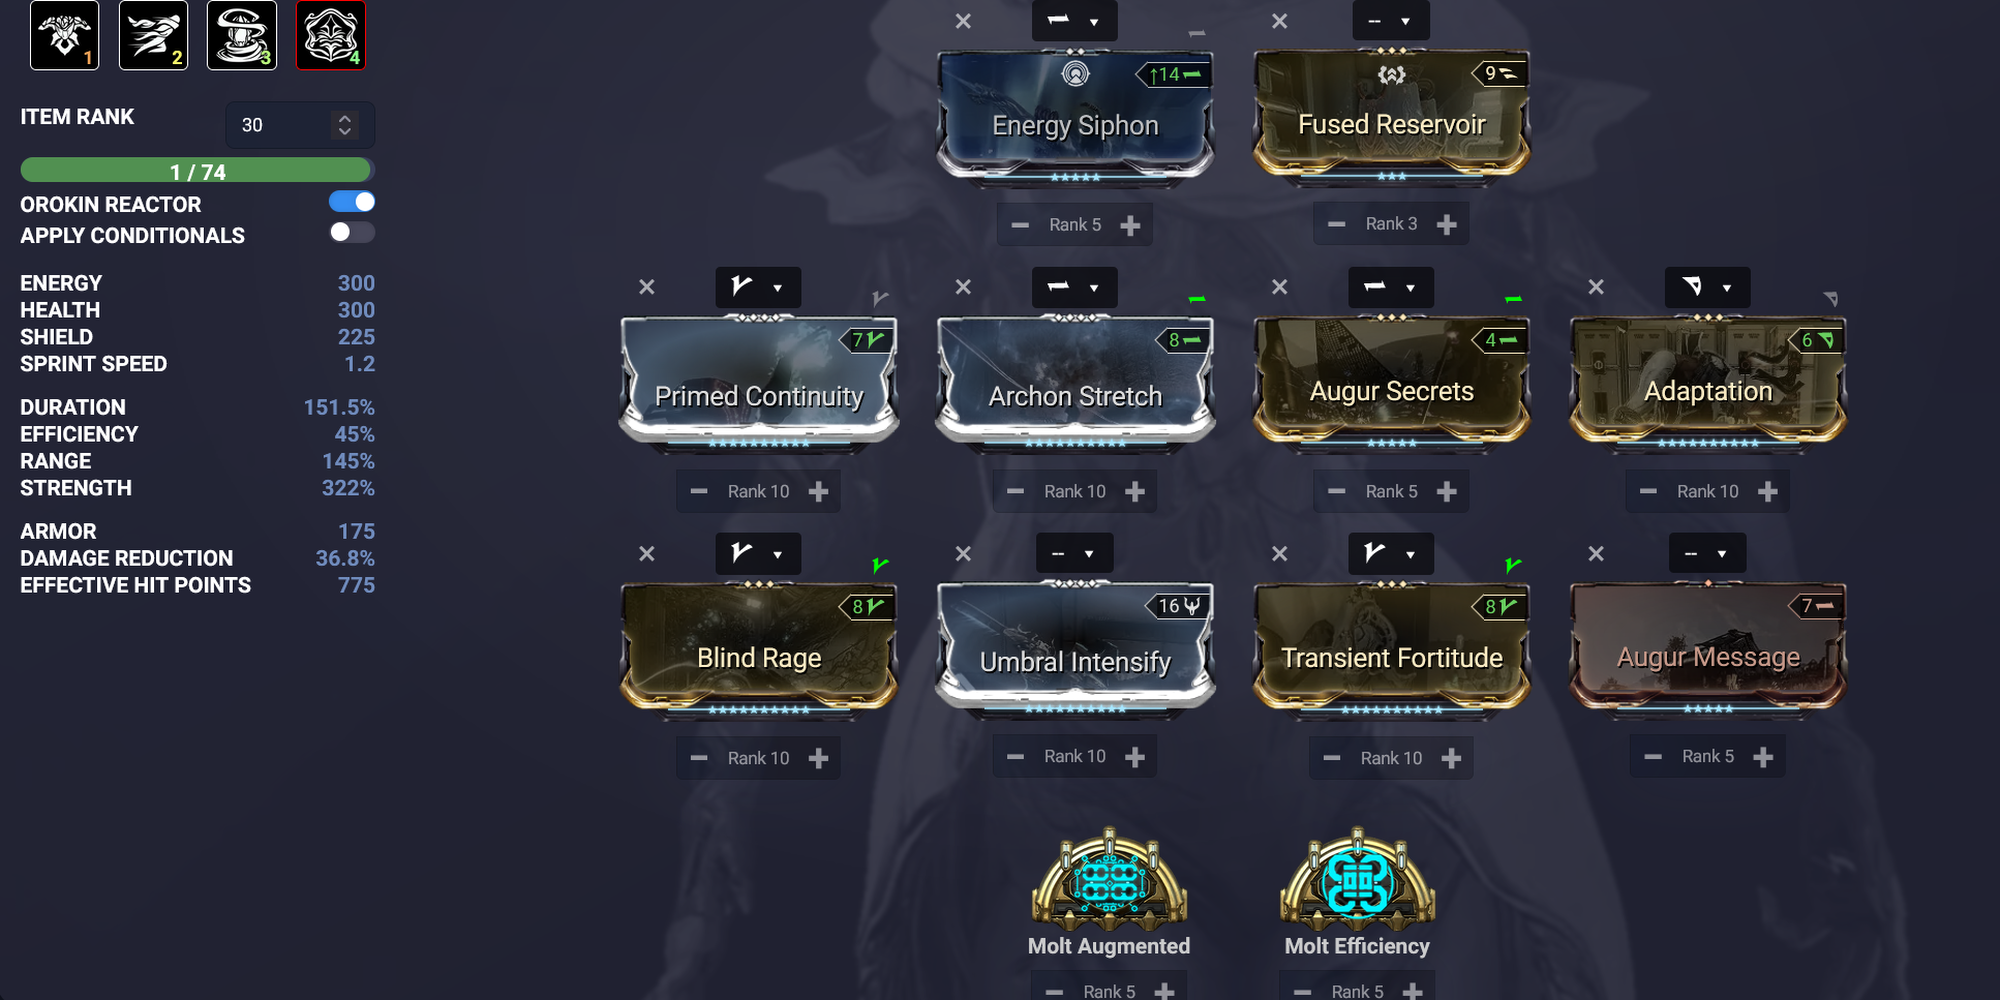
Archon Support Build (4 Forma, Nourish Subsume)
- Forma: 4 (2 Vs, 2 –)
- Subsume: Nourish (Grendel)
This build is a variant of our general support build, focusing on maximizing Grendel's Nourish ability over using a more generic damage buff like Roar or Eclipse. One of Nourish's greatest strengths is its Energy multiplier, scaling the amount of Energy recovered both passively and from active pickups. This means we can effectively counteract Blind Rage's negative Efficiency stat by scaling passive Energy regeneration.
To do this, we use Energy Siphon and Archon Stretch. The latter is noteworthy since it triggers off Electricity damage. Since our Shock Mote deals a small bit of electric damage, this bonus is always active. Paired with our high Ability Strength, we can regenerate close to ten Energy per second. If you run Zenurik with this build, you will effectively have infinite Energy to spend.
The rest of the build is what you'd expect. We use Blind Rage, Transient Fortitude, Archon Intensify, Augur Secrets, and Molt Augmented to greatly buff Wisp's Ability Strength stat. This makes your Motes provide much stronger buffs, increases the debuff strength of Breach Surge, and makes Nourish even stronger. Use Primed Continuity, Augur Message, and Molt Efficiency to greatly boost your Ability Duration, and you should have no issues maintaining constant Mote and Nourish buffs to your squad.
Theoretical Strongest Motes (4 Forma, Empower Subsume)
- Forma: 4 (Aura, 3Vs)
- Subsume: Empower (Helminth)
- Focus: Madurai
- Archon Shards: 5 Tauforged Crimson (Strength)
This build is more a min-maxing showcase than a proper build. This much Strength isn't required for any content. Use our previous build for a more well-rounded setup.
If you've wondered how powerful you can make Wisp's Reservoir motes, this build min-maxes them to an absurd degree. This build achieves 808% Ability Strength with all buffs active, increased to 1,040% with a Specter.
Reaching 1,040% Strength requires the following:
- A Kitgun with the Pax Bolt Arcane (+30% Strength)
- Madurai Focus School (+40% Strength)
- The Power Drain Mod on your Parazon (+50% Strength)
- Empower Ability (+50% Strength)
- Five Tauforged Crimson Shards (+90% Strength)
- A Nidus Specter (1.2875x Strength multiplier)
The process looks something like this:
- Reach maximum stacks of Molt Augmented (only needed for hypothetical maximum Strength).
- Summon your Nidus Specter. While you complete the following steps, it should eventually cast Parasitic Link on you.
- Cast an Operator Ability and Void Sling to proc Molt Vigor and Madurai's buffs.
- Cast Reservoir. Take damage at some point before finishing this process to proc Archon Intensify.
- Activate Empower.
- Grab an Energy Orb to activate Energy Conversion.
-
Land a Mercy kill with your Parazon.
- This is easily the hardest part, but you only need to do it once. Use Impact procs to make this easier.
-
Land a precision final blow with your Kitgun to proc Pax Bolt.
- This should proc Growing Power in the process.
- Summon your Fused Reservoir.
Is that a ton of work? Yes. Is it impractical? Absolutely. But this is the strongest Mote setup in Warframe that you can achieve solo. It's possible to buff this further with Helminth Invigorations, Fissure buffs, and having a dedicated Nidus on your team, but this build can be done solo and doesn't rely on weekly infusions or activity modifiers.


